Gtir Motorsport club
Would you like to react to this message? Create an account in a few clicks or log in to continue.
Gtir Motorsport club

Welcome to the largest Nissan Pulsar & Sunny GTI-R Forum. Masses of info, friendly members, cars for sale, lots of spares. Best forum on the net by far. Everything your gtir needs is here.


You are not connected. Please login or register

Restoration Project

+19
Cosmic73
toaster55
wrc
Stu
robins
MartyMG
Mr B
Andy Sunny Gti
mikewazowski
Ajay.
gtir_woody
PartyPete
knights of nee
Gaz GTiR
nomad
buckym120
GTI-R US
johnny gtir
burrows1980
23 posters

Go to page : 1, 2, 3, 4, 5, 6  Next

Go down  Message [Page 1 of 6]

1Restoration Project Empty Restoration Project 11th November 2013, 9:36 pm

burrows1980

burrows1980

Hi all,
 
I posted a while back about my R project, thought I better show a few pictures of my progress so far, must admit only got as far as stripping it down Laughing 
 
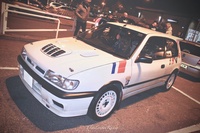
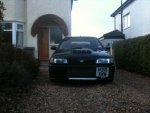
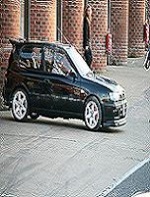
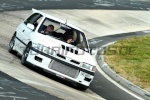
Before I started photos:
 
Restoration Project IMG_4052_zpsbf30e293
 
Restoration Project IMG_4070_zps25700db6
 
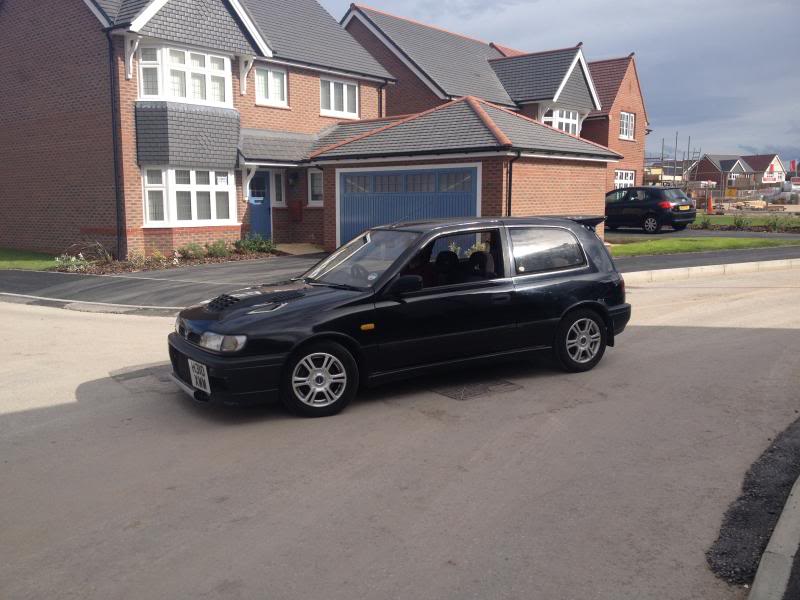
Anyway the story, I was on the point of selling her, owned her for 9 years and fancied a change, but when it came down to it, I just couldn't part with her!  So the plan was hatched of restoring the black beast, to be fair there's not much wrong with her, but I've got the time to do it properly so what the hell..  
 
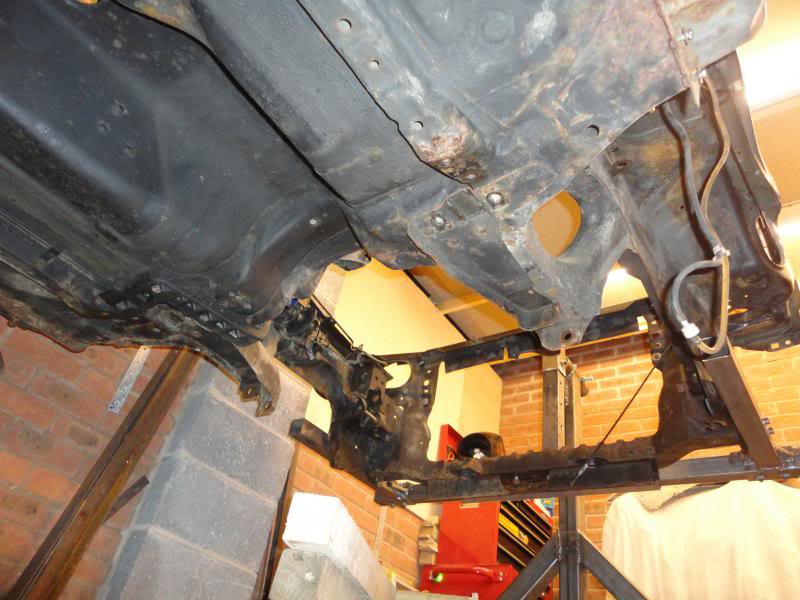
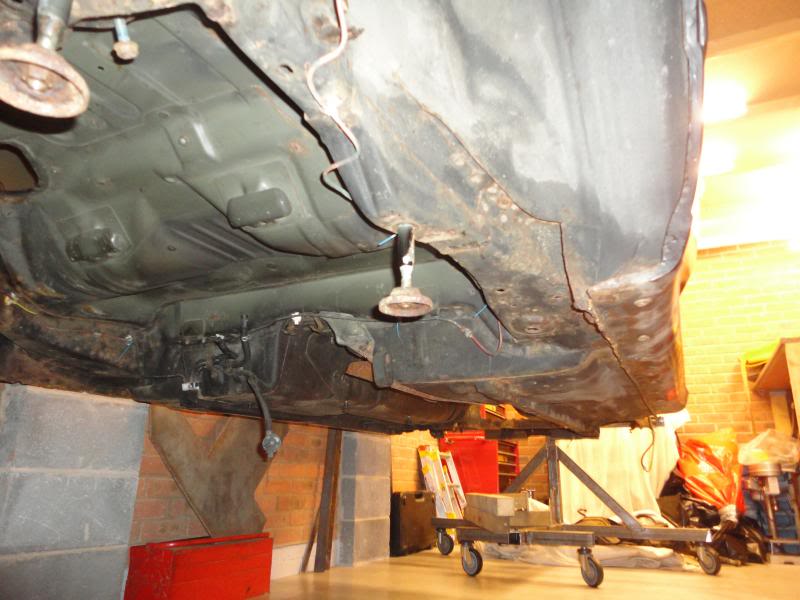
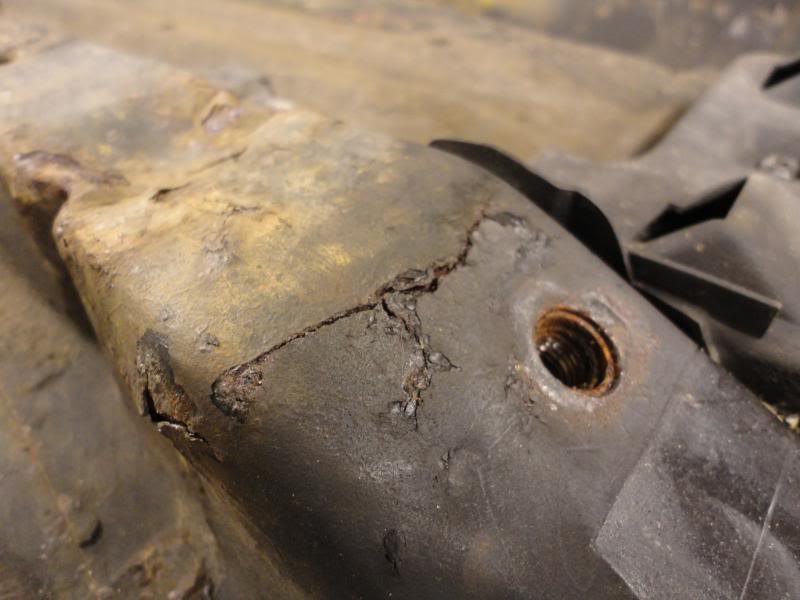
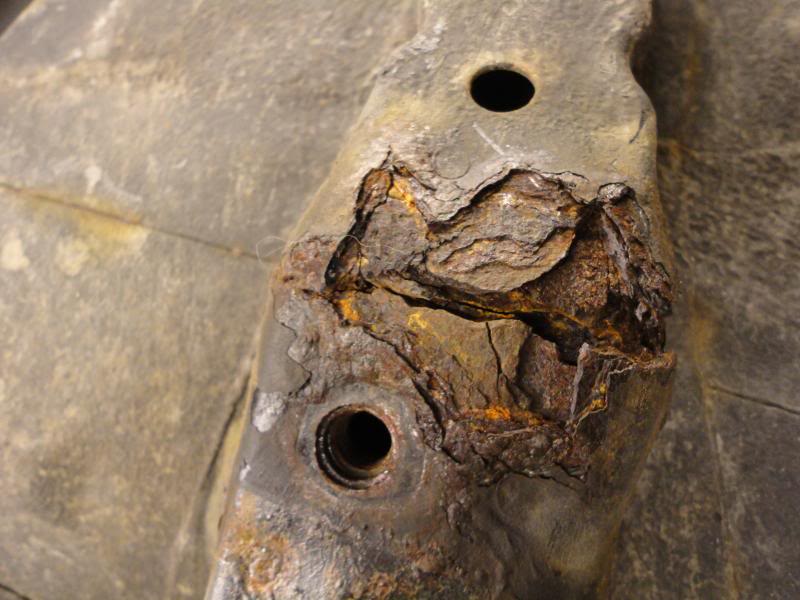
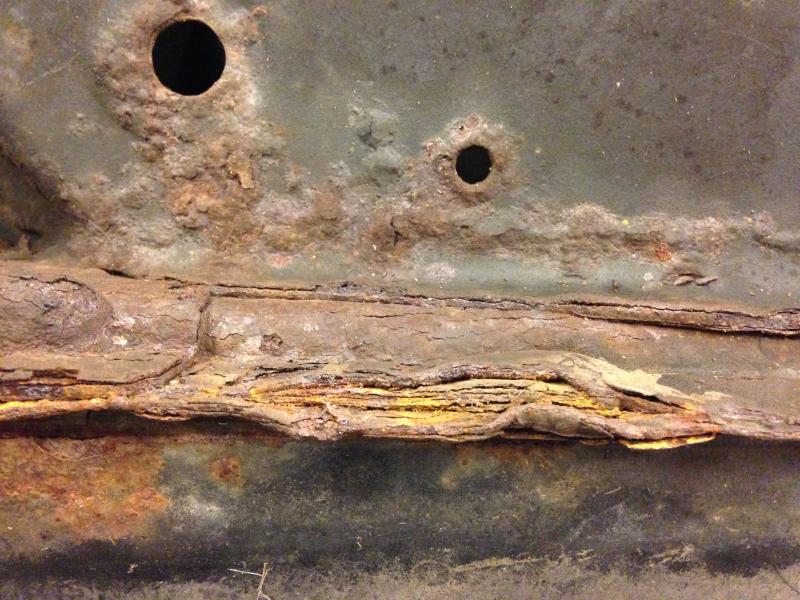
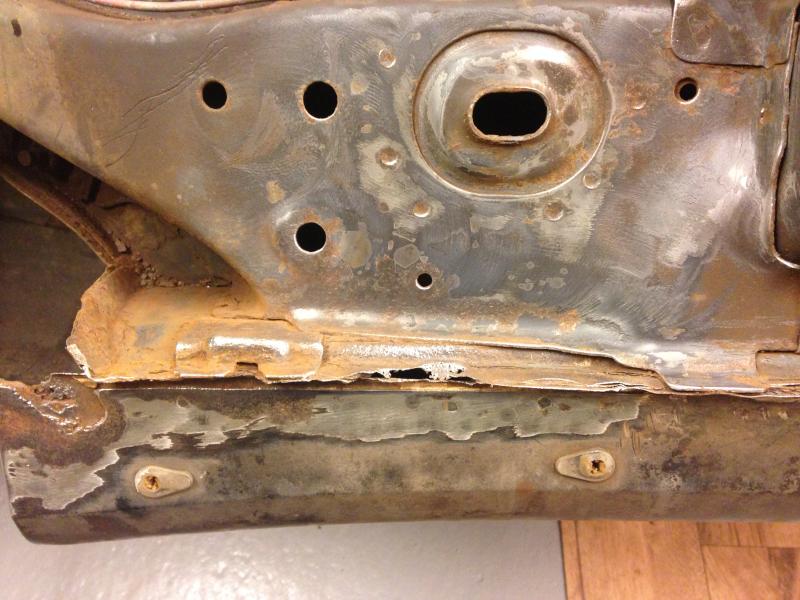
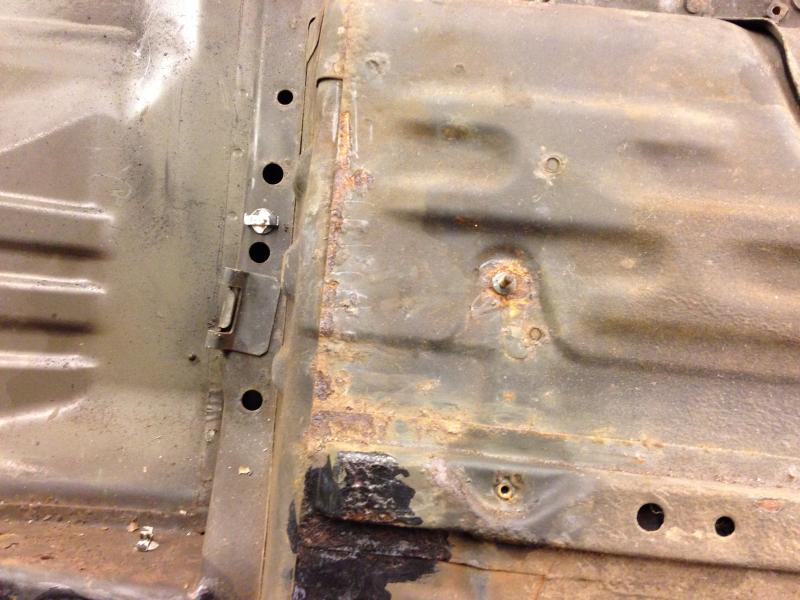
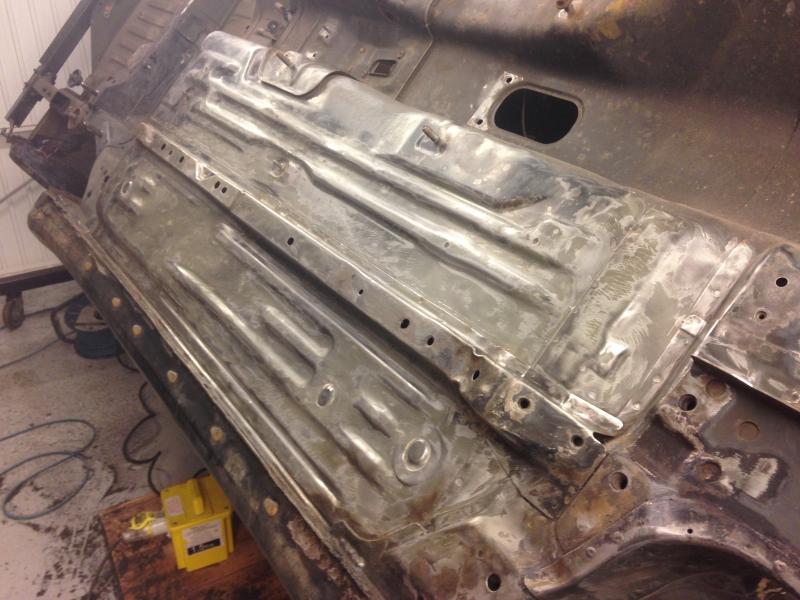
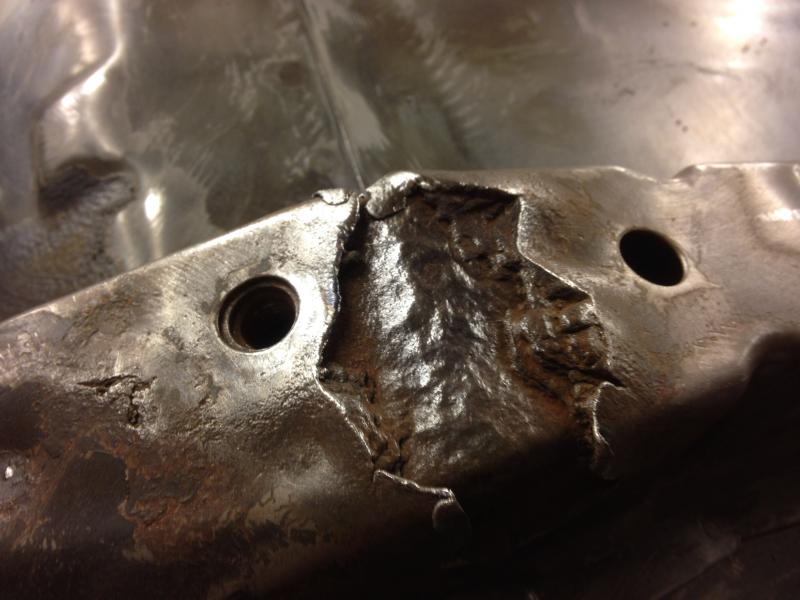
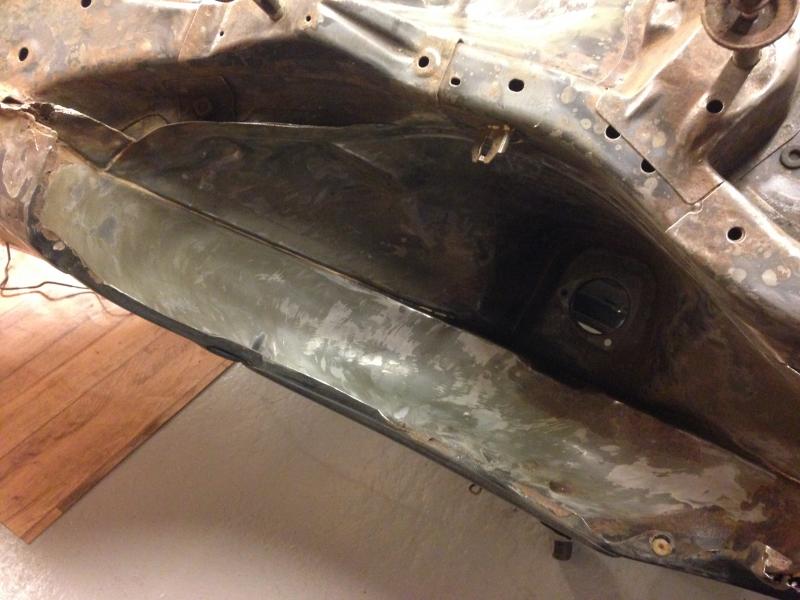
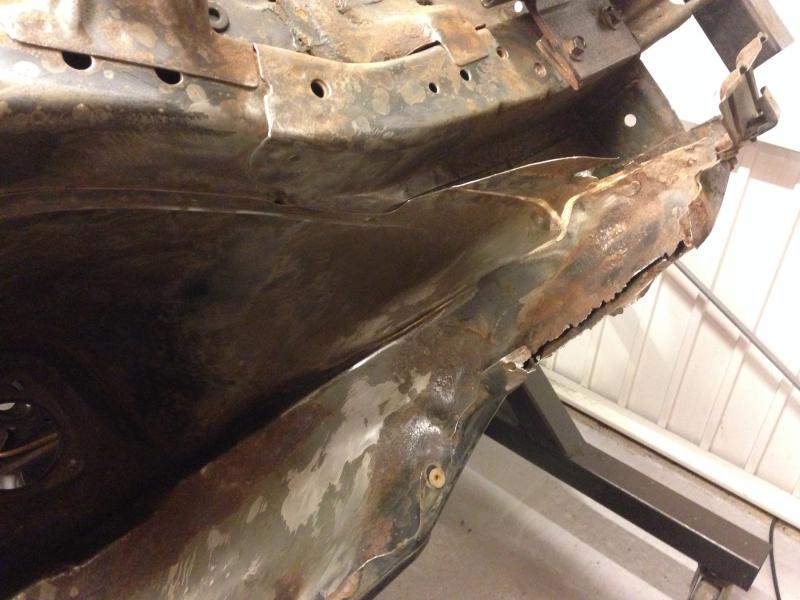
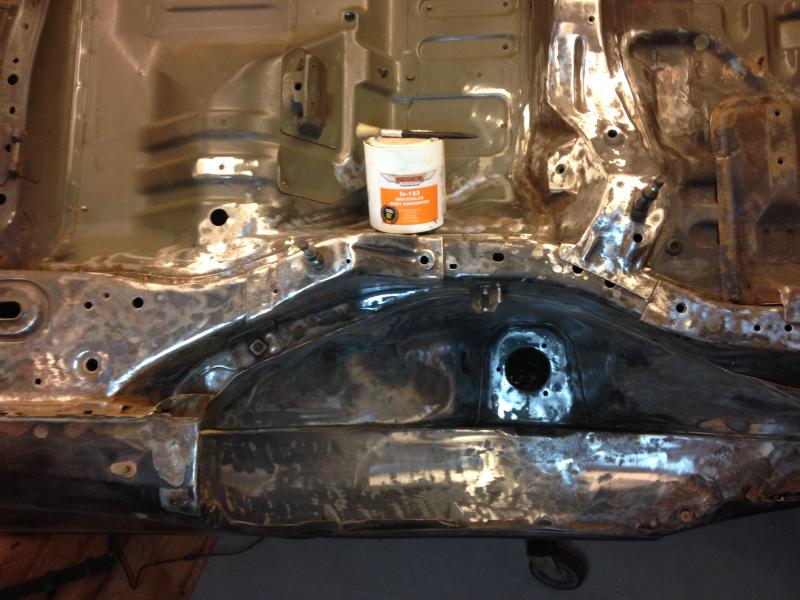
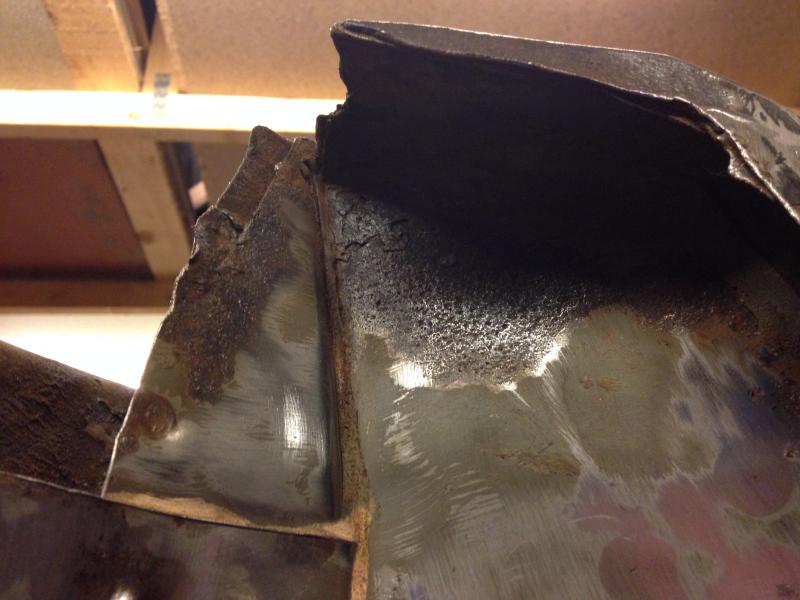
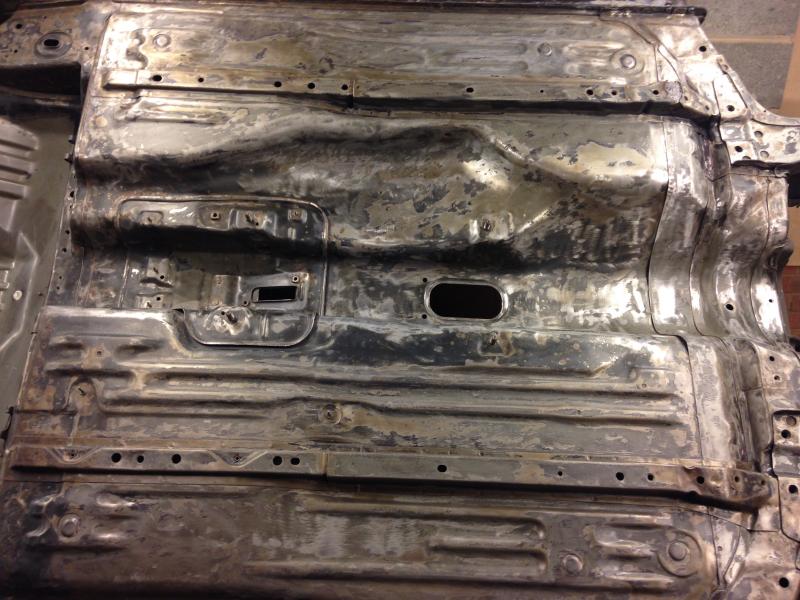
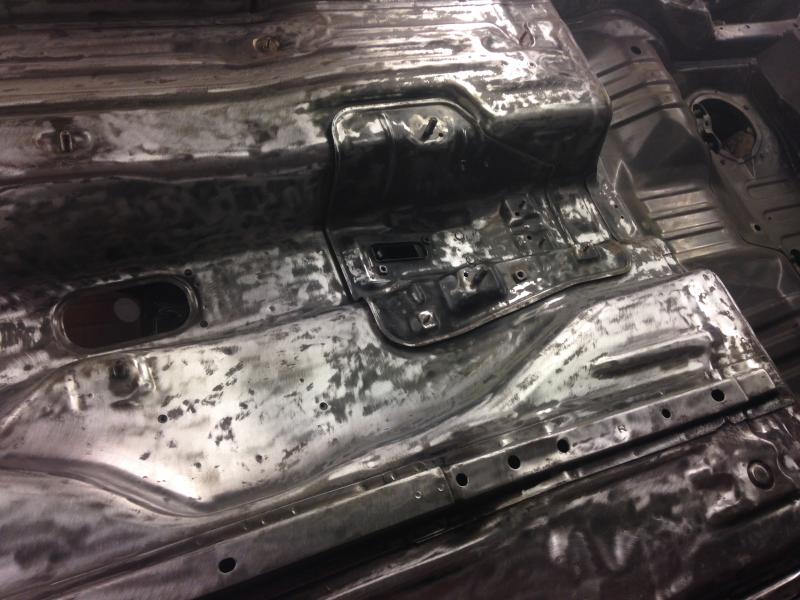
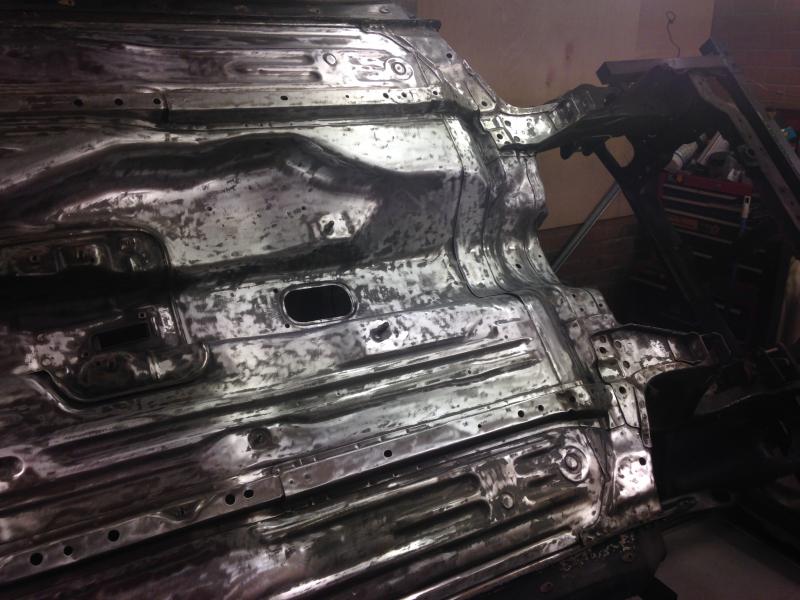
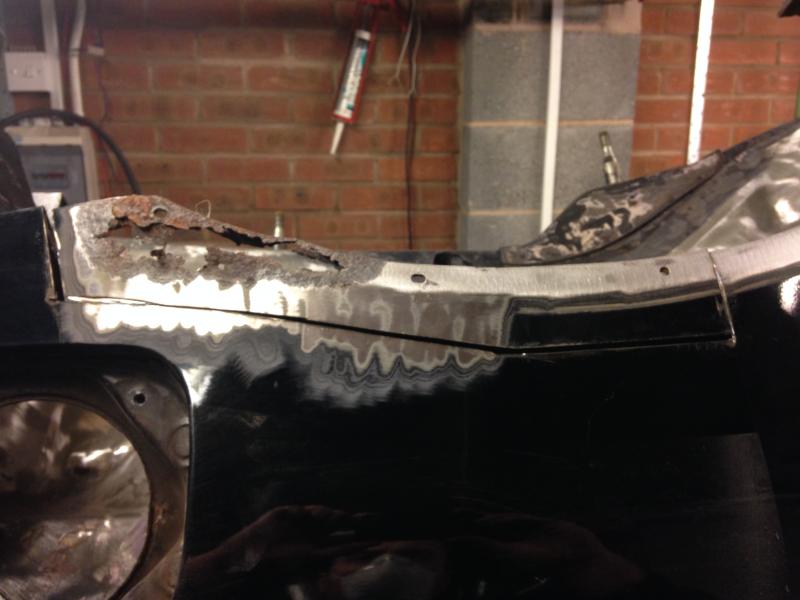
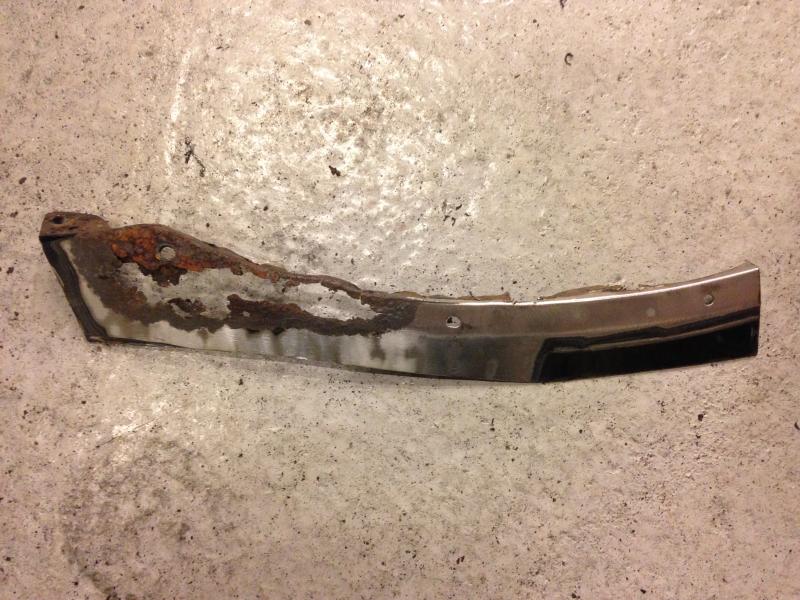
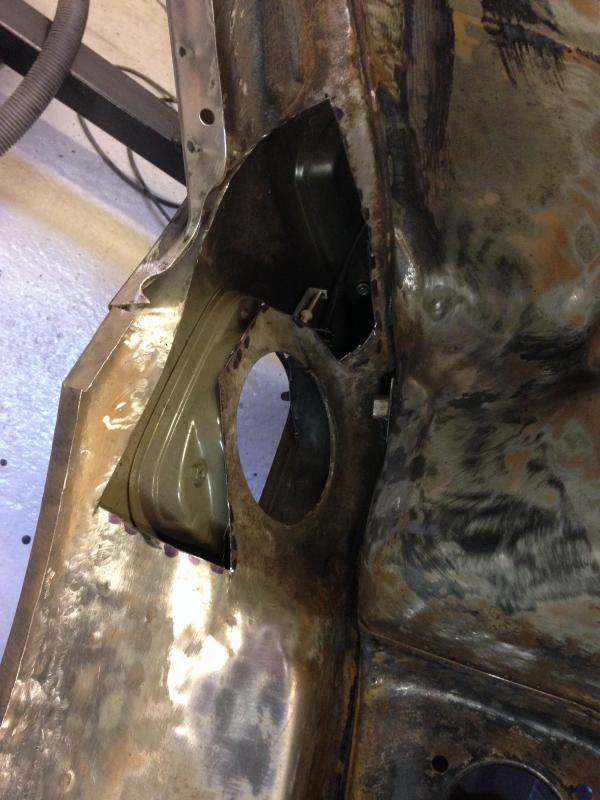
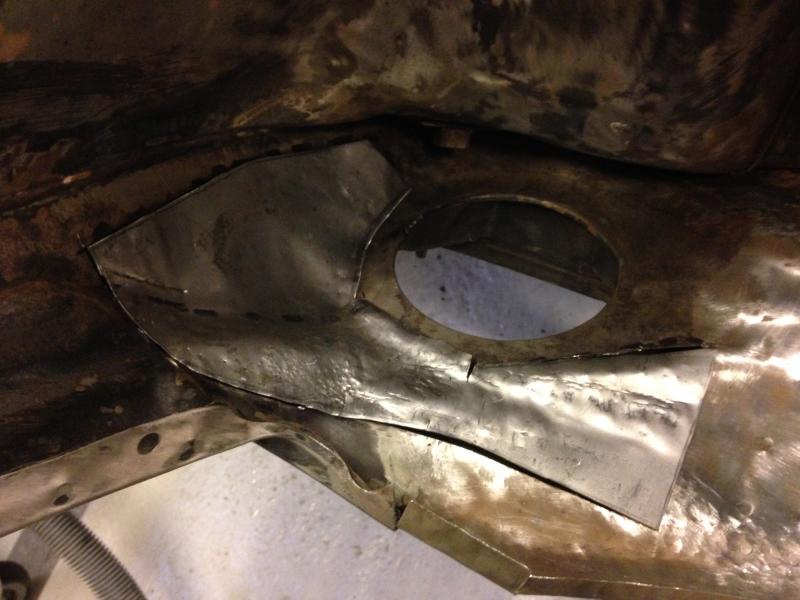
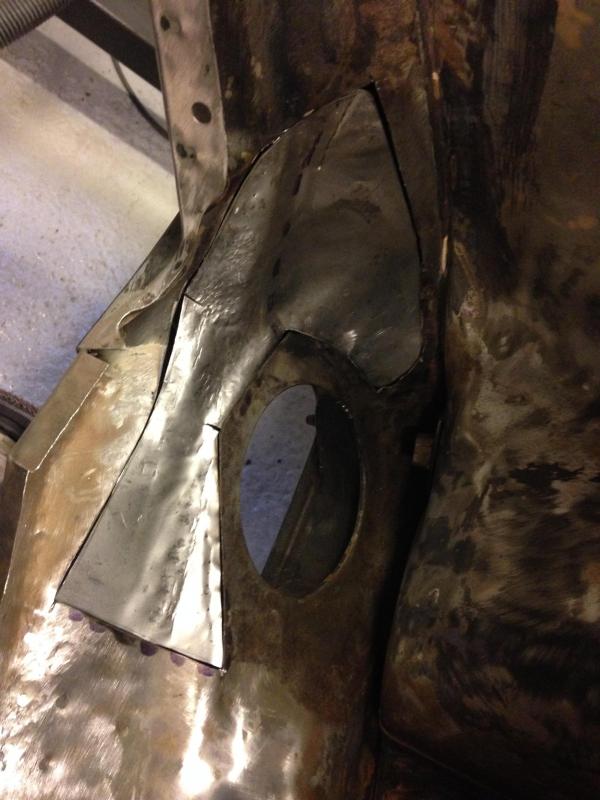
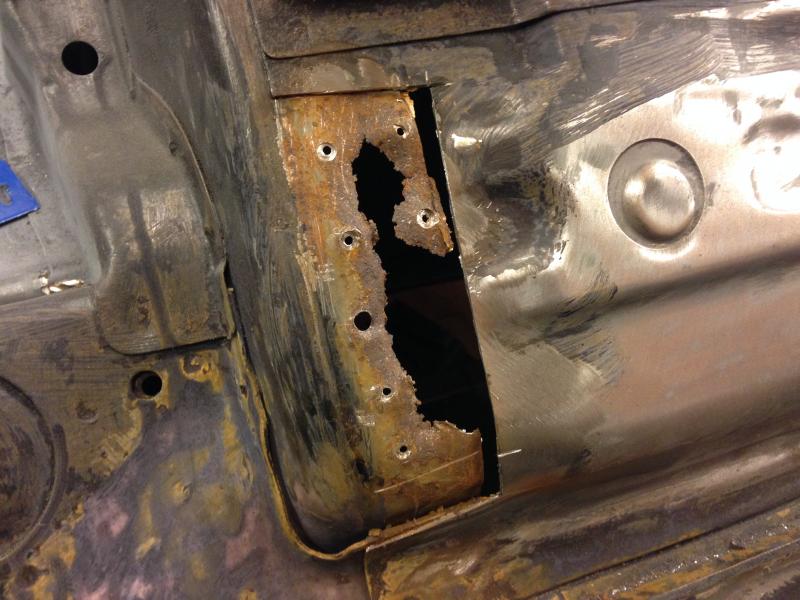
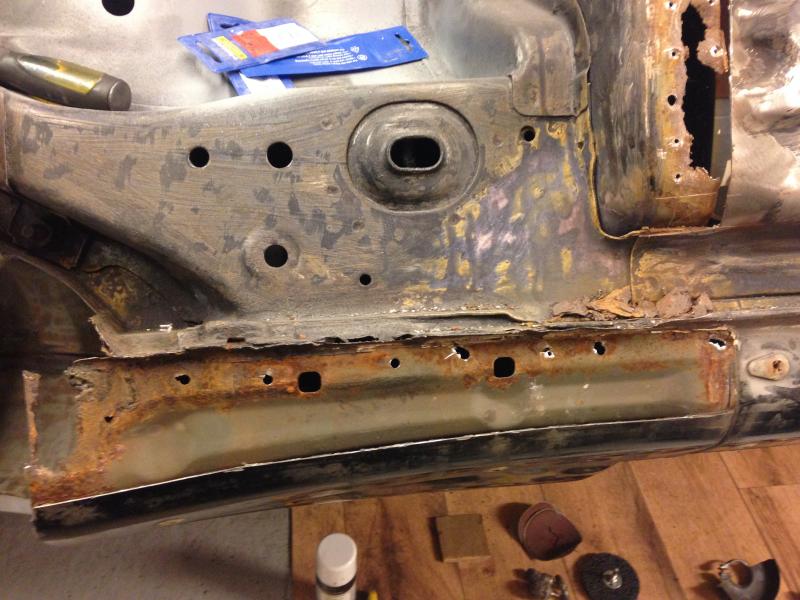
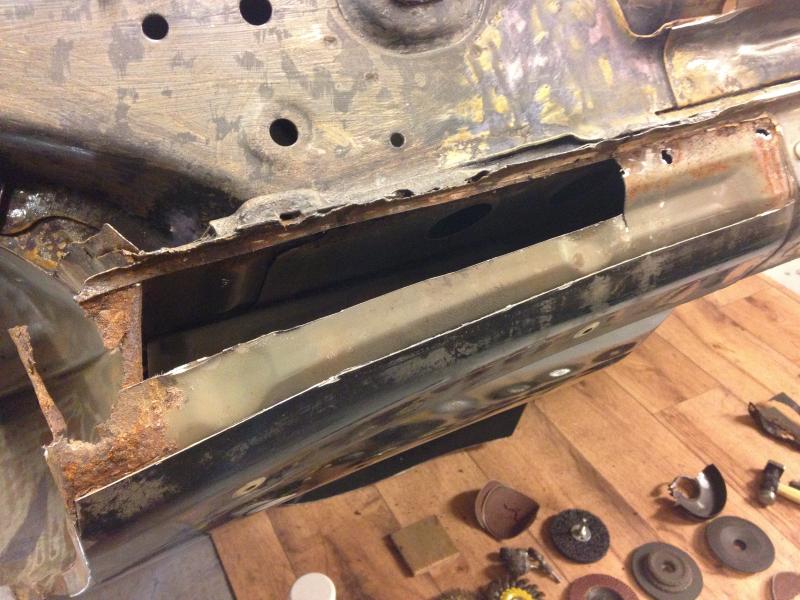
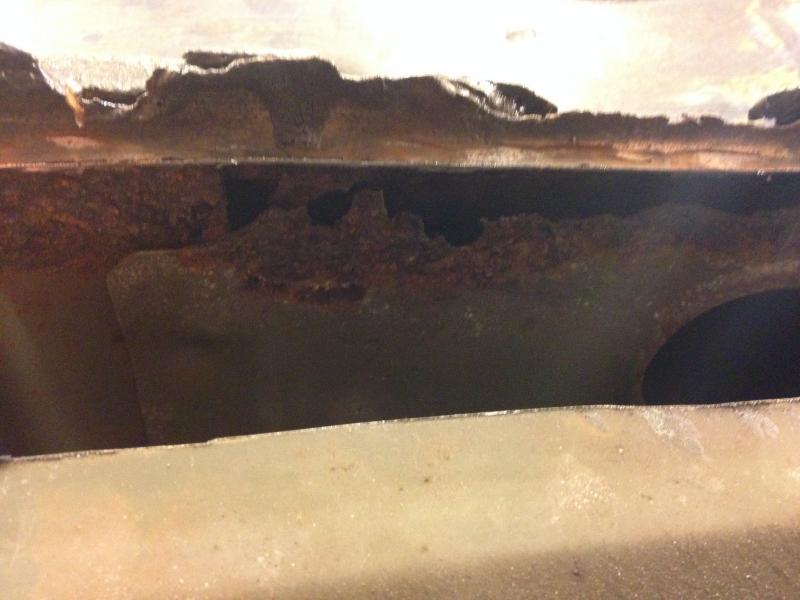
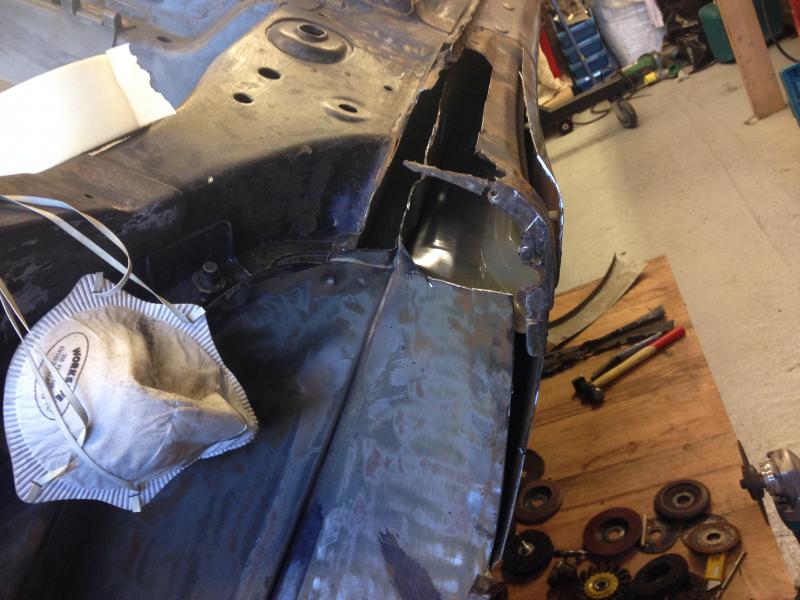
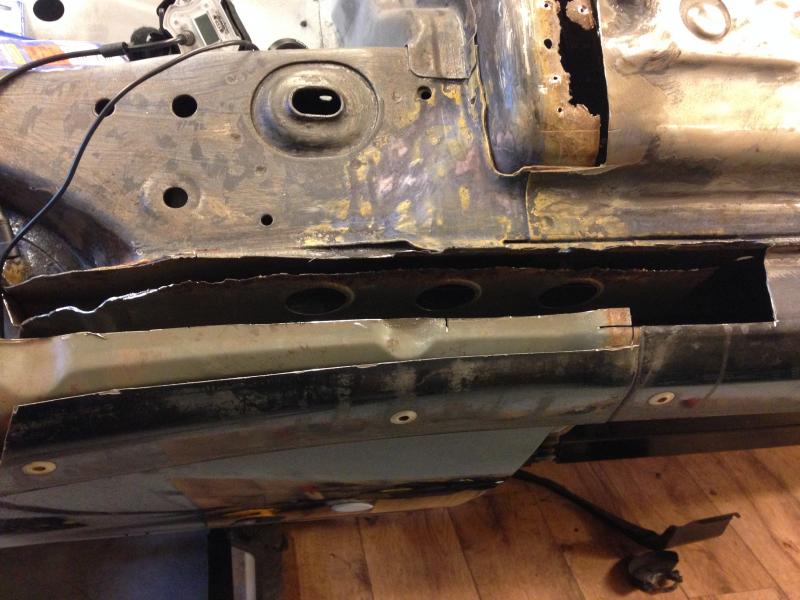
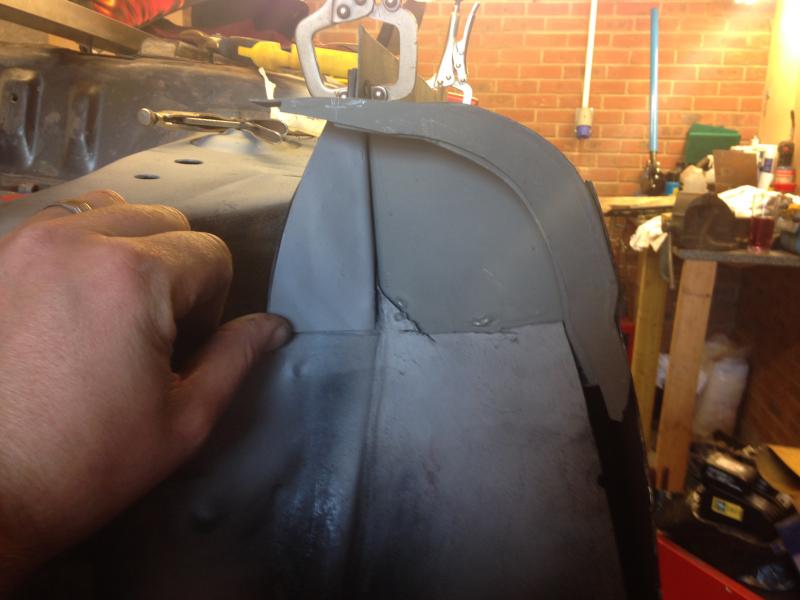
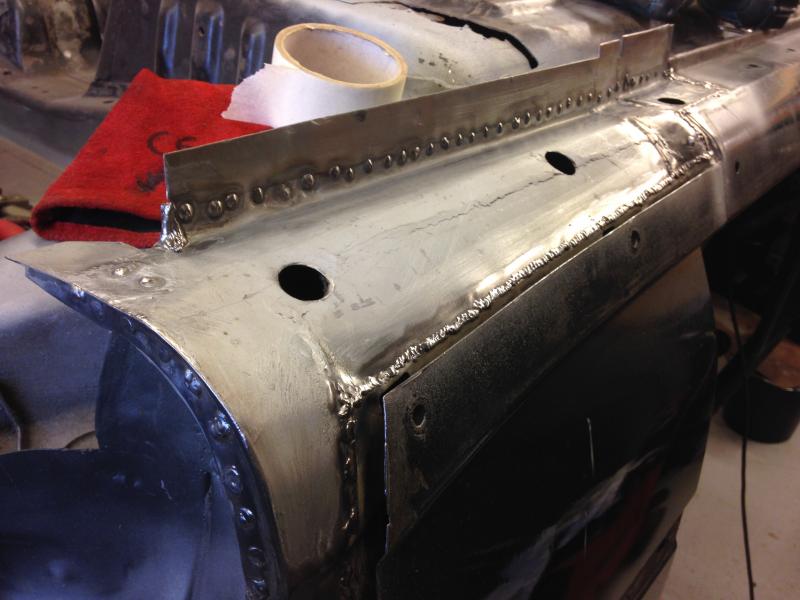
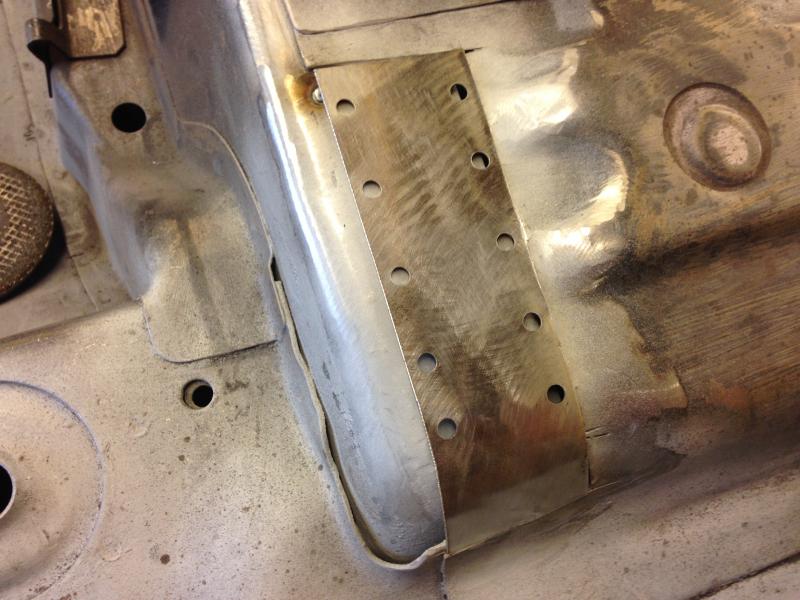
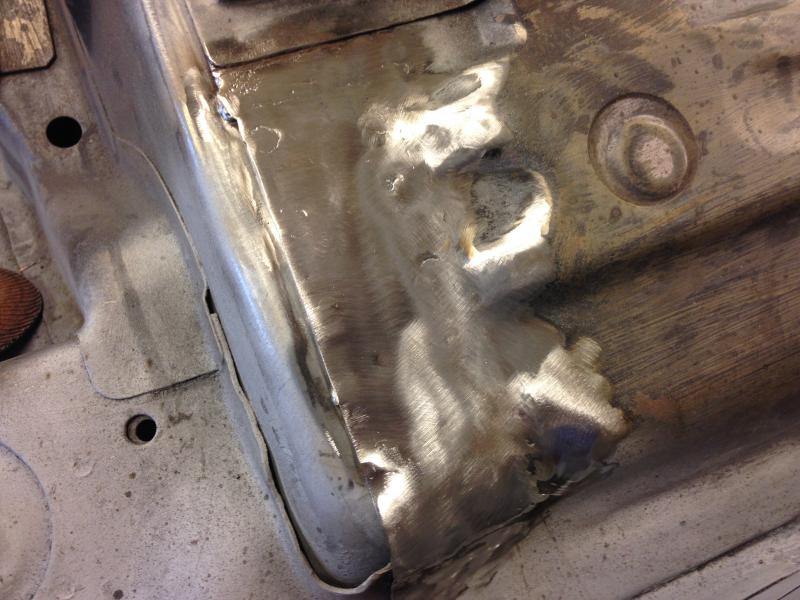
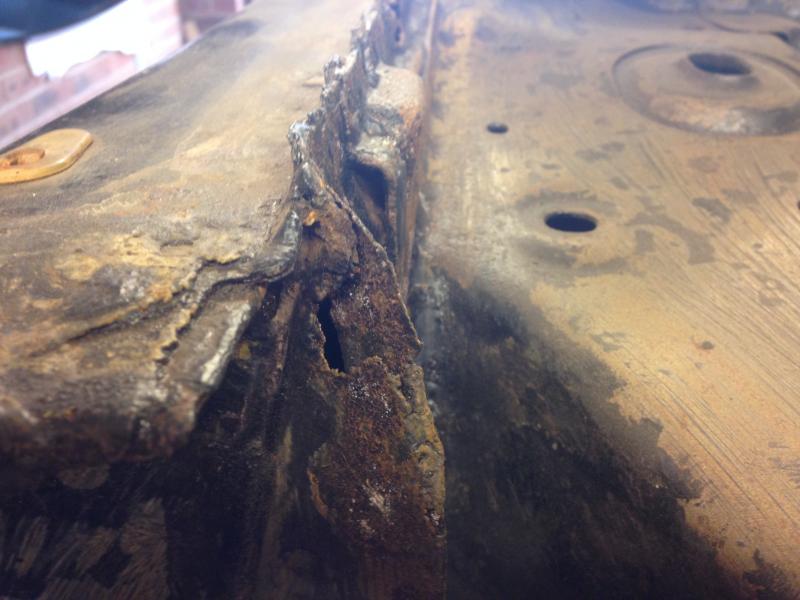
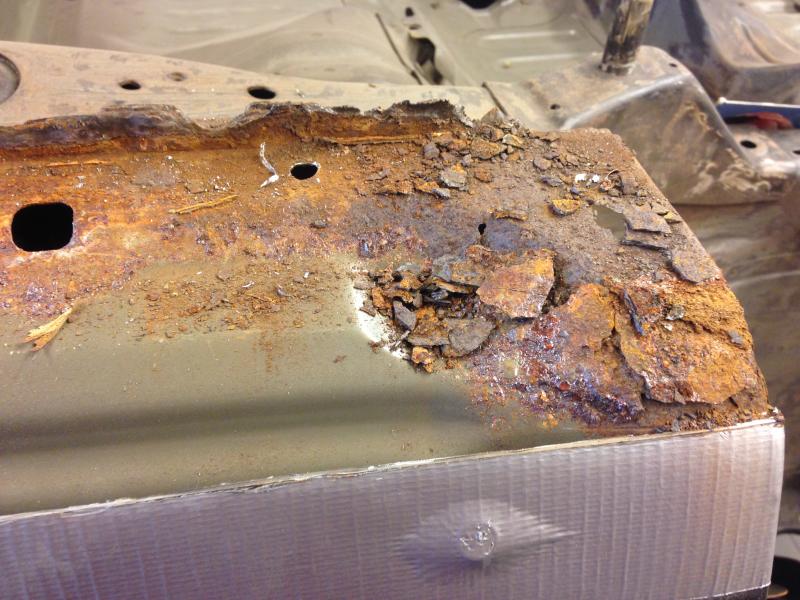
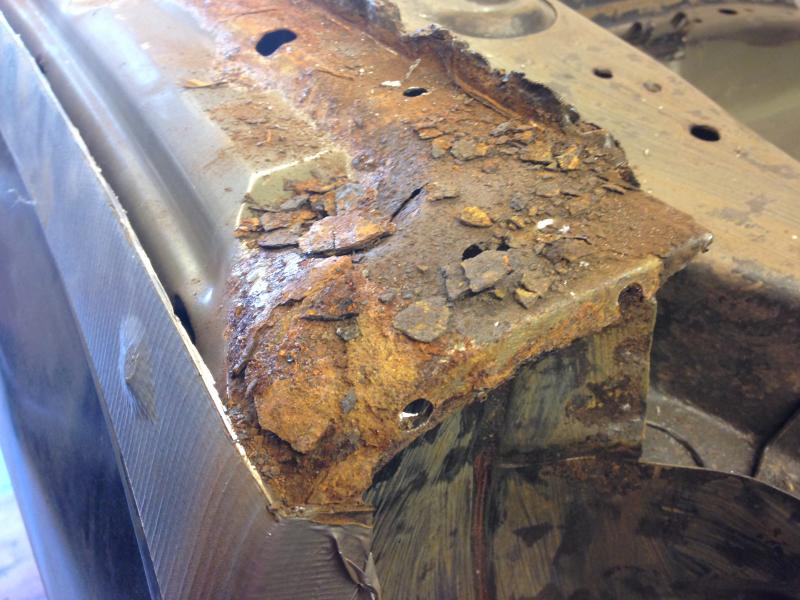
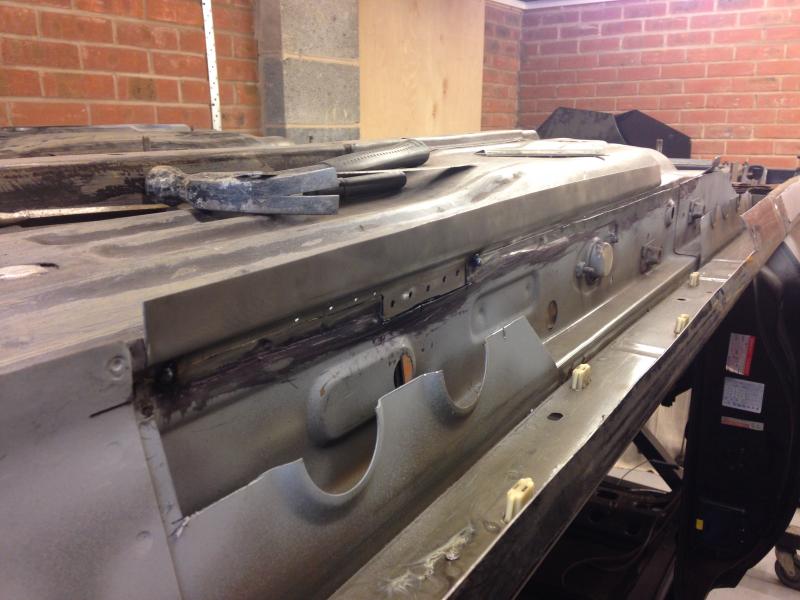
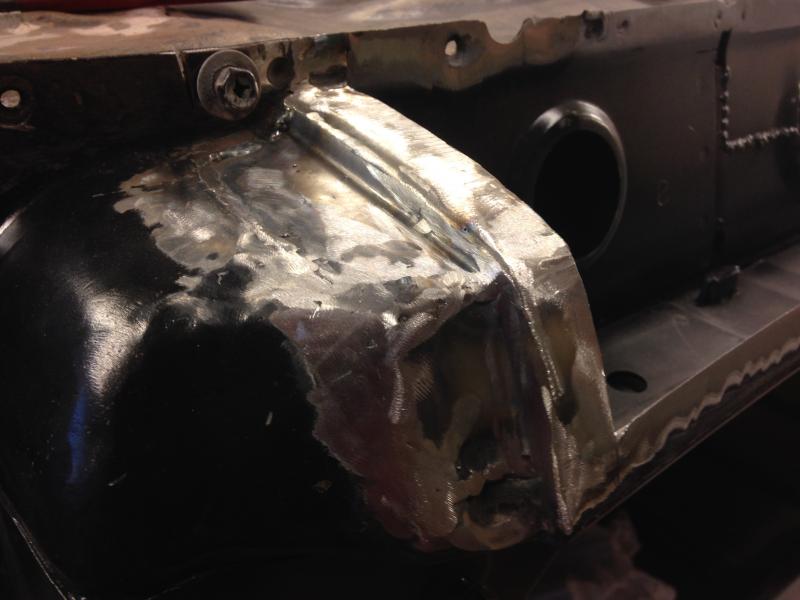
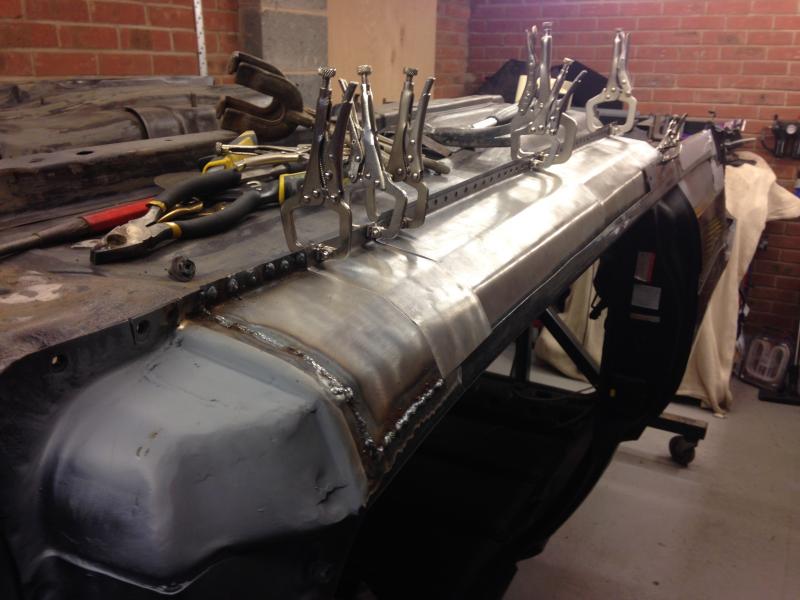
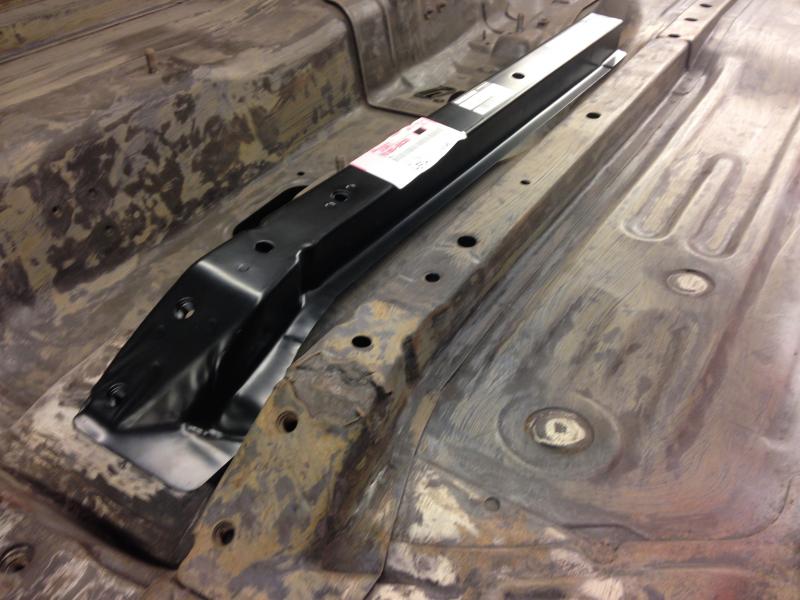
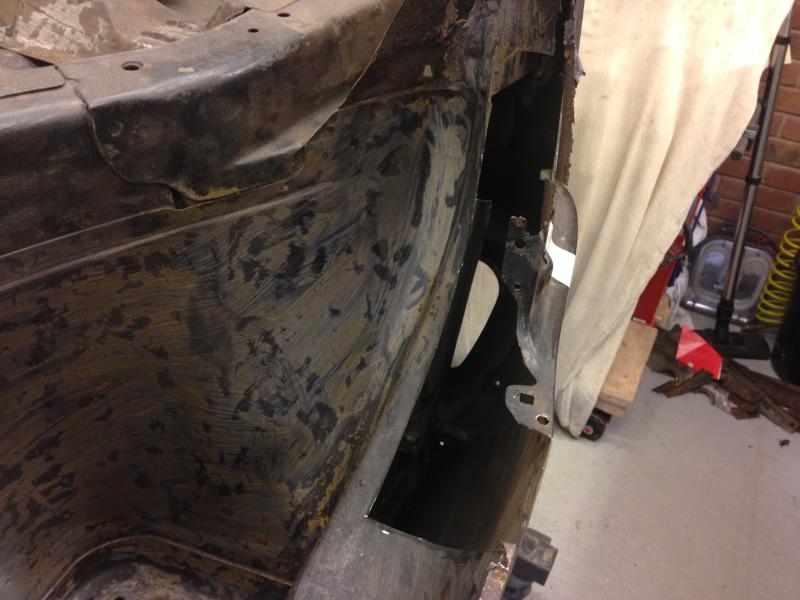
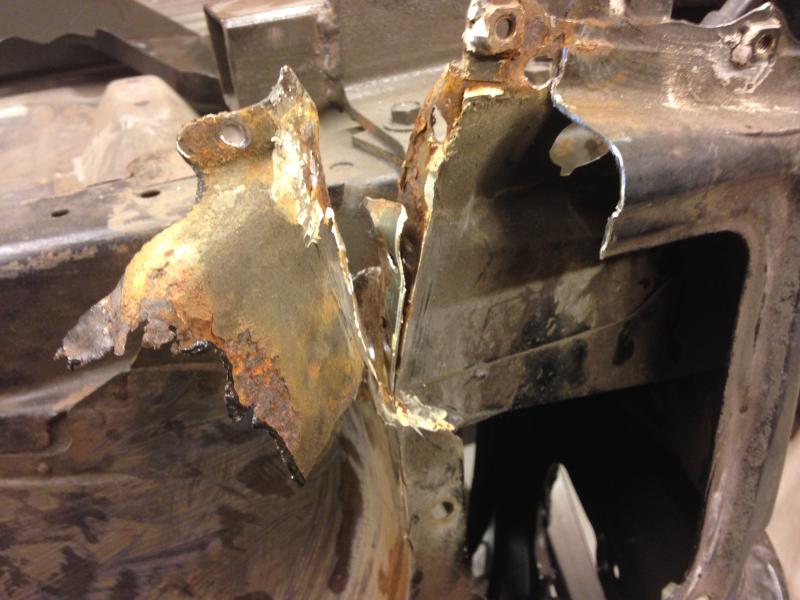
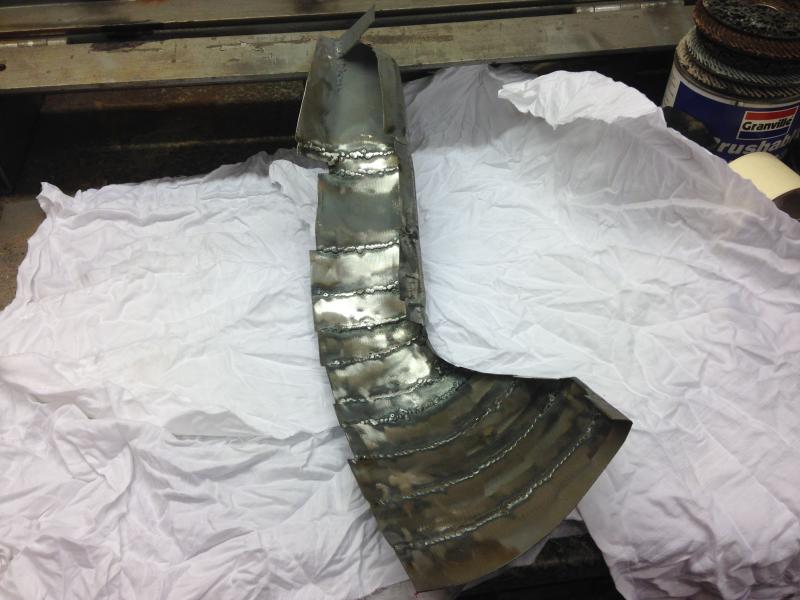
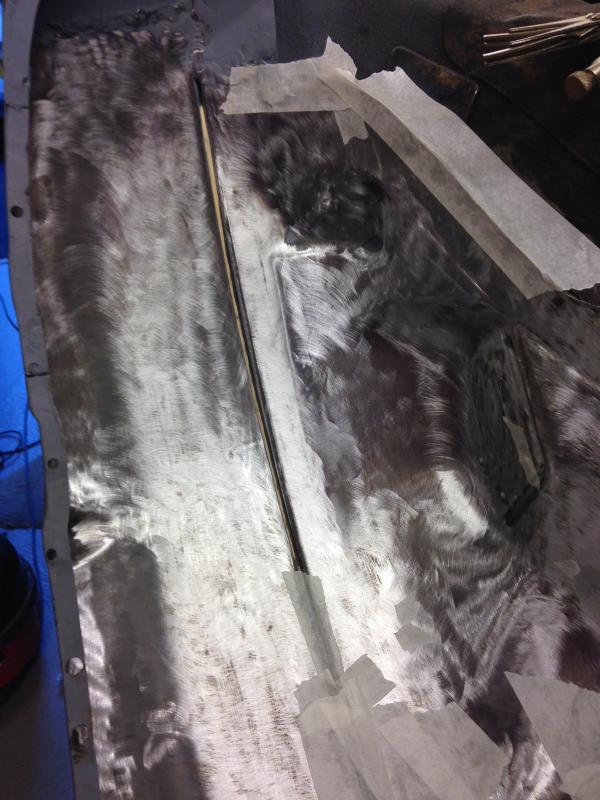
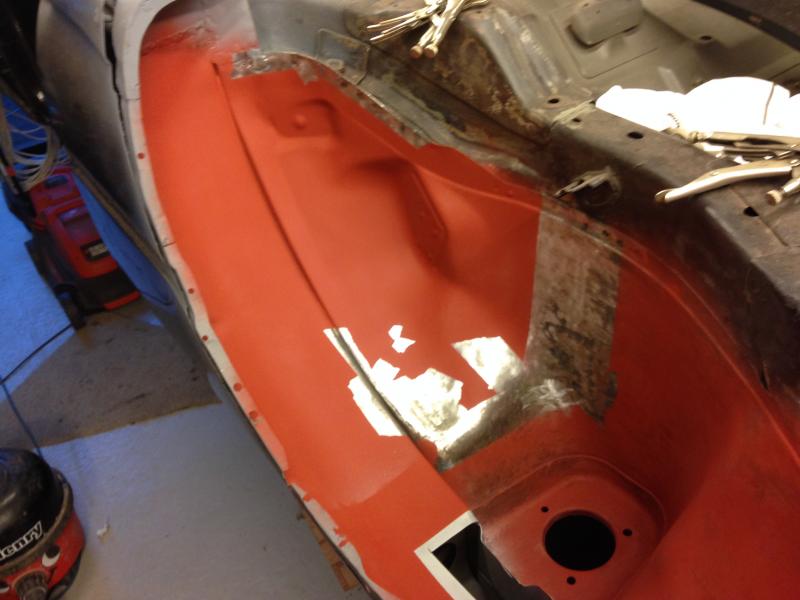
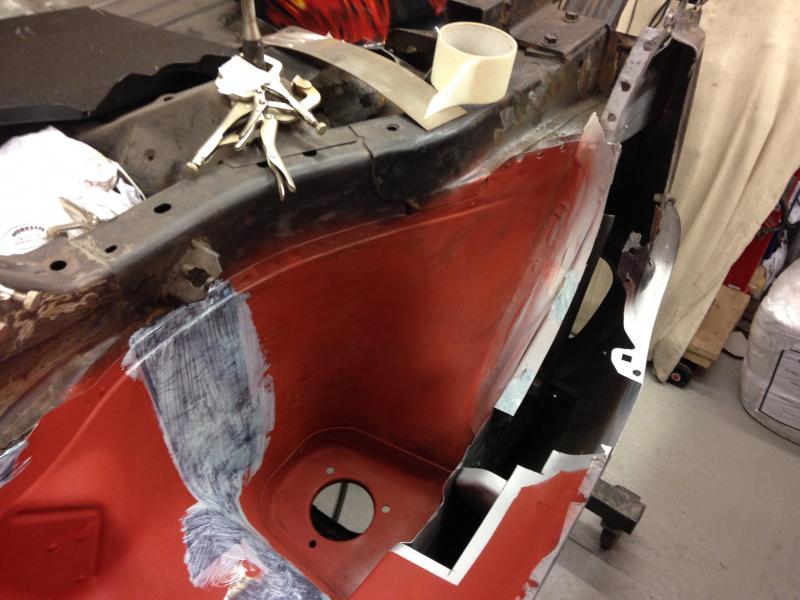
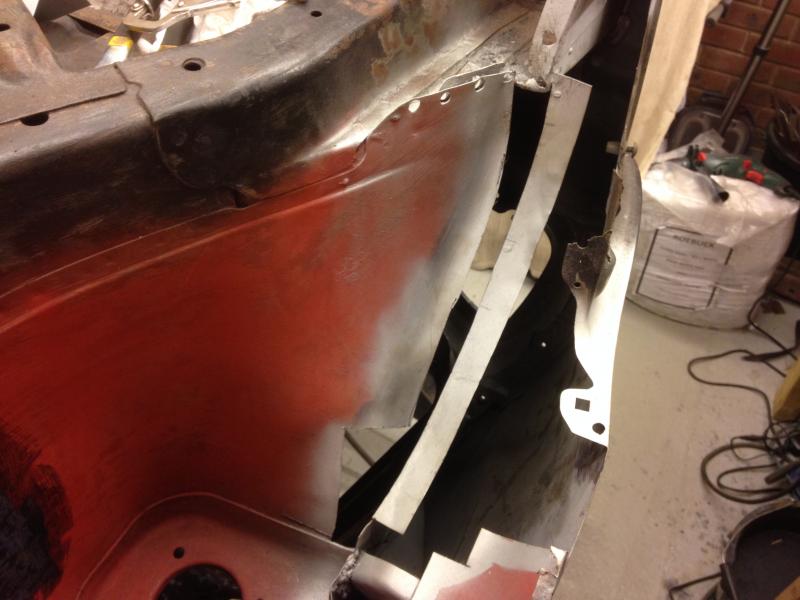
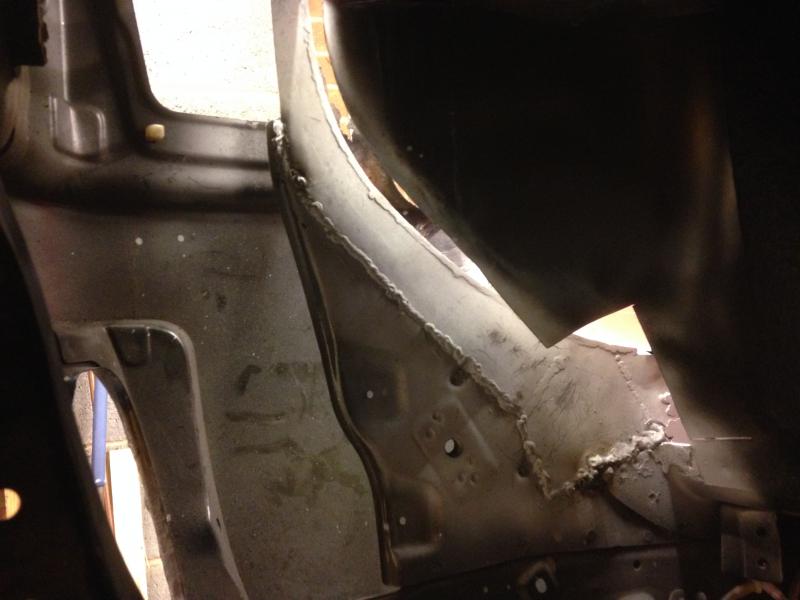
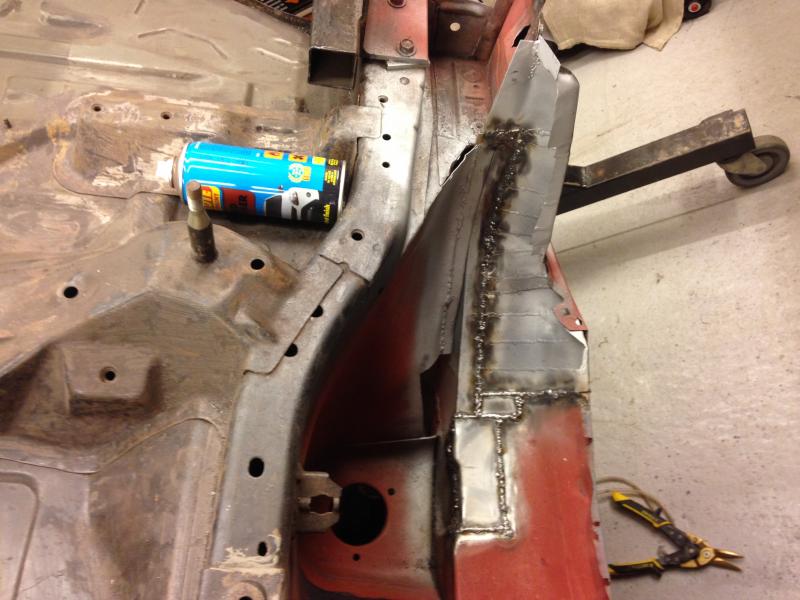
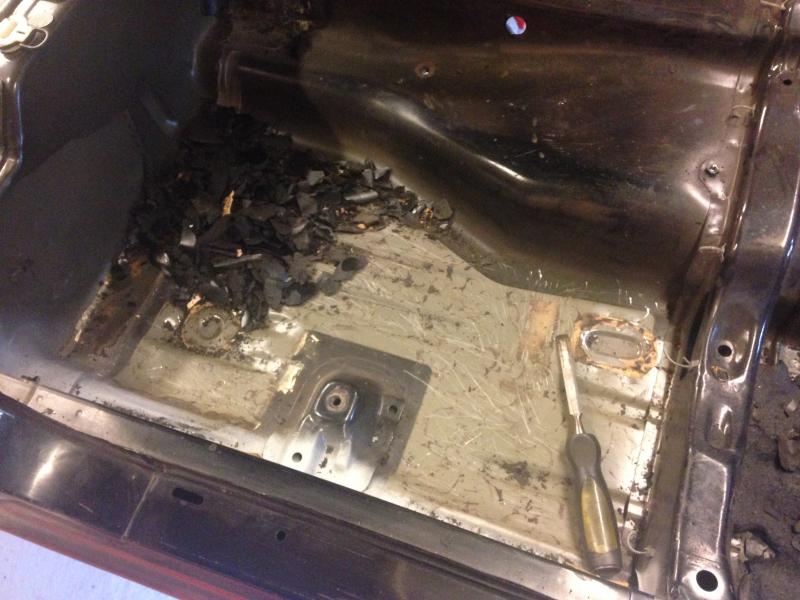
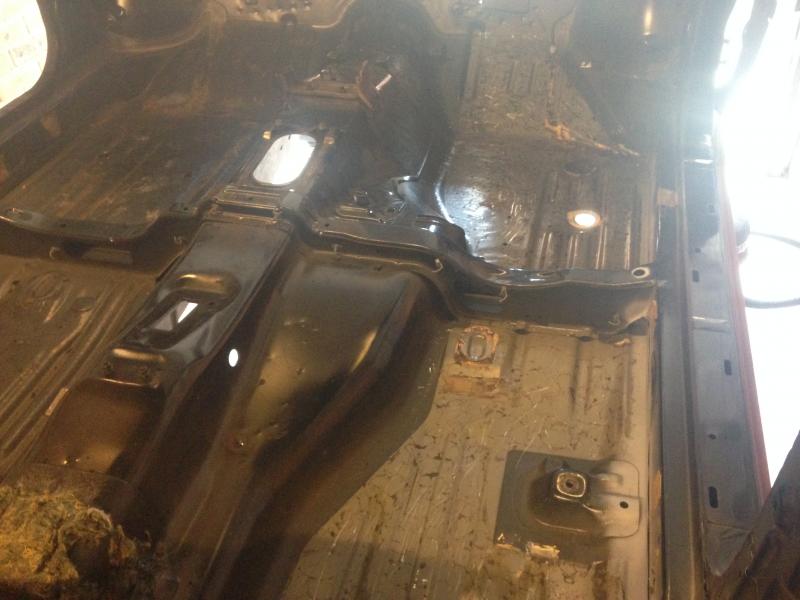
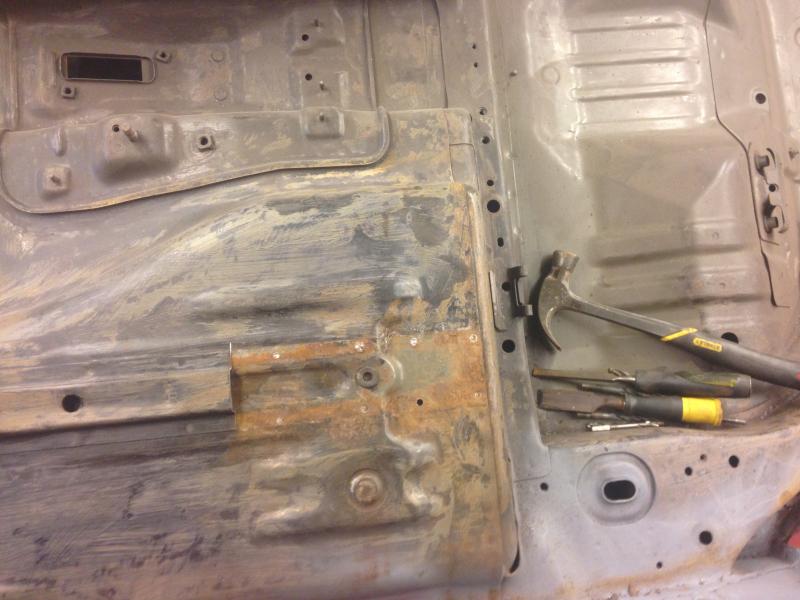
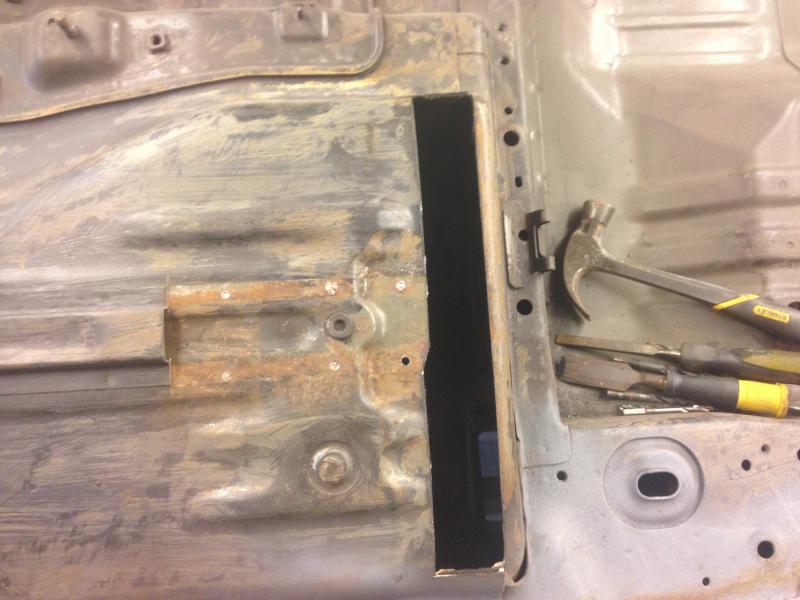
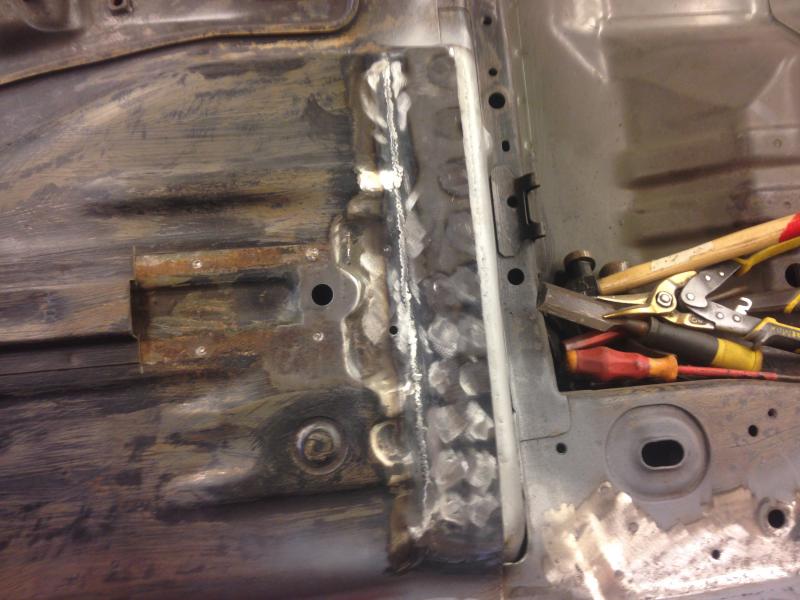
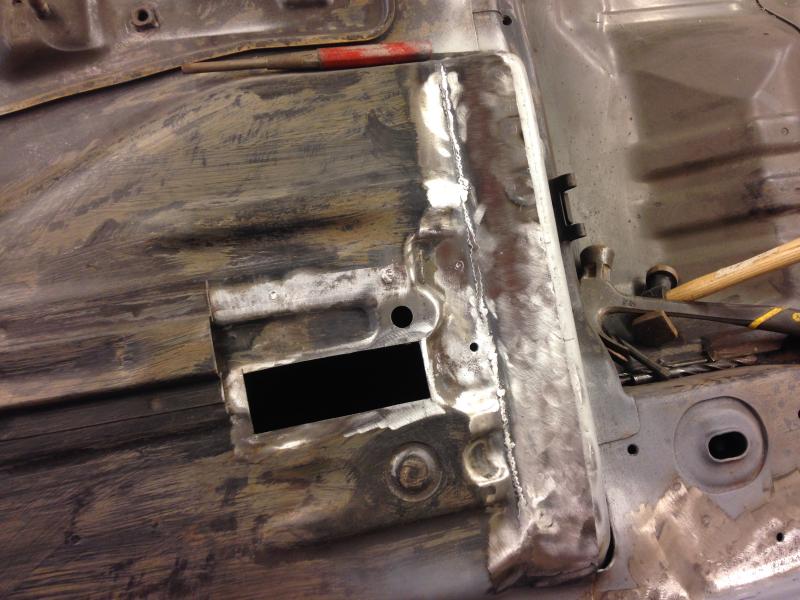
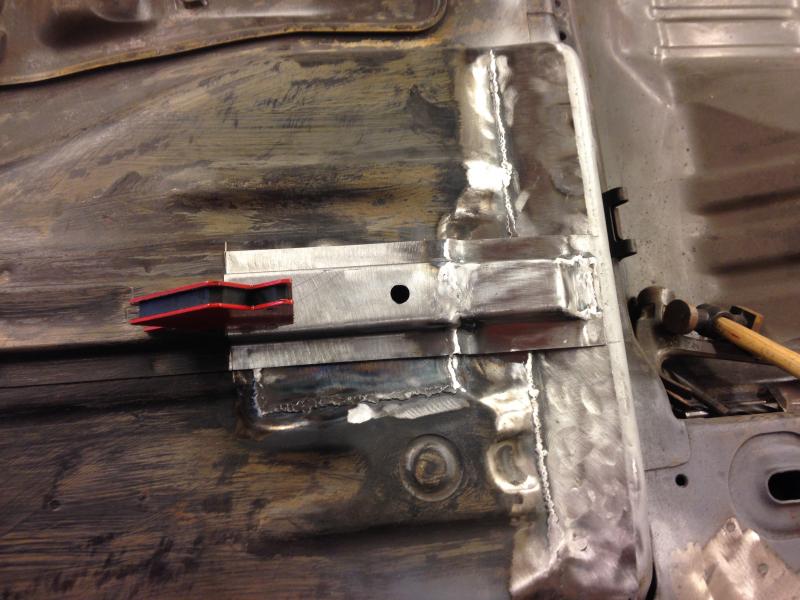
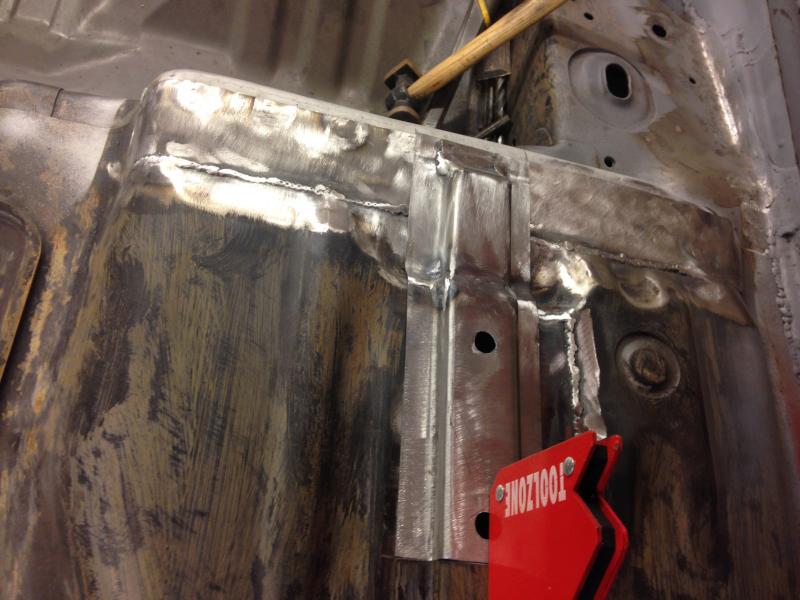
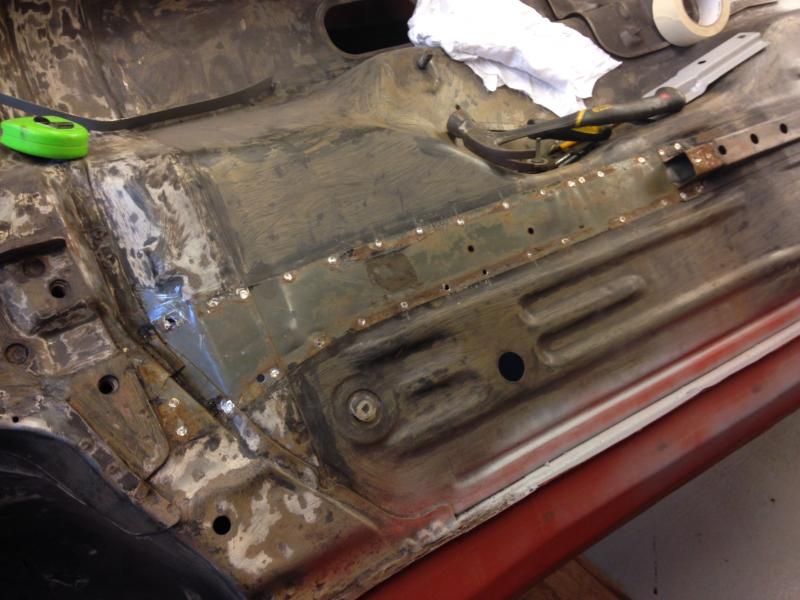
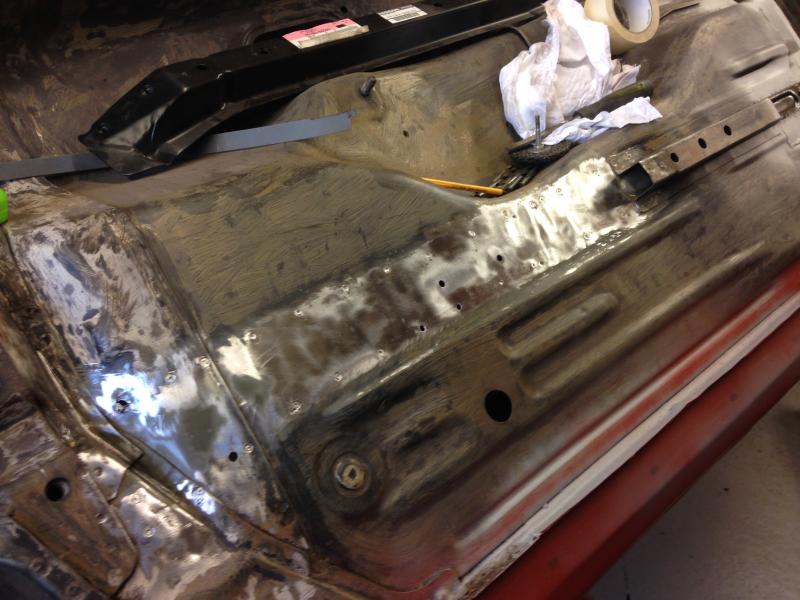
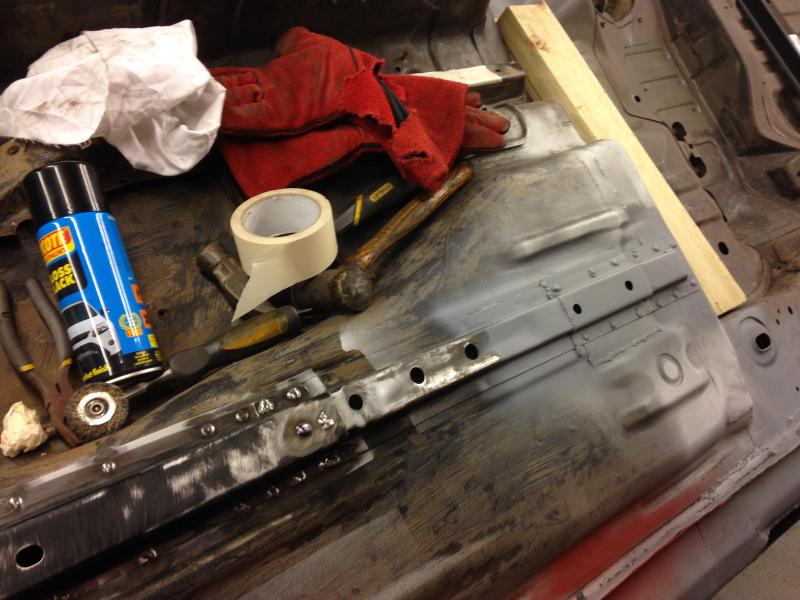
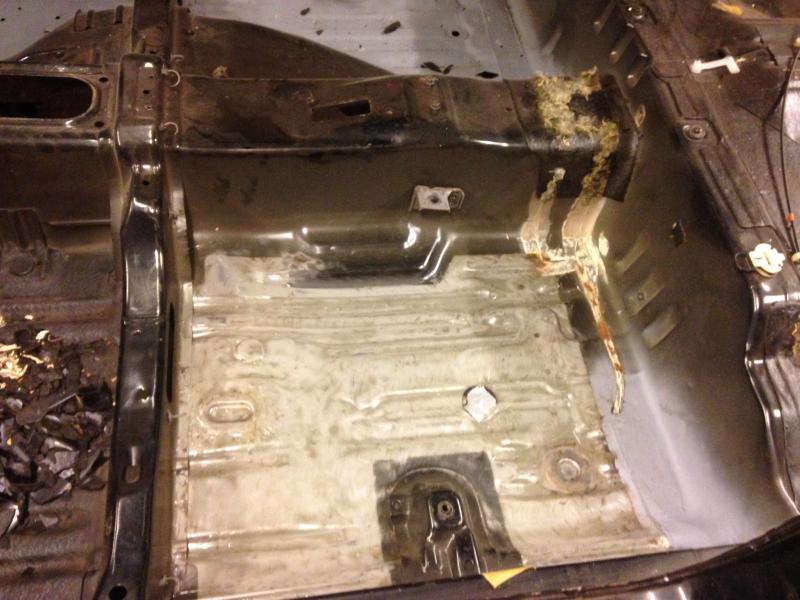
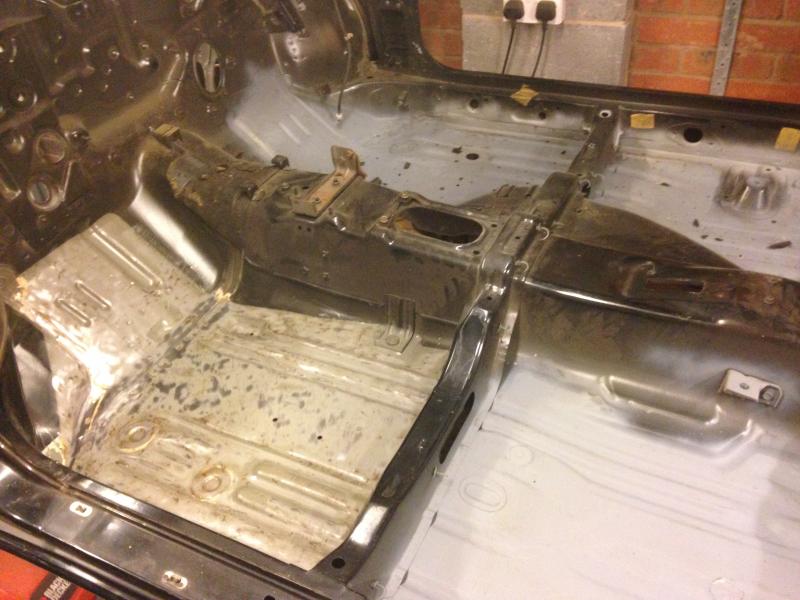
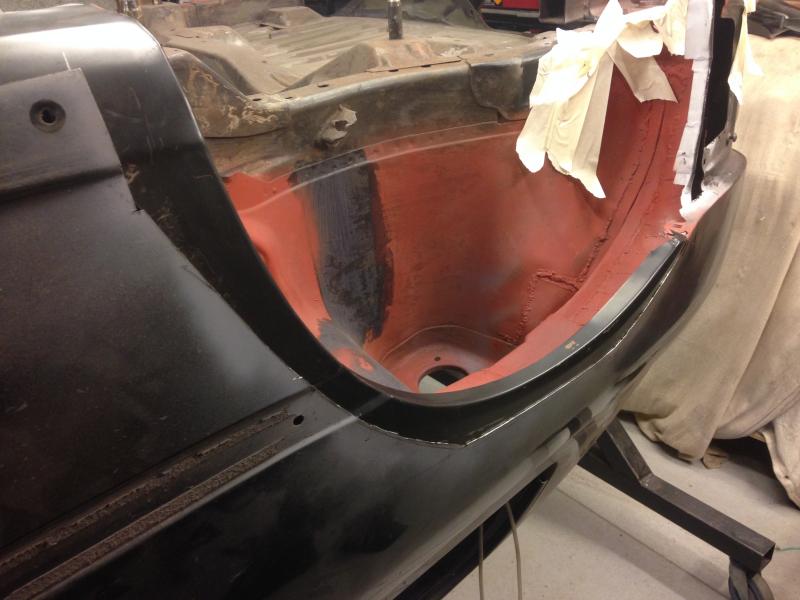
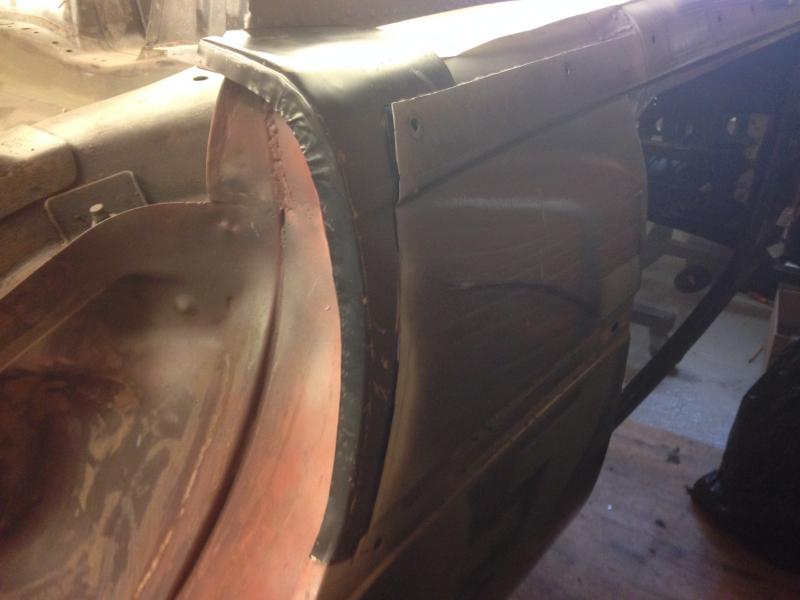
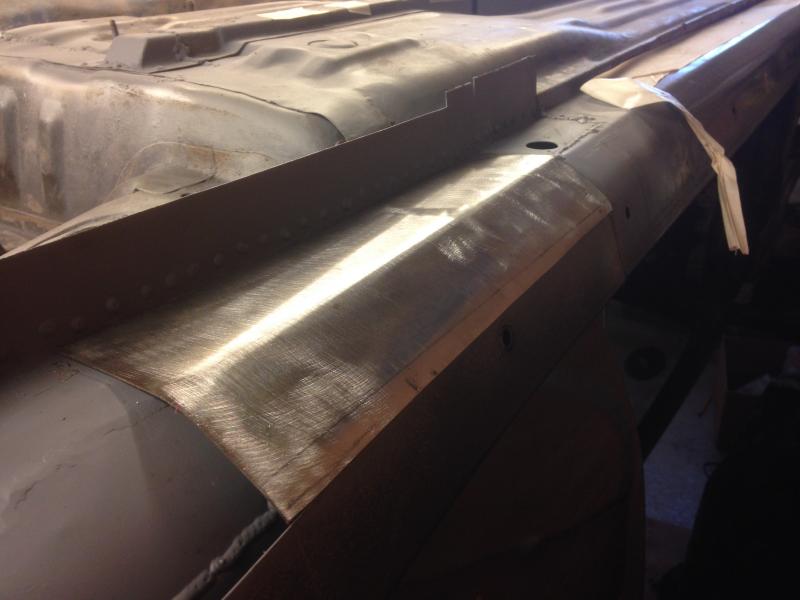
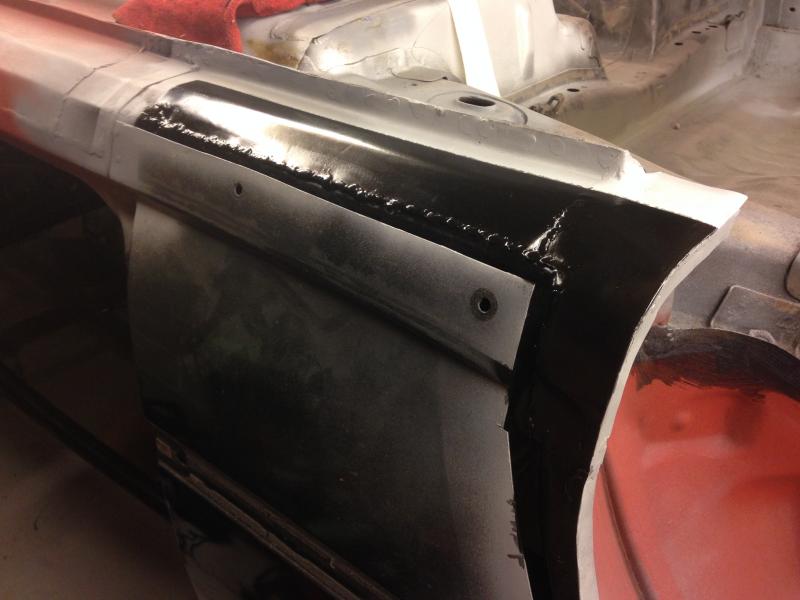
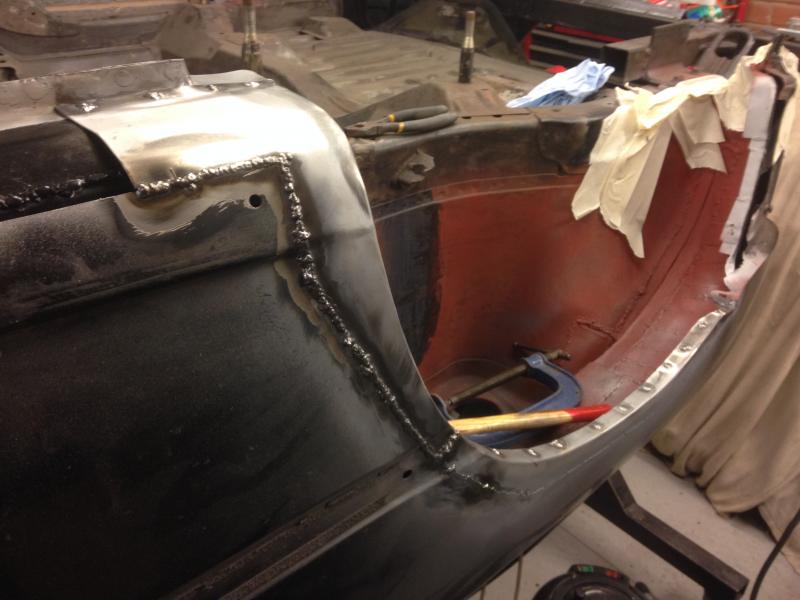
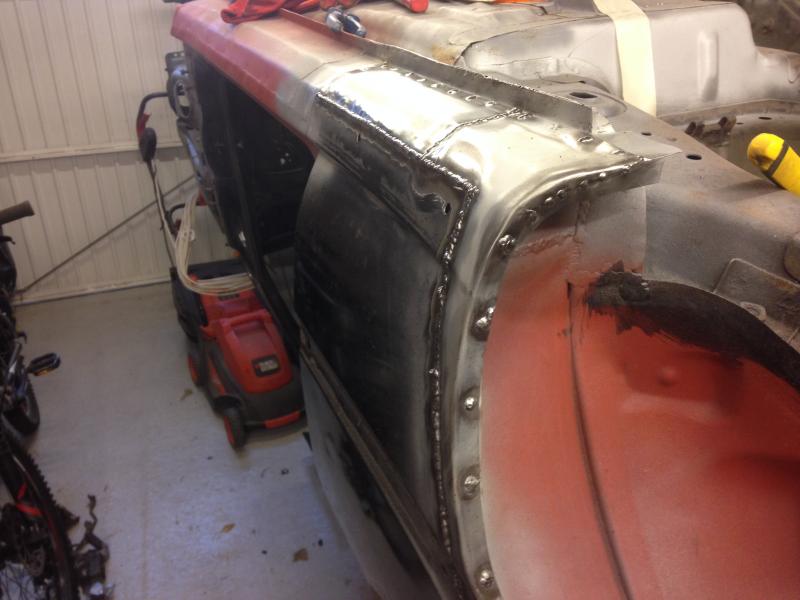
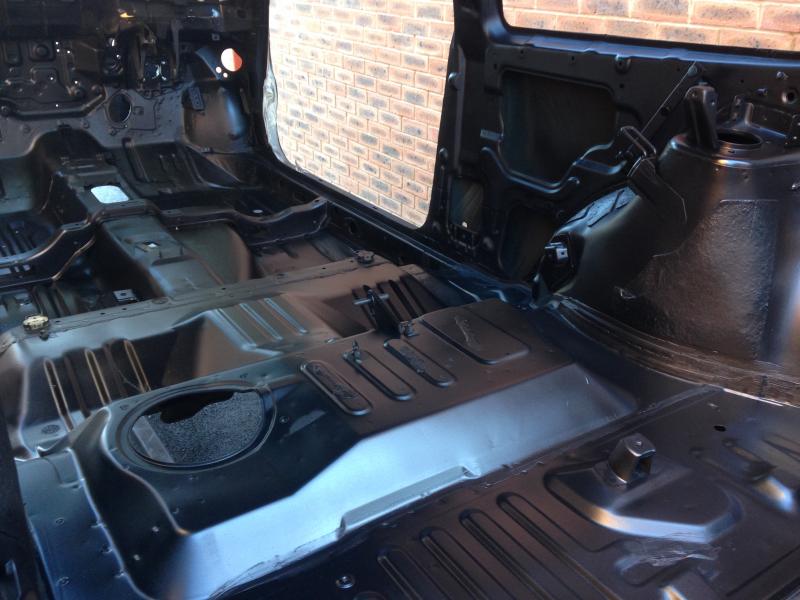
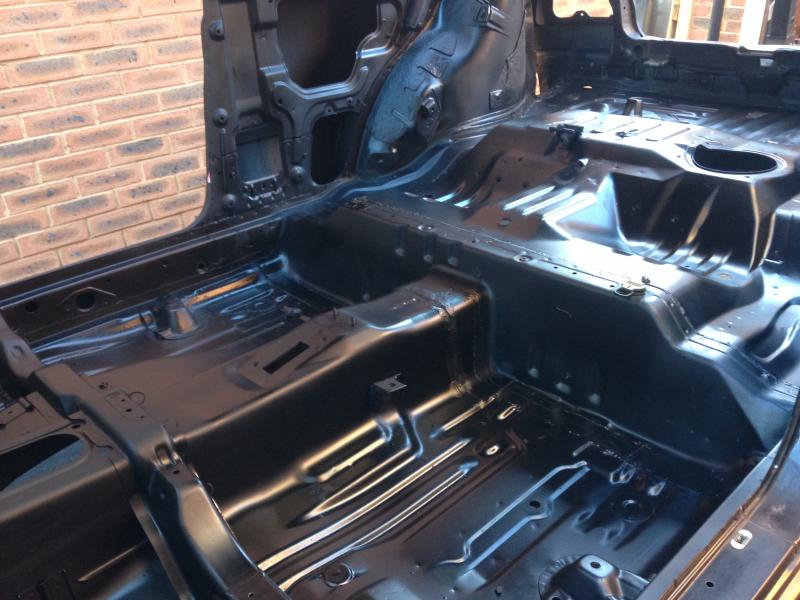
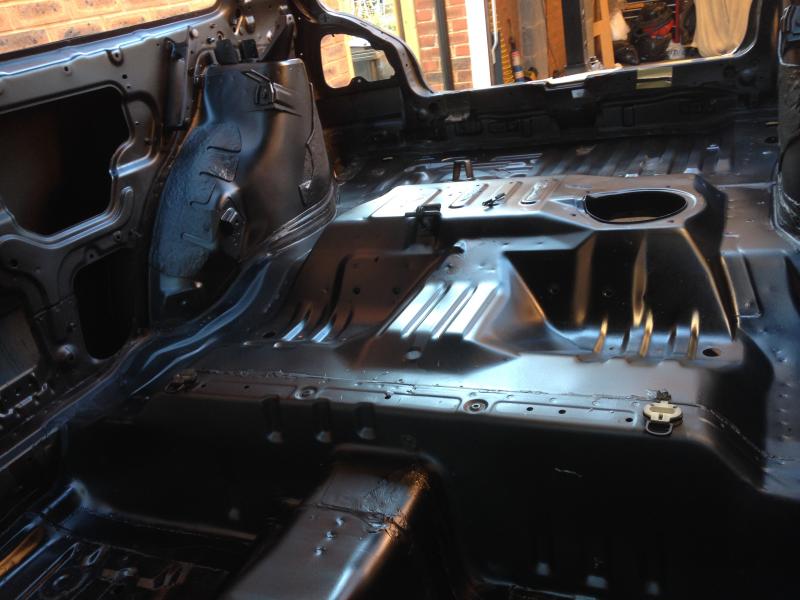
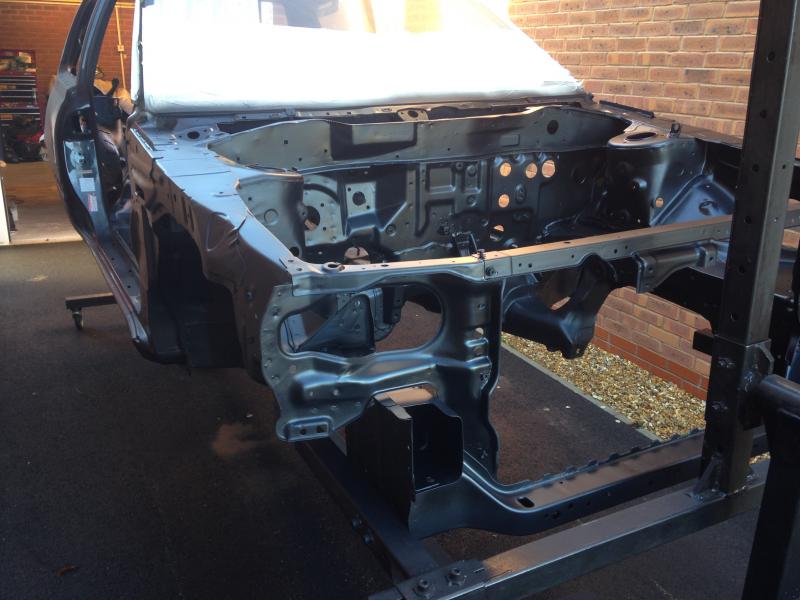
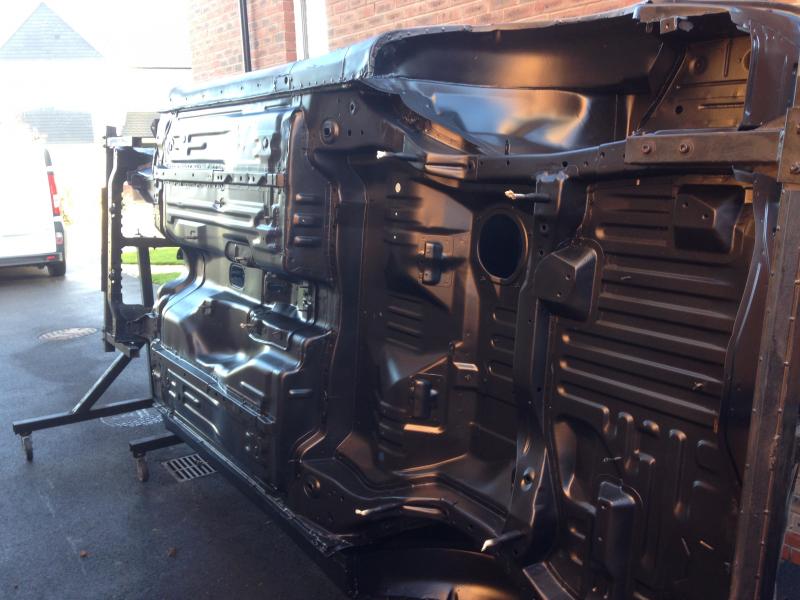
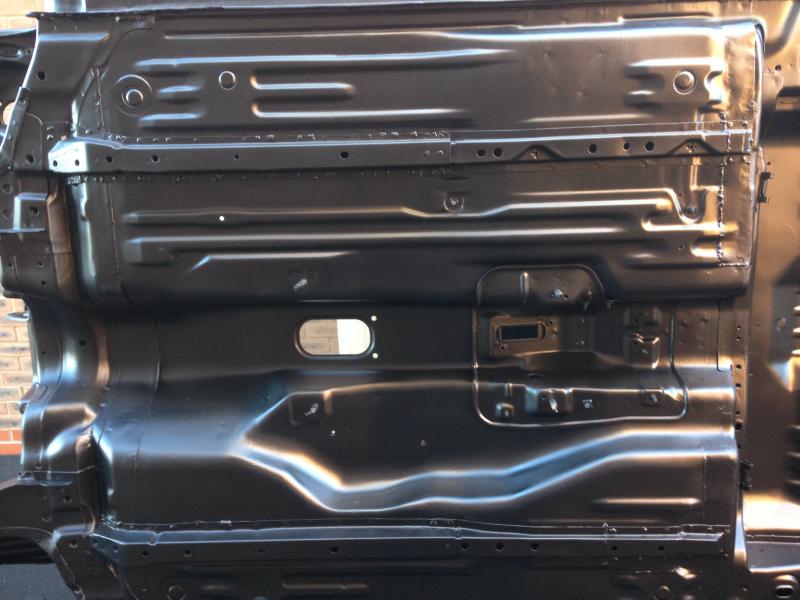
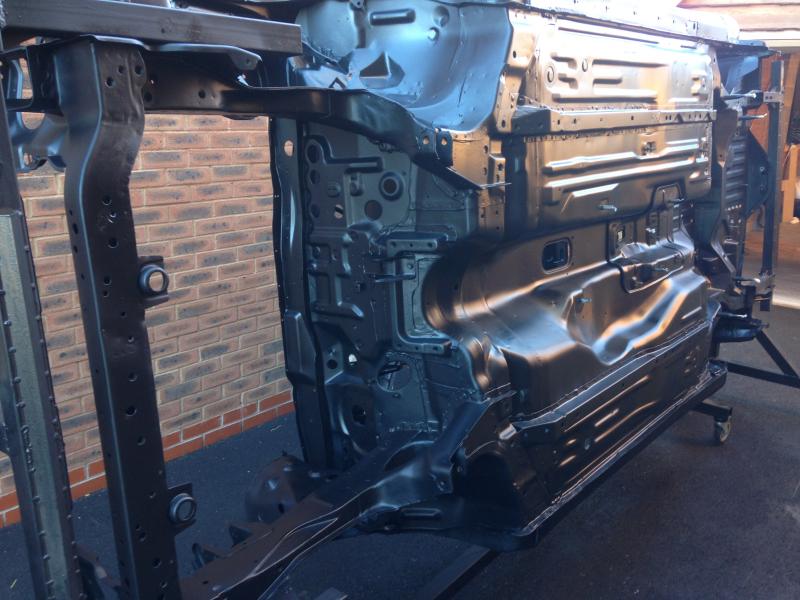
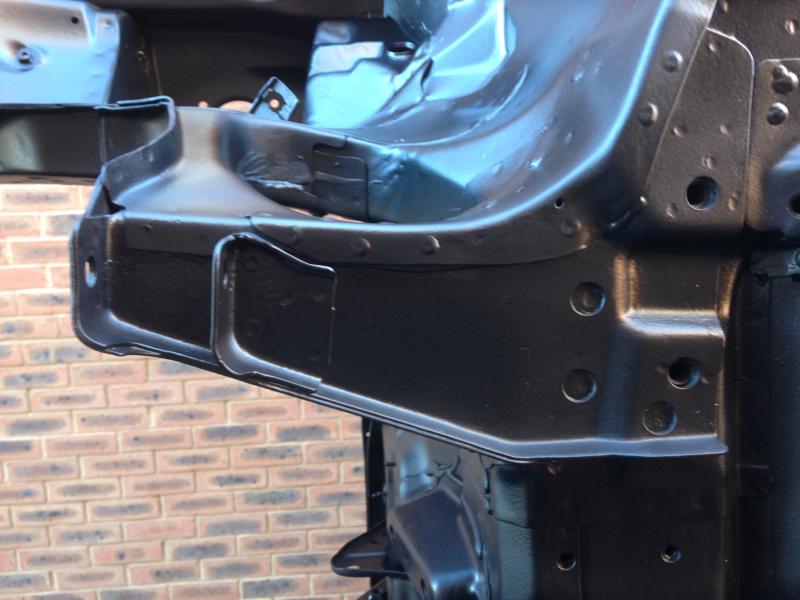
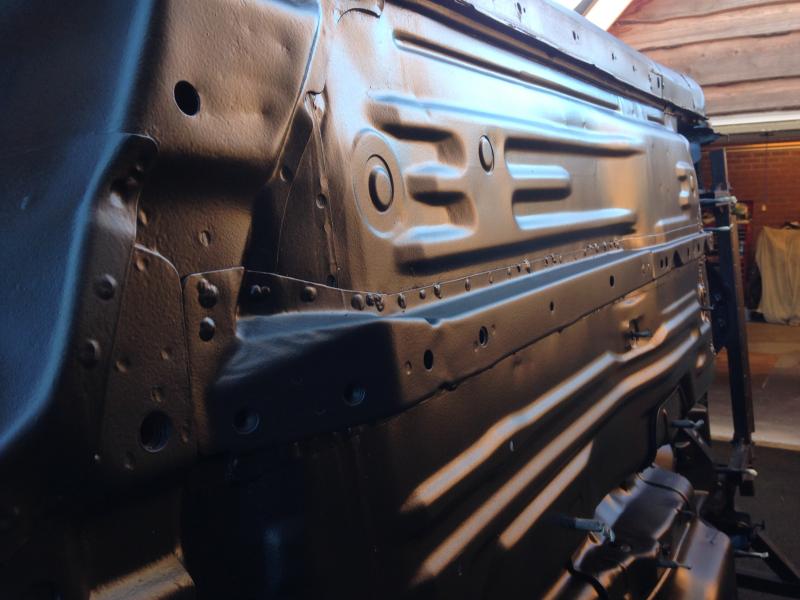
Body work wise theres very little rust, plenty of surface rust underneath as you would expect but on a whole really straight and solid..
 
Restoration Project DSC02185_zpsa4832c04
 
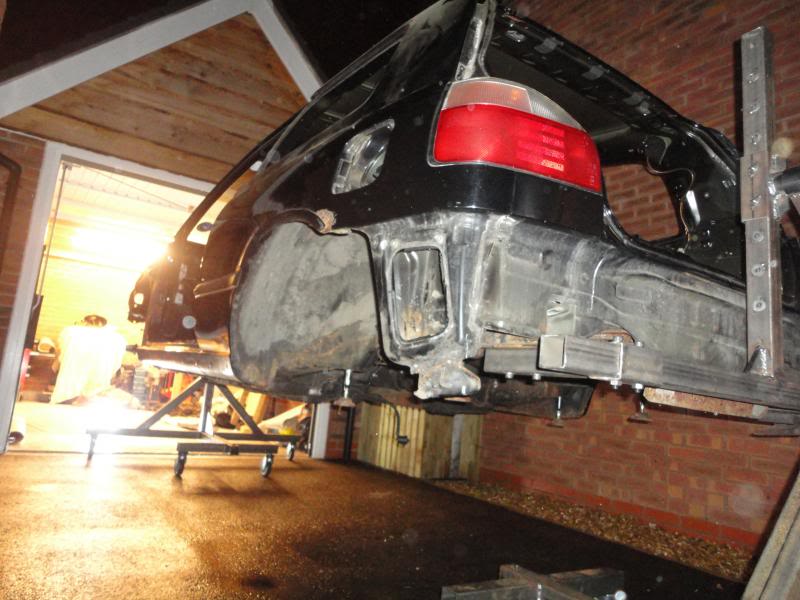
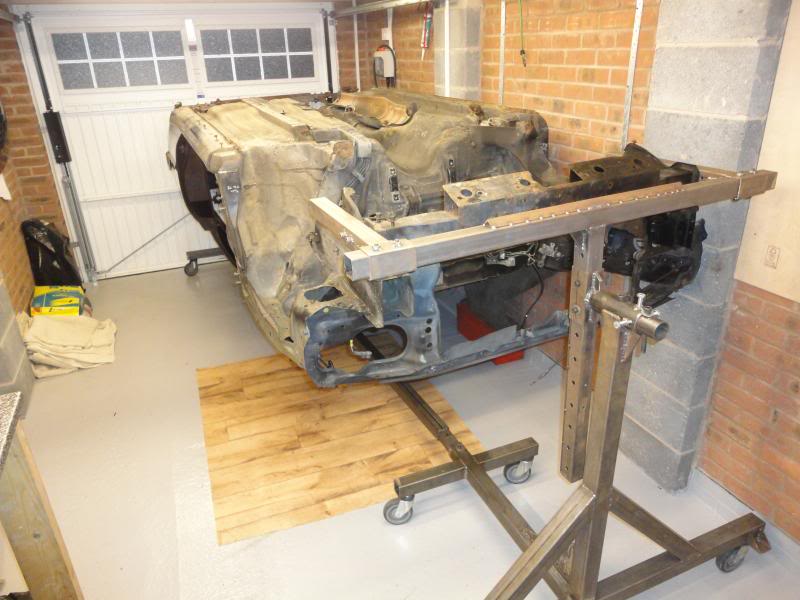
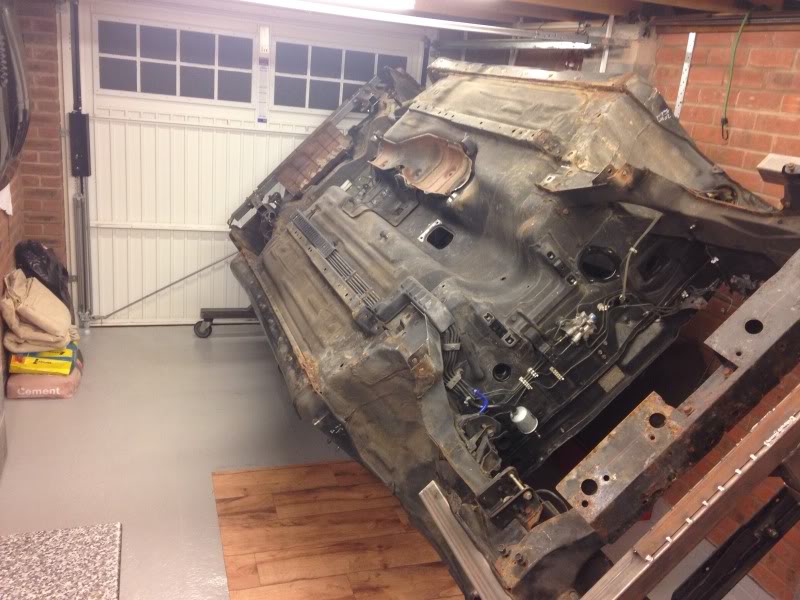
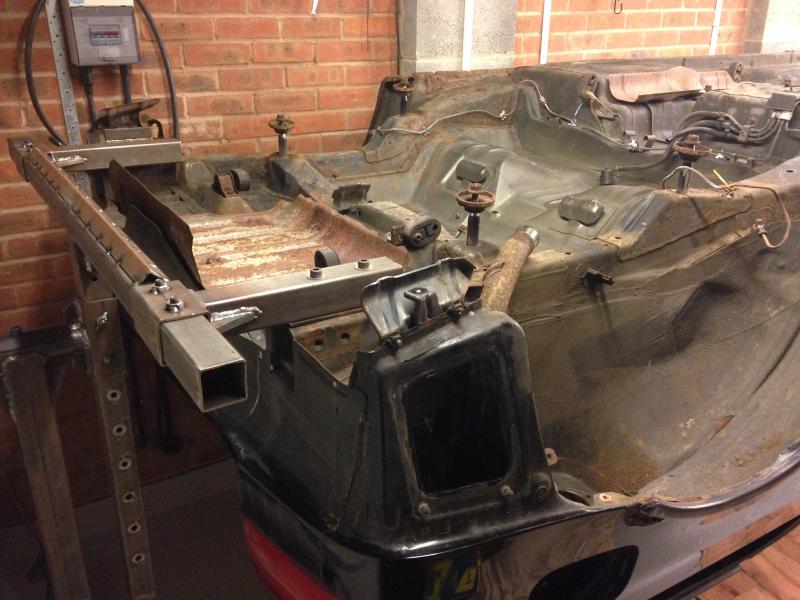
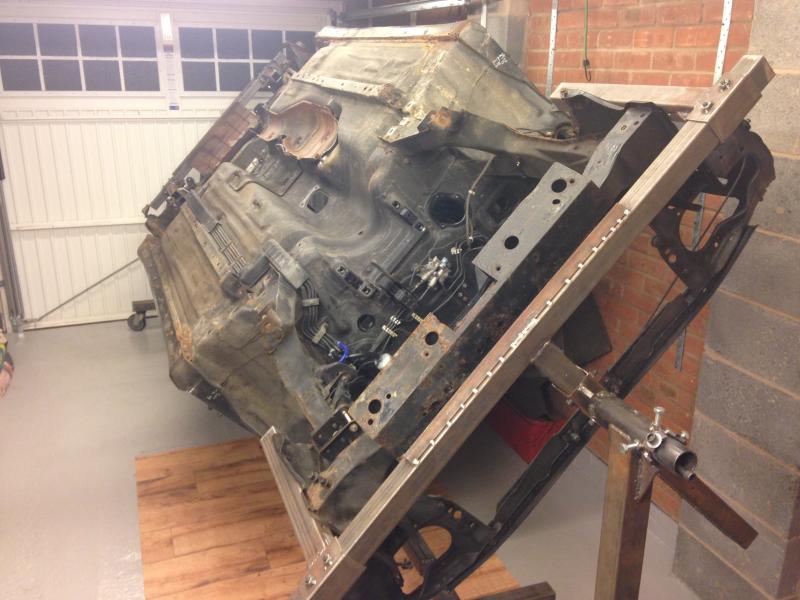
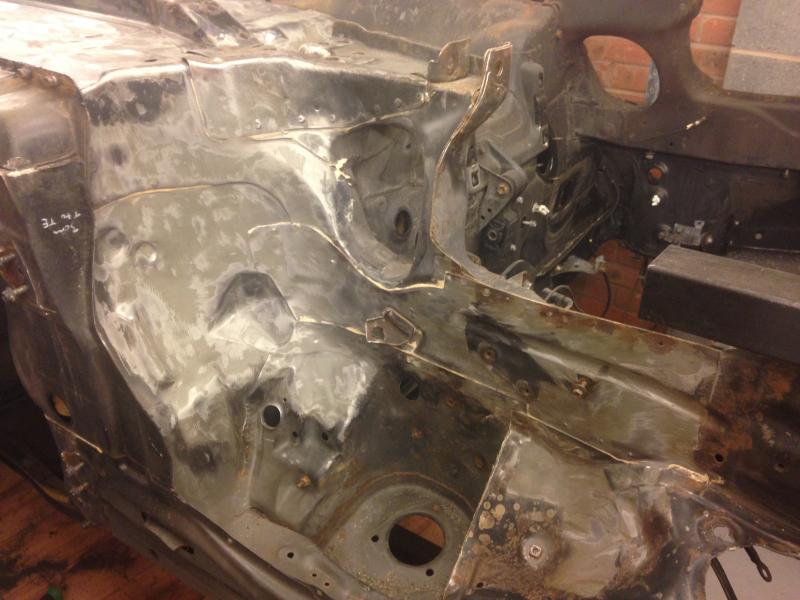
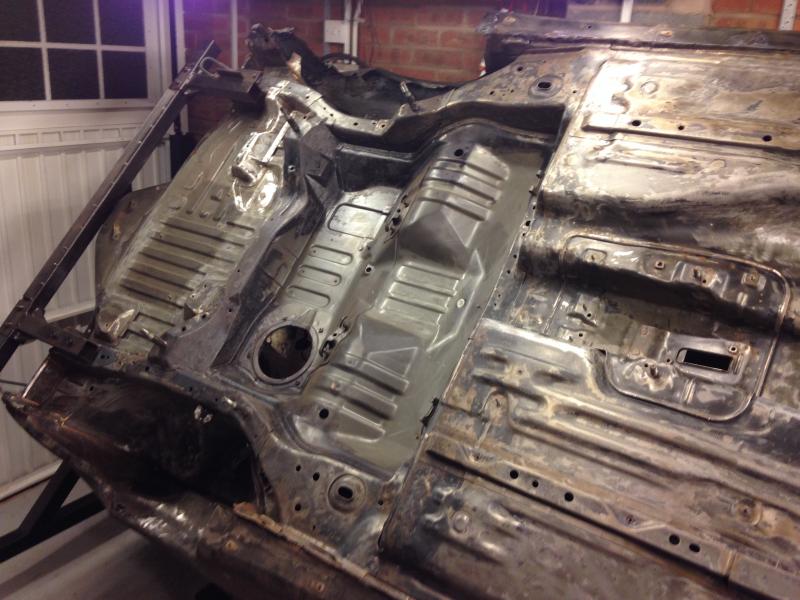
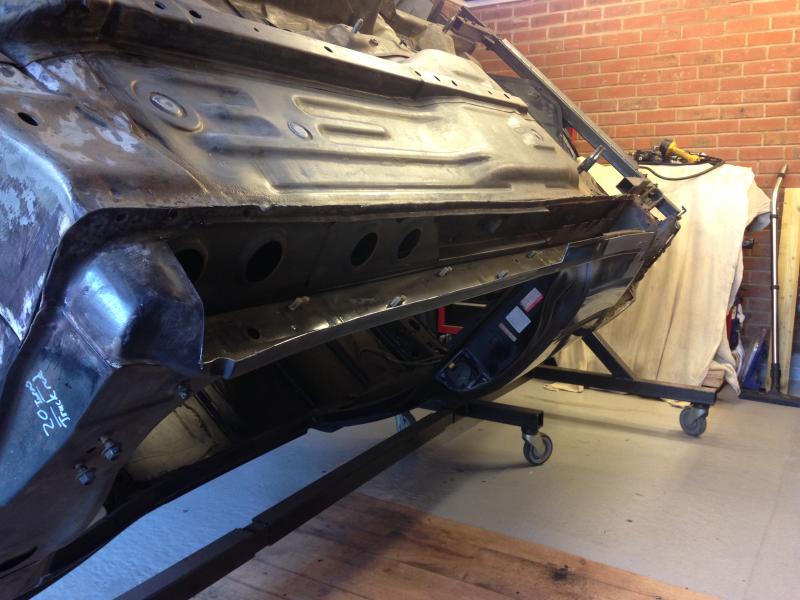
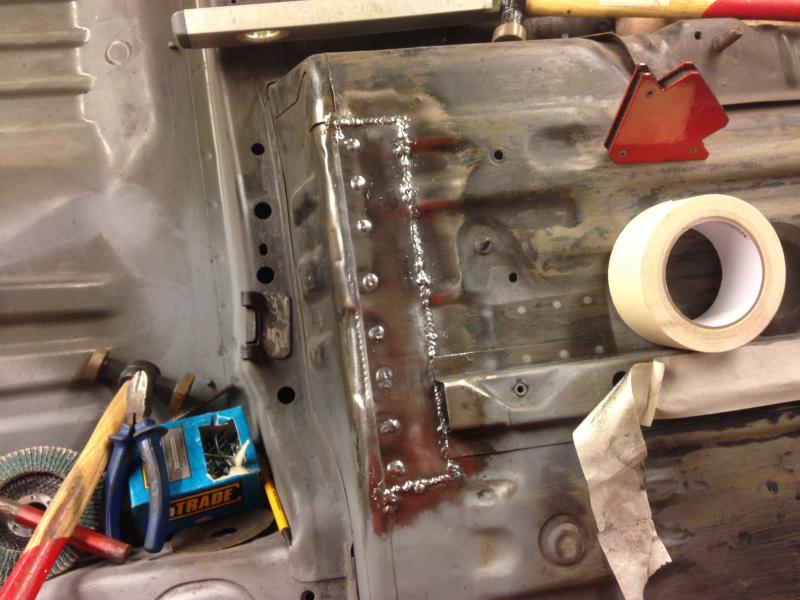
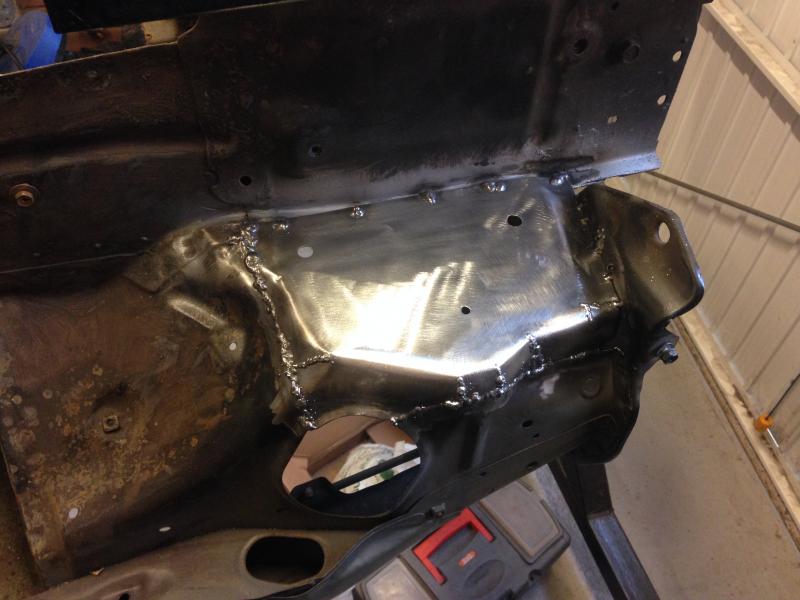
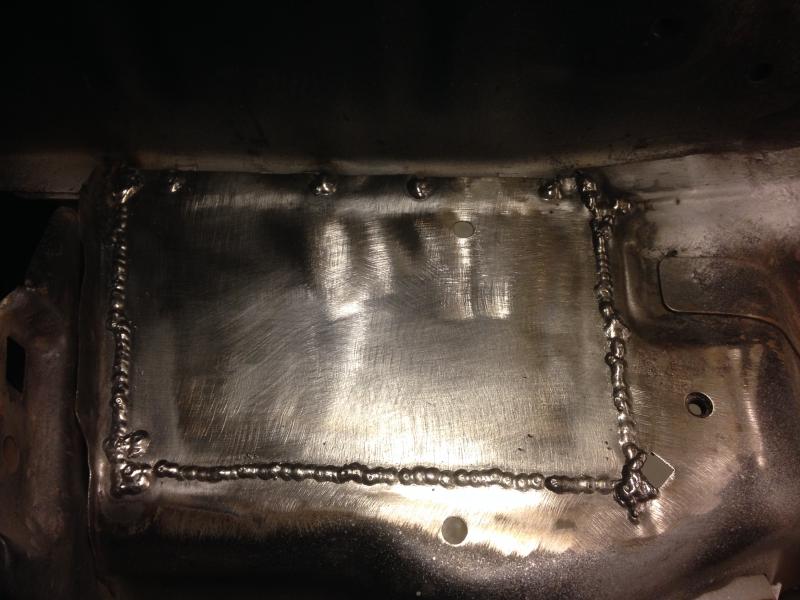
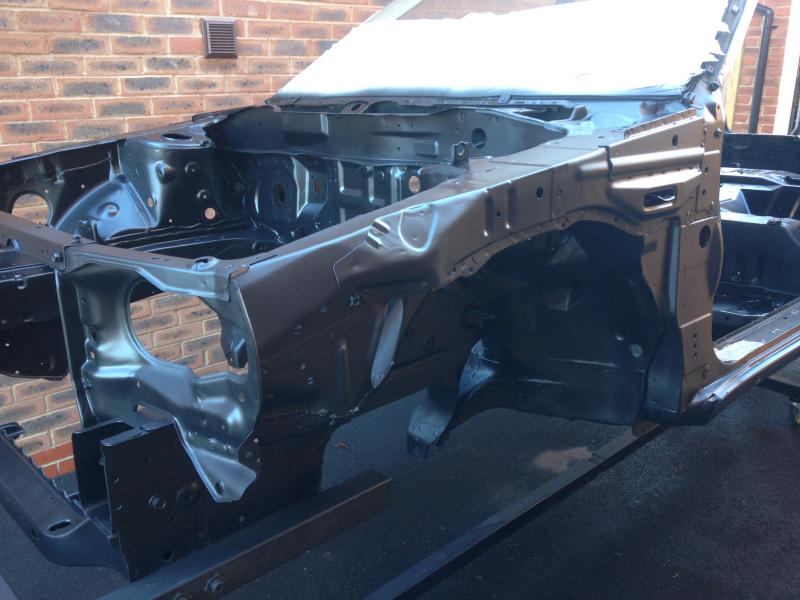
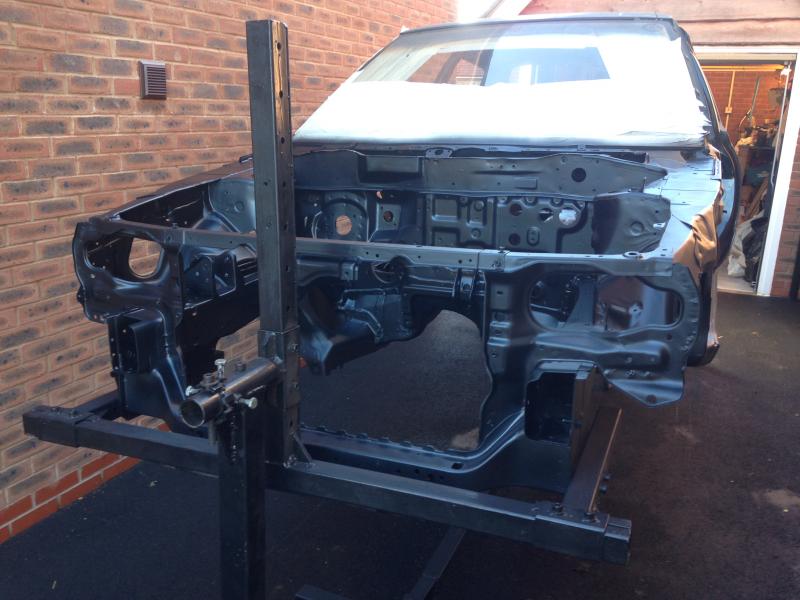
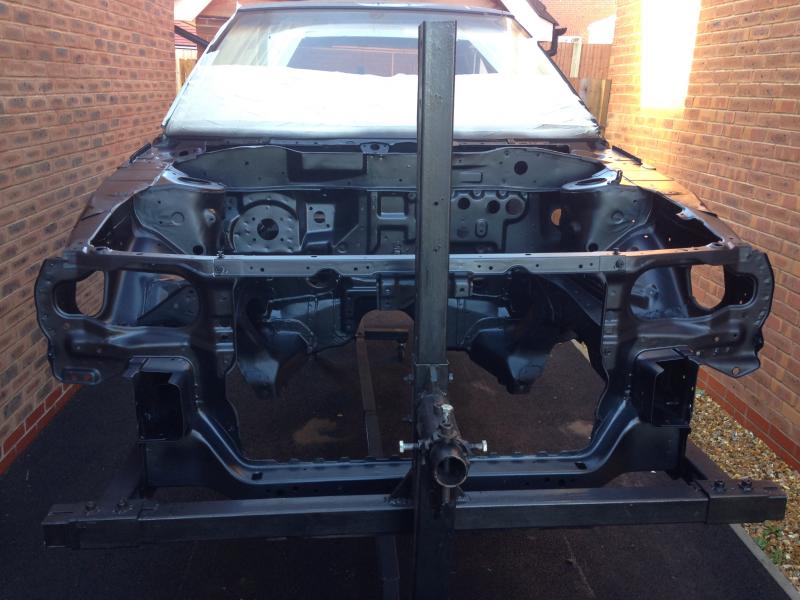
Over the last month or so ive stripped it down completely and made a rotisserie to make it easier to tackle the underside plus very handy for moving around the garage!
 
Restoration Project DSC02192_zpsc0da3938
 
Some how I managed to weld the pivot point slightly off being straight on both dolly's! Christ knows how I managed that when everything else is perfect, oh well it still works!  Mental note to myself when I rotate the car take my tools and crap out the boot first Shocked hmmmmm a lot of noise shall we say!
 
I meant to ask this question a while back, how do you take the rear light plastic lenses out?  I've taken the small fixing nuts off but the lenses seem to have a black sealant all around them, dont want to damage them by just tugging on them!  Thinking of a hairdryer to make the sealant flexible enough to pull free??
 
Restoration Project DSC02183_zps42df29b0
 
Need to raise the car another 200mm so it can rotate a fully without the roof and rear panels catching on the dolly's, also need to put the link bar in between the two dolly's so its all properly secure.
 
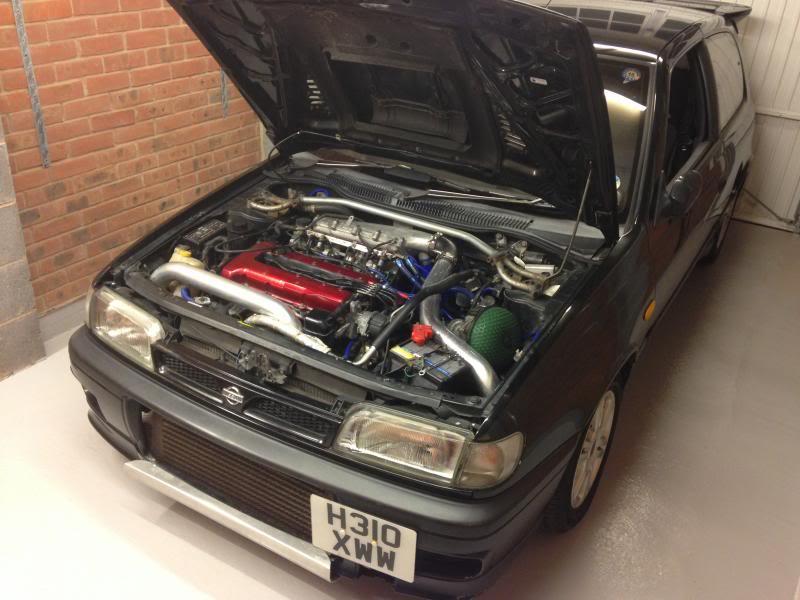
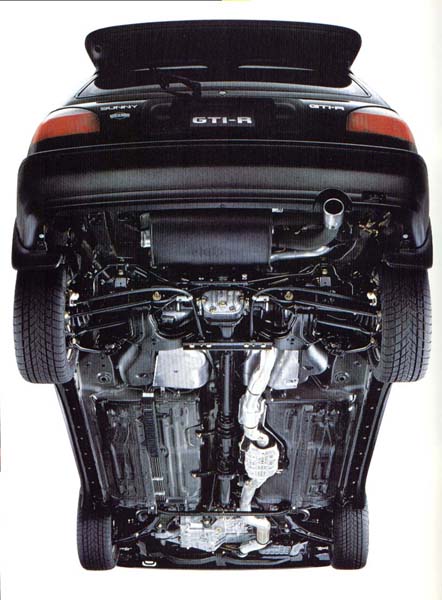
Engine wise im not too sure what I want to do yet, currently running 330bhp @ fly, been running that happily for 20k although the standard clutch I put in 7 years ago is now smooth as something very smooth Laughing would like to run 400bhp, but don't want to start having gearbox problems etc, but that's a year or so away yet plenty of time to decide..
 
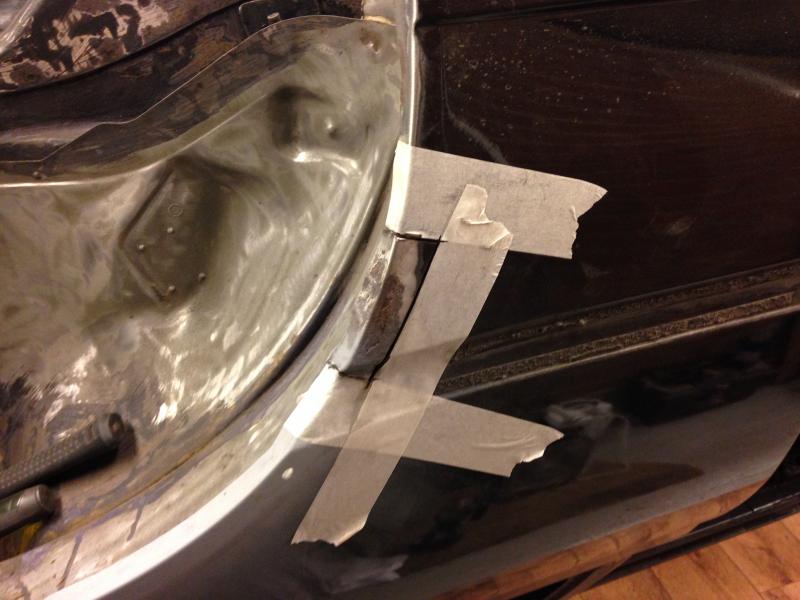
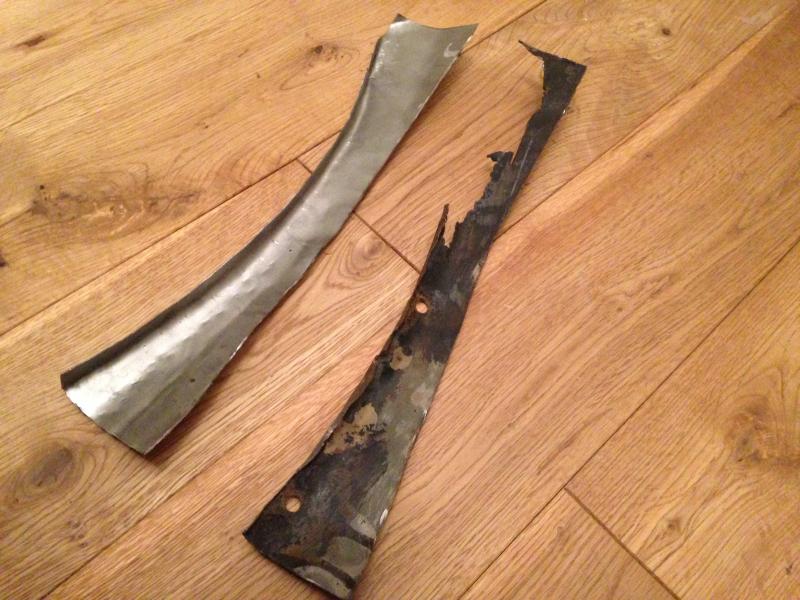
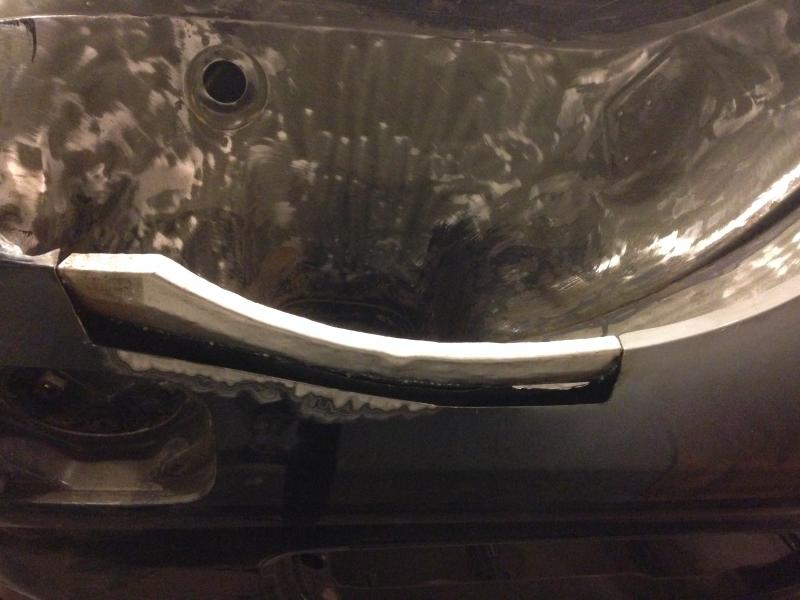
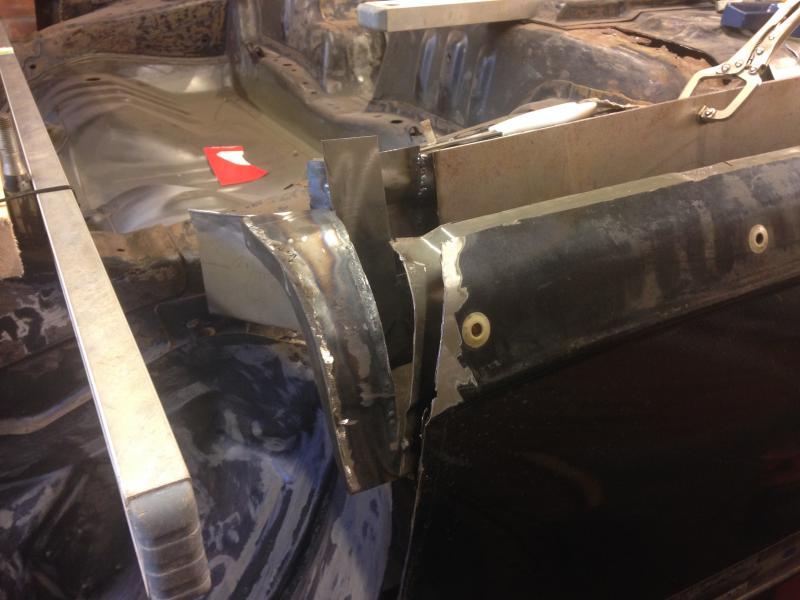
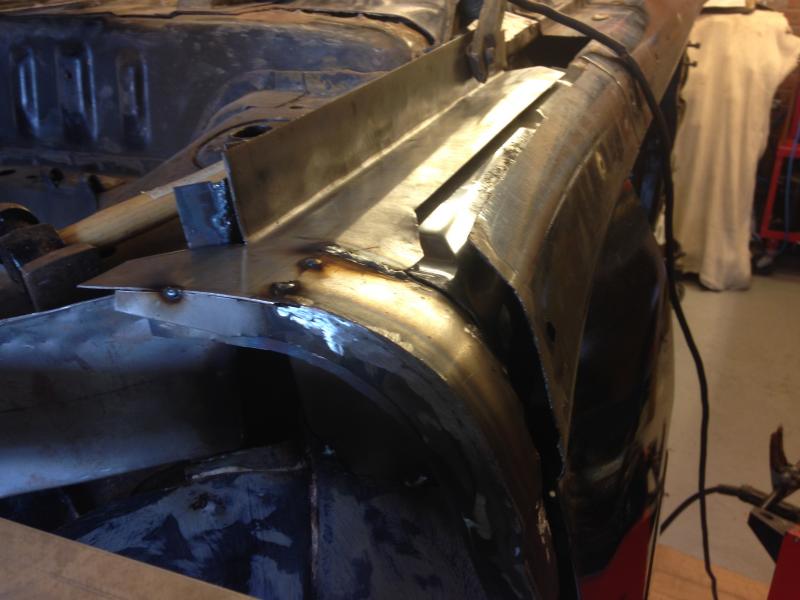
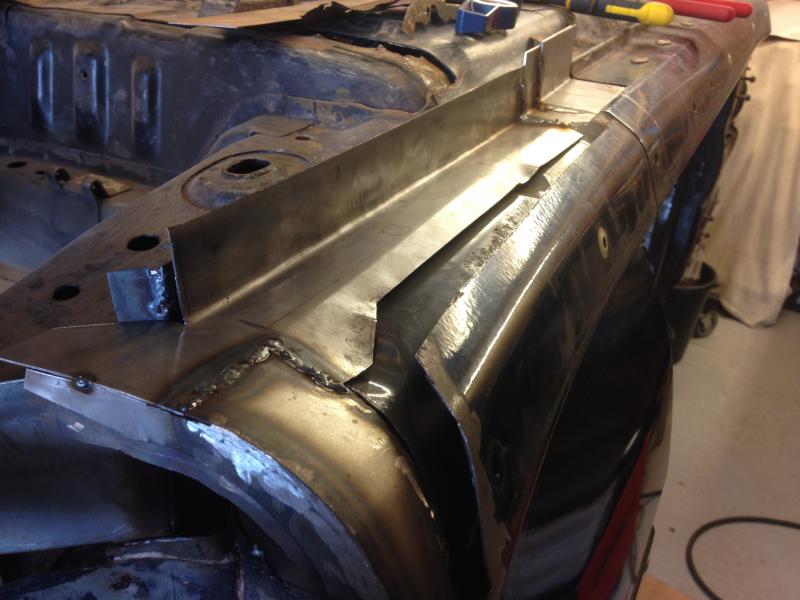
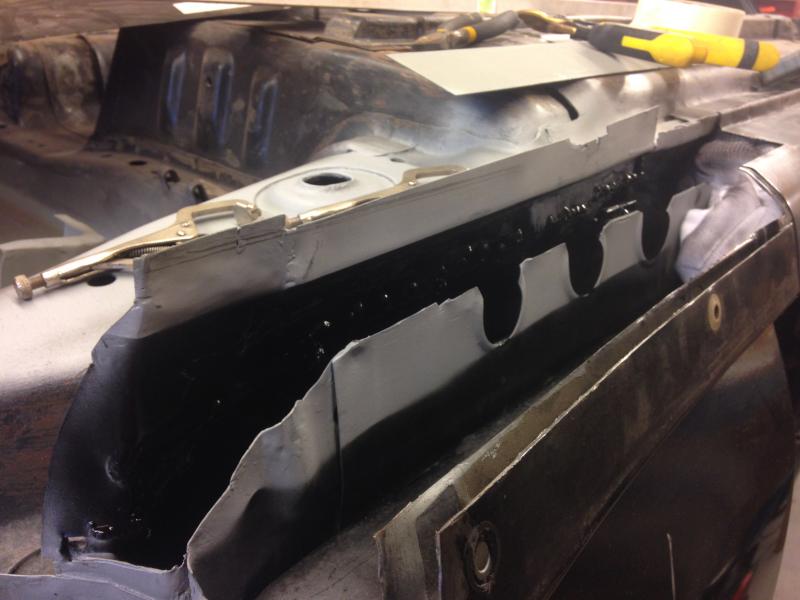
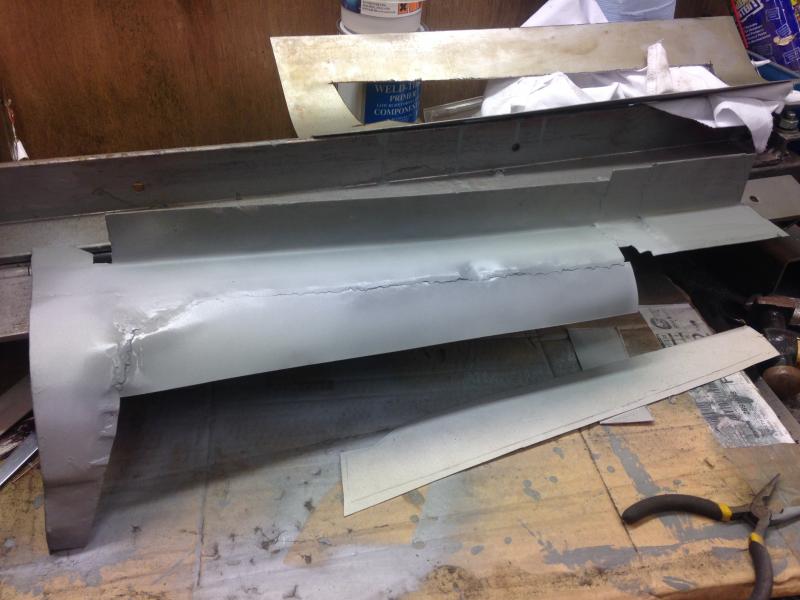
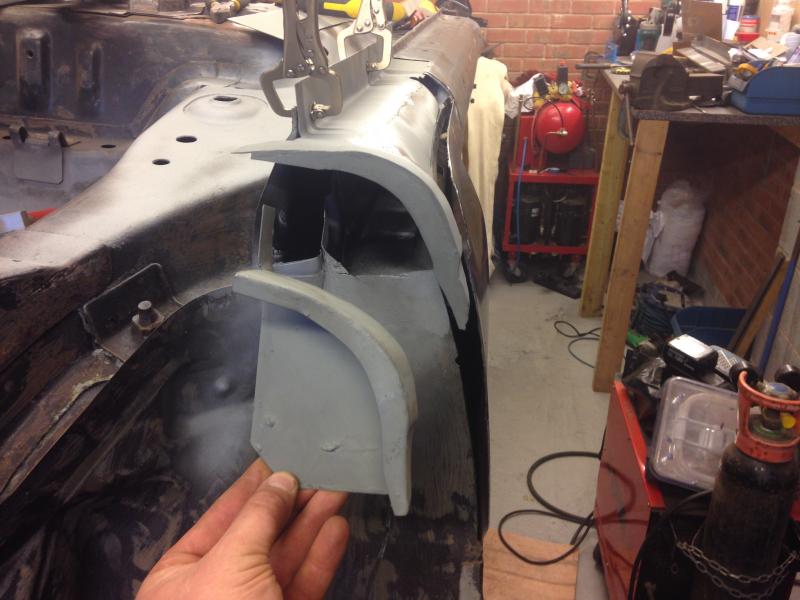
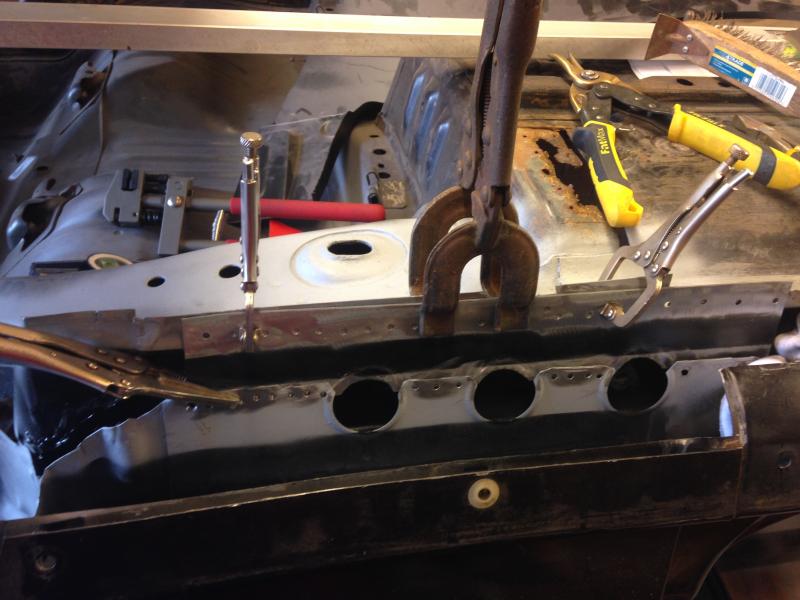
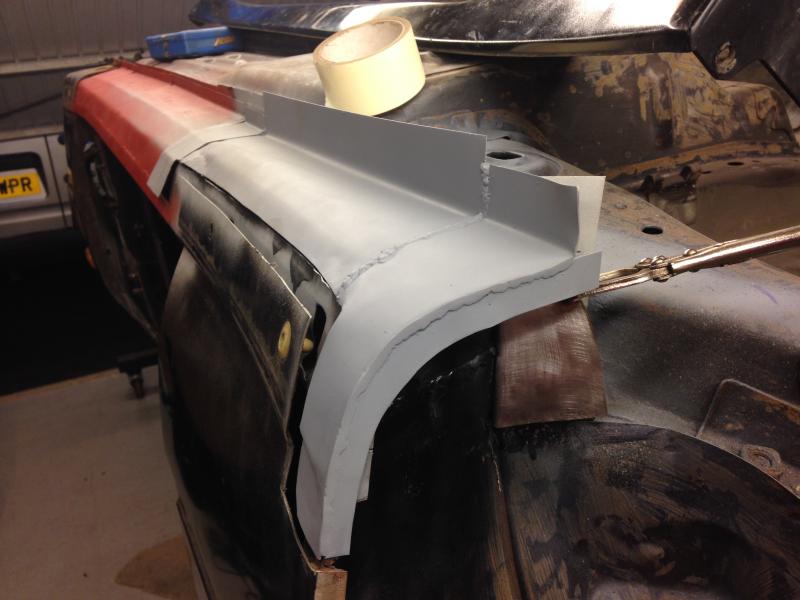
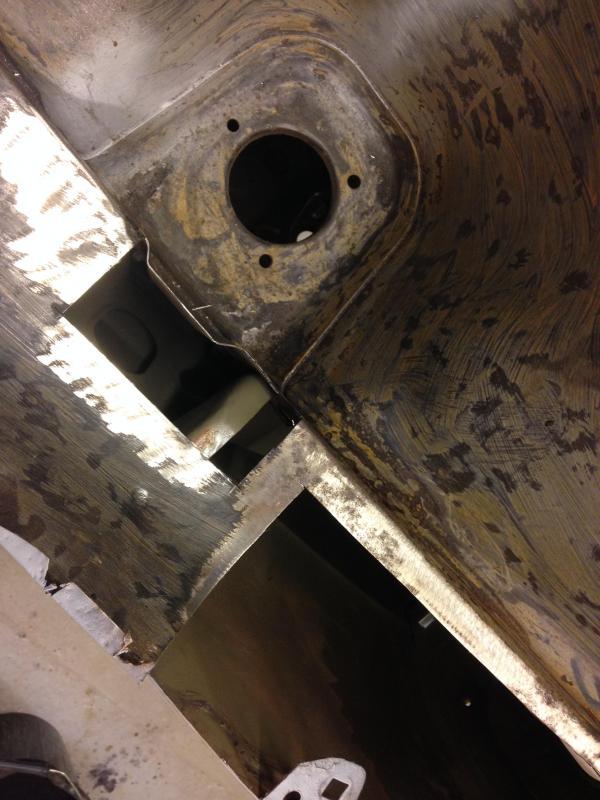
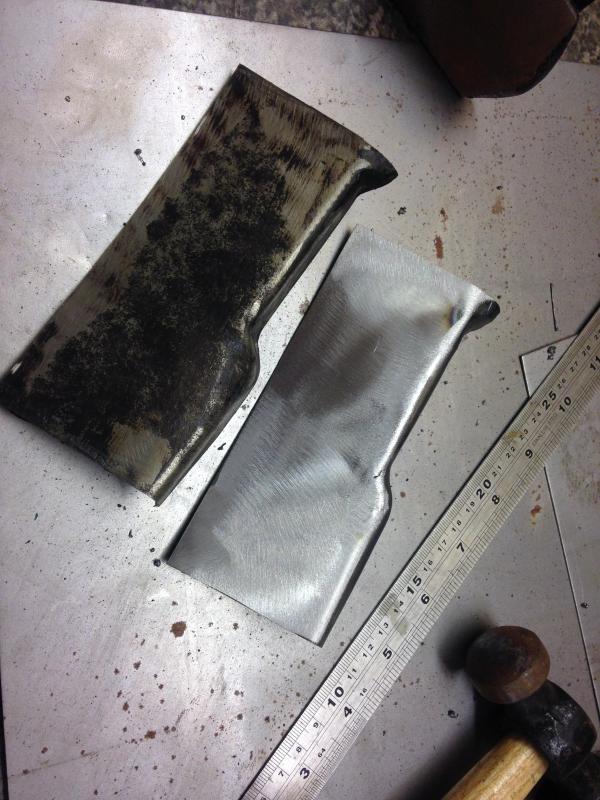
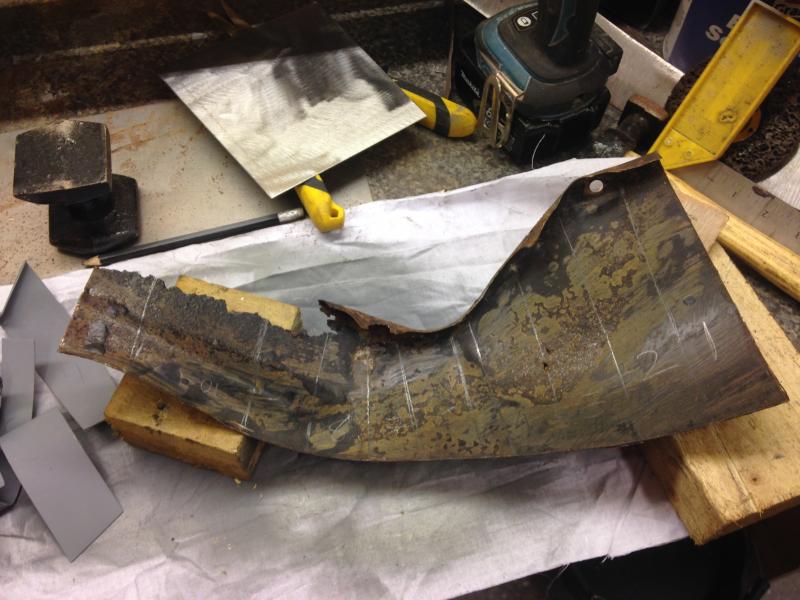
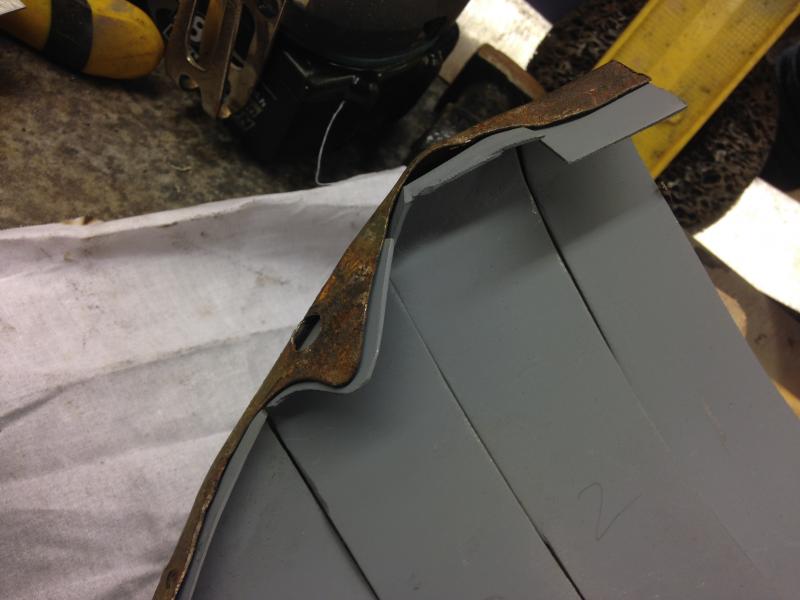
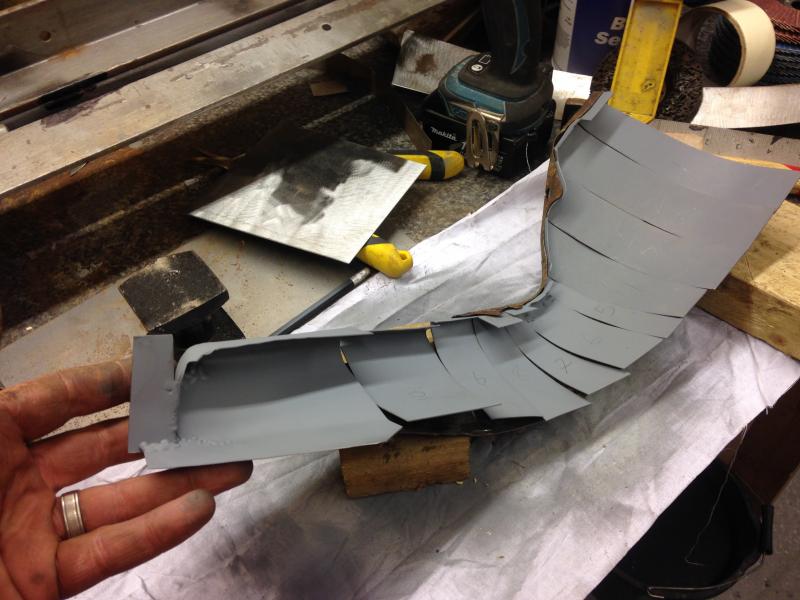
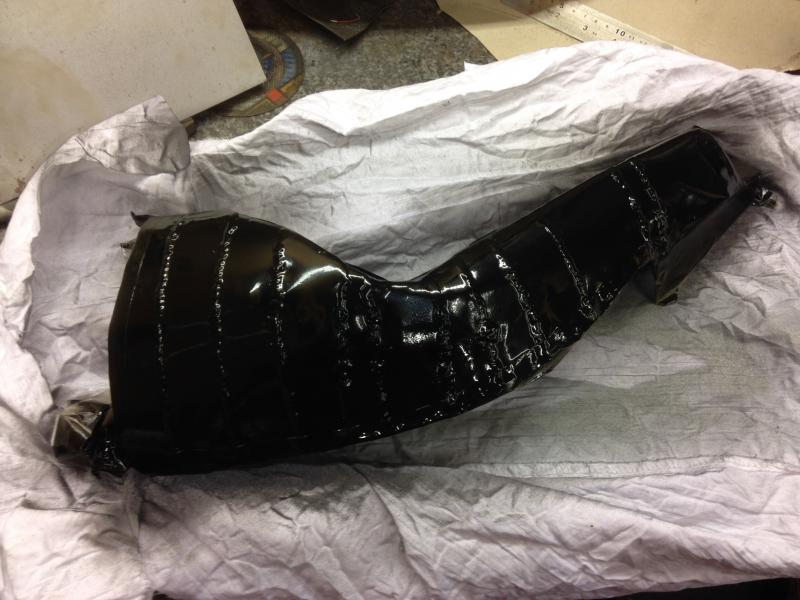
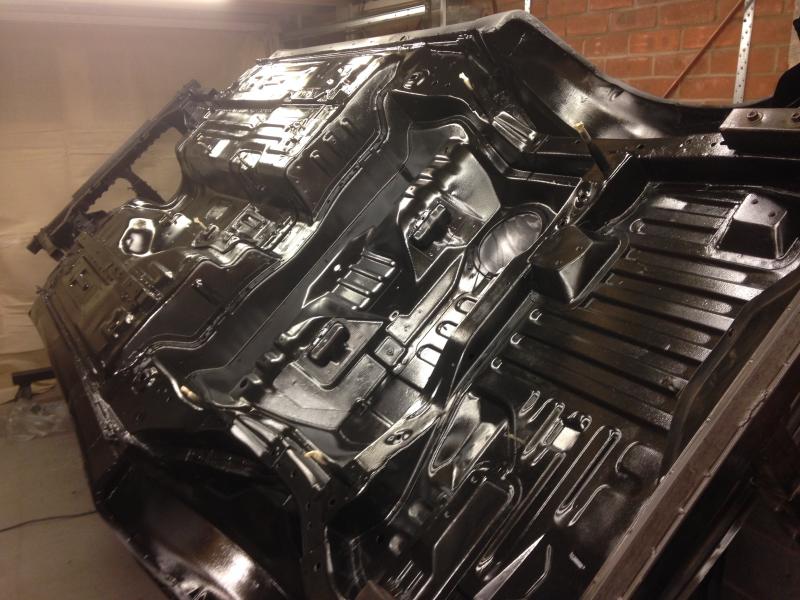
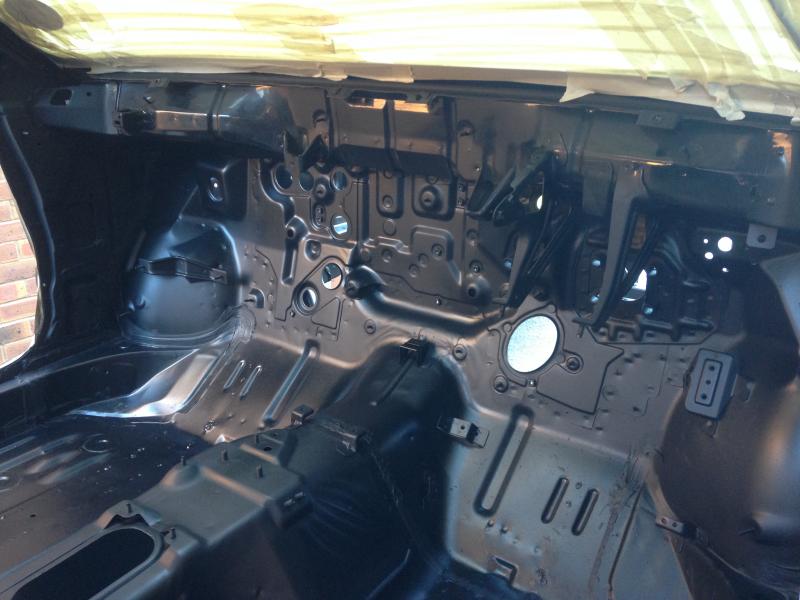
All running gear off to sand blasters and either powder coated or painted up. For the underside all old underseal removed (only had one coat when I had it imported 9 years ago) so shouldn't be too hard to get off, treat rusty bits, weld in new rear arch, full respray (black).  Will clean up the interior, in vgc anyway, roof lining a bit dirty, not sure how to clean that for the best, don't want to damage the backing board and cause creases..
 
Restoration Project DSC02187_zps54d6f66b
 
Restoration Project DSC02186_zpsb98c04c3
 
Restoration Project DSC02191_zps7b62e342
 
Restoration Project DSC02180_zps134d2441
 
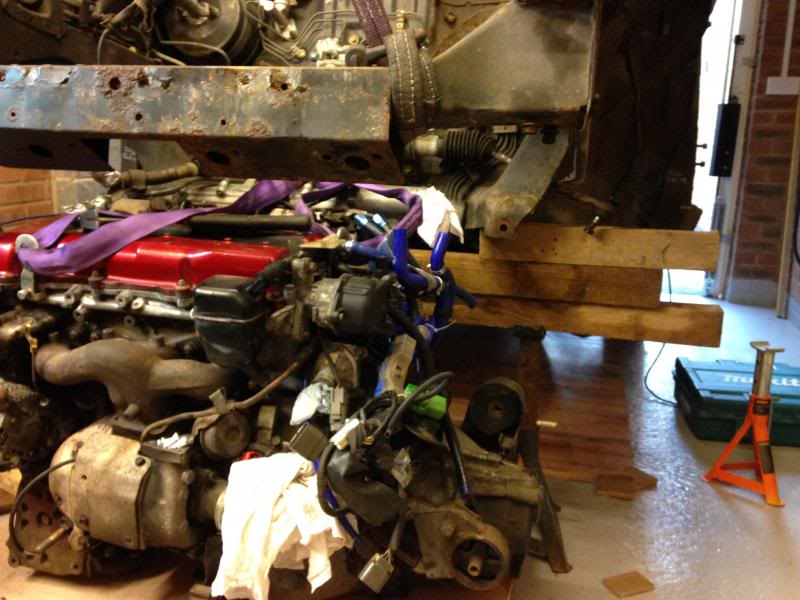
Removed the engine the tried and test way, fence posts! easy as, never done it this way before had it out in no time at all, on my own as well.
 
Restoration Project IMG_4285_zpse2a39f93
 
Restoration Project IMG_4310_zps231318f6
 
Once I have some progress photos of the underside etc, I will post them up..
 
Gaz

2Restoration Project Empty Re: Restoration Project 11th November 2013, 9:51 pm

johnny gtir

johnny gtir
moderator
moderator

Excerlant project and progress wish i had a garge big enough to work in well done on taking the time to post up

3Restoration Project Empty Re: Restoration Project 11th November 2013, 10:10 pm

burrows1980

burrows1980

johnny gtir wrote:Excerlant project and progress wish i had a garge big enough to work in well done on taking the time to post up
Cheers Johnny, going to take a while cost more than anything, but certainly be worth it in the end!

Gaz

4Restoration Project Empty Re: Restoration Project 11th November 2013, 11:02 pm

GTI-R US

GTI-R US
Management
Management

hi gaz and welcome to the forum if ive not already said so

now to your question regarding rear lights...........problem is in the 4th pic down you've left the lights on which will flatten your battery Laughing 
no as you said just heat the sealant a little with a hair dryer and apply constant firm pressure and they will come free.

brill write up btw and the rotisserie thing you made is the nuts

keep the updates coming please

http://www.gti-r-us.co.uk www.force500.com

5Restoration Project Empty Re: Restoration Project 11th November 2013, 11:29 pm

buckym120

buckym120

Wow that's some project mate, I've just done the under side on mine but to no where near this level.

6Restoration Project Empty Re: Restoration Project 13th November 2013, 10:05 pm

burrows1980

burrows1980

Bit of a update:
 
Rotated it for the first time tonight and discovered something alarming!
 
Restoration Project DSC02208_zps909c83bd
 
Restoration Project DSC02209_zpsc32d25c9
 
Just behind the ARB mounting points, is this a common problem with them?
 
I thought I had taken all the odd bolts and bits out the car before rotating, but no, clatter bang Mad 
 
https://www.youtube.com/watch?v=LmJ_G3p0PqU  -  not the best vid, will do another in day light... The crunch at the end wasn't the roof hitting Laughing  a locating pin washer got stuck on the frame, thought the worst had happened!!
 
Restoration Project DSC02221_zps277db50a
 
Got a bit to be getting on with through the winter months!!
 
GTI-R US wrote:hi gaz and welcome to the forum if ive not already said so

now to your question regarding rear lights...........problem is in the 4th pic down you've left the lights on which will flatten your battery Laughing
no as you said just heat the sealant a little with a hair dryer and apply constant firm pressure and they will come free.

brill write up btw and the rotisserie thing you made is the nuts

keep the updates coming please
 
 
Will nick the mrs hair dryer over the weekend Cool 
 
Yeah the rotisserie is a really handy tool.. Was going to buy one but your looking from 300 quid onwards for a decent one, got all the box steel for wholesalers down the road from me for 75 quid bargain! plus they cut it all to the sizes I needed Very Happy  I wish i'd put a hydraulic ram either end to make it easier lifting the car up to the height needed, again fence posts to the rescue nice big T and a trolley jack, job done..
 
buckym120 wrote:Wow that's some project mate, I've just done the under side on mine but to no where near this level.
 
 
Been reading your thread, looking really good, hat off to you doing it all on axel stands though!!
 
Gaz

7Restoration Project Empty Re: Restoration Project 13th November 2013, 11:19 pm

nomad

nomad
Admin
Admin

Awesome love the spit ..... i think it is a problem area  ive seen quite a few where they have been  jacked  up on that point wich its not designed for mines split there wich i got to weld up ...

8Restoration Project Empty Re: Restoration Project 13th November 2013, 11:47 pm

Gaz GTiR

Gaz GTiR

Yep my arb poits was the same, had to weld them up

9Restoration Project Empty Re: Restoration Project 17th November 2013, 9:53 pm

burrows1980

burrows1980

Rotisserie finished, can now lock at a variety of angles, cant wait to start work on the underside now!
 
Restoration Project 714F45D8-64CD-4BC0-A670-5C721306DBF1-1426-0000017E9C69C60E_zps4592e977
 
What I have noticed, the rusty areas that need the most work are where 3 panels meet, sill floor and a inner panel?
 
Restoration Project D6B0F6E7-2221-4765-8630-EE2358D3E333-1401-000001752B0F7F99_zps5a903879
 
Restoration Project F172A698-EE73-44D2-BB62-927B2B472DC9-1401-0000017537207DA9_zps74ccd189
 
To be honest im not sure what to do with these bits, either cut the whole lip out treat with rust remover then weld across the area, or clean it up with wire brush attachment on grinder then treat with rust remover paint and under seal.
 
Seems to be were its been jacked up before on wheel frees, crushed the seem Evil or Very Mad
 
What's the best way to deal with this?
 
Over the next few months im going to attack the underside.  First off a full wire brush (the time consuming boring part Crying or Very sad  ) repair damaged to far gone sections, treat affected areas, paint and underseal..
 
Already looking into what products to use, for the rust treatment ive heard good things about:
 
Bilt Hamber Hydrate 80 - seems to be the one to use, or
Eastwood Rust Encapsulator
 
I will be spraying inside the chassis legs and any other parts with Waxoyl plus the whole underside.  Got a few new nuts to weld on as a few odd bolts sheared off cant be arsed drilling them out, tapping or helicoiling the hole, too much faff.  All bolt holes will be freshly tapped once sprayed up, to make assembly quick and easy.
 
Gaz

Edit: got a daylight vid of the rotisserie now: https://www.youtube.com/watch?v=f4JpMZAIdeM well bit lighter than the other Laughing 

10Restoration Project Empty Re: Restoration Project 17th November 2013, 10:09 pm

nomad

nomad
Admin
Admin

I recently discoverd the most inexpensive rust cure ....vinegar ..... going to check your video out now ...Wink

11Restoration Project Empty Re: Restoration Project 25th November 2013, 8:21 am

knights of nee


I had the chassis rails replaced on my last car due to being bent and cracked ARB mounting points. What normally happens is the captive nuts either strip or become unattached so you can't bolt the bar up anymore, I can't remember how much new rails are something like £40-£50 I think.


Rob

12Restoration Project Empty Re: Restoration Project 25th November 2013, 12:38 pm

burrows1980

burrows1980

Don't suppose you have a part number for them Rob?

Been looking on fast but can't seem to find them..

Gaz

13Restoration Project Empty Re: Restoration Project 19th January 2015, 9:55 pm

burrows1980

burrows1980

Hi,

Ive been busy over the last year, and thought id better update this thread really!!  So the shell is prepped and ready for paint now,  looking to respray it in the next few months then start the rebuild and sourcing parts etc for her..

My last post, I was at the point of starting to strip the underseal off, unfortunately this was hiding a fair bit of rust and rot on the rear end..

Discovering rust time!

Restoration Project IMG_4510_zpsd7fbe7e8

Restoration Project IMG_4512_zps5654ad63

Restoration Project IMG_4519_zps8e80b2c1

Restoration Project IMG_4529_zps9be44cf4

Restoration Project IMG_4530_zpsb5780f46

Crack in front extension member

Restoration Project IMG_4557_zps02571724

Hole

Restoration Project IMG_4561_zpsa1bc8d55

Rot back of floor pan

Restoration Project IMG_4581_zps39a315ce

Remove rotted sump guard bracket

Restoration Project IMG_4583_zpsa03714c1

Restoration Project IMG_4584_zpsdacef5ce

Restoration Project IMG_4585_zpsaf62c625

9" grinder handy for underseal removal

Restoration Project IMG_4663_zps0f1caba6

Underseal removal

Restoration Project IMG_4668_zps6af26297

Restoration Project IMG_4669_zpsfd5481c2

Restoration Project IMG_4670_zpsa0af7fc6

Other front extension member cracked big time, but as its got a bracket on the inside, it looked worse than it is.

Restoration Project IMG_4676_zpsfa477b6d

SOmething else to make

Restoration Project IMG_4686_zps3696a94c

Rear arch

Restoration Project IMG_4710_zps0a2e59e6

Rusted away, be interesting to make with nothing to go off!

Restoration Project IMG_4711_zps10313fa2

Each time I cleaned to bare steel used Rustbuster FE-123 to treat and protect

Restoration Project IMG_4728_zps7551a576

Restoration Project IMG_4743_zps9d54225e

Wheel arch meeting sill, didnt look that bad at first!

Restoration Project IMG_4762_zpsebb9bdc5

There must be an end to this!

Restoration Project IMG_4765_zpsd9da296e

Underseal removed

Restoration Project IMG_4774_zps12dca7f3

Restoration Project IMG_4776_zps7f9497ba

Restoration Project IMG_4777_zpsabe12995

Restoration Project IMG_4801_zpsef5f97c7

Restoration Project IMG_4802_zps715d6af2

Restoration Project IMG_4807_zps63a8a666

All finished back together, pmsl

Restoration Project IMG_4817_zps84cb2bf7

Let the chopping commence

Restoration Project IMG_4927_zps54ac224e

Restoration Project IMG_4929_zps77fd5ac1

Restoration Project IMG_4935_zpseb090761

Restoration Project IMG_4938_zps473e039c

First bit fabricated

Restoration Project IMG_4941_zps1e247044

Restoration Project IMG_4942_zps4cb4a2ae

Tacking in

Restoration Project IMG_4946_zps6d29208b

More chopping

Restoration Project IMG_4969_zpsfe9d0870

Boom! done

Restoration Project IMG_4971_zps6113792d

Restoration Project IMG_4972_zpsc7fa6208

Floor rot, ended up chopping the whole width of car in the end

Restoration Project IMG_5005_zps037e52a1

Now the fun starts

Restoration Project IMG_5006_zps80a5ba67

Restoration Project IMG_5008_zpsa3460c7d

Restoration Project IMG_5009_zps453165eb

Restoration Project IMG_5012_zpse0d68771

Restoration Project IMG_5013_zpsbdb761fb

Restoration Project IMG_5014_zps04c245fb

Restoration Project IMG_5016_zpsaf61ad66

Restoration Project IMG_5025_zps6c636db3

Wire brush attached to drill, clean inside sill, only light surface rust in there, wish the other side was the same!

Restoration Project IMG_5034_zps5db6e4b3

14Restoration Project Empty Re: Restoration Project 19th January 2015, 9:56 pm

burrows1980

burrows1980

Start the arch and sill fab

Restoration Project IMG_5039_zps341a8804

Restoration Project IMG_6061_zps3d45f047

Restoration Project IMG_6067_zps1ecedbac

Restoration Project IMG_6068_zps067706f6

Restoration Project IMG_6072_zpsd4a709d1

Restoration Project IMG_6153_zps1cb8df62

Restoration Project IMG_6157_zps0084a399

Restoration Project IMG_6162_zps6e2785d1

Sill strengthening

Restoration Project IMG_6181_zps43ca4c49

Restoration Project IMG_6187_zps085a62dc

Welded in

Restoration Project IMG_6225_zpsb519bfd4

Floor Patch

Restoration Project IMG_6245_zps0e6f95b6

Restoration Project IMG_6246_zps0c949922

Restoration Project IMG_6248_zpsb466a4ce

Other sill, no messing this time chopping little pieces out at a time, chopped the whole thing out in one go, well kind of!

Restoration Project IMG_6260_zps645a648f

Restoration Project IMG_6277_zpsf2a33b6b

Restoration Project IMG_6278_zps81df2ec7

Restoration Project IMG_6286_zpsb9377a5e

Restoration Project IMG_6300_zps6d92a66b

Restoration Project IMG_6314_zps56ef81bb

Restoration Project IMG_6316_zps51e1e598

Restoration Project IMG_6317_zps66ccbecc

Restoration Project IMG_6334_zps1d78dc0b

Restoration Project IMG_6349_zpsf4340c8d

Restoration Project IMG_6353_zps61a8ee9f

Bolts help to pull sill out flush when tacking

Restoration Project IMG_6372_zpsc31c88c5

Great only bits I dont need to fabricate, lol

Restoration Project IMG_6422_zpsf8cd271b

Nearly done

Restoration Project IMG_6437_zps1742b221

Boom, that side done. The black stuff you can see is Bilt Hamber S50, when grinding the welds down capilliary action pulled it into the joint, very handy for added protection! same thing on the extension members.

Restoration Project IMG_6460_zps3f27039d

Here goes the rear arch

Restoration Project IMG_6484_zps55a5f2ad

Restoration Project IMG_6486_zps3d1f5fe5

Restoration Project IMG_6496_zps43ffd941

Restoration Project IMG_6498_zps85aa5910

The only way I could make this was in sections due to the complex curves of the panel, looks messy once welded but does the job so not arsed really, english wheel would be handy!

Restoration Project IMG_6500_zps61a6f106

Restoration Project IMG_6501_zpsb909b73c

Restoration Project IMG_6502_zps785d9fc3

Somewhere near, lol

Restoration Project IMG_6504_zps046a9faf

Restoration Project IMG_6508_zps639e59bb

Restoration Project IMG_6511_zps48c3e769

Rest of arched cleaned for rust inspection

Restoration Project IMG_6521_zps4a8de723

Bare bits had tiny bits of rust, not worth chopping so treating was fine

Restoration Project IMG_6524_zps91b23d03

Restoration Project IMG_6526_zps9f4cd502

Restoration Project IMG_6533_zps53738d85

Restoration Project IMG_6534_zps5c5959b7

Whole damn thing needed fabricating in the end

Restoration Project IMG_6535_zps24beee72

Restoration Project IMG_6536_zps62ccb87f

15Restoration Project Empty Re: Restoration Project 19th January 2015, 9:56 pm

burrows1980

burrows1980

Can anyone notice the welds, ;-)

Restoration Project IMG_6569_zps8558ad66

Restoration Project IMG_6579_zps53ce051f

Sound deadening removal

Restoration Project IMG_6614_zpsbe357eaf

Restoration Project IMG_6615_zpsa6765b1e

Rear extension fab

Restoration Project IMG_6616_zps01edc4fc

Restoration Project IMG_6620_zps7d08d919

Restoration Project IMG_6623_zpsd123a4b0

Restoration Project IMG_6627_zps60d30c3f

Restoration Project IMG_6629_zps6db0fc09

Restoration Project IMG_6631_zps1a741bdd

Restoration Project IMG_6633_zps56f024d9

Restoration Project IMG_6634_zps682dfd28

Front extension now!

Restoration Project IMG_6646_zps6390b076

Restoration Project IMG_6648_zps563e5887

Restoration Project IMG_6651_zpsede598a2

Welded in front and rear

Restoration Project IMG_6707_zps41eb2de4

Restoration Project IMG_6708_zpsd4bf03e4

More sound deadening removal

Restoration Project IMG_6715_zpsc2a81759

More rust rear floor pan

Restoration Project IMG_6717_zps98b019da

Restoration Project IMG_6720_zps1560db0b

Other extension leg

Restoration Project IMG_6796_zps1d8adab3

Restoration Project IMG_6799_zps051869a6

Restoration Project IMG_6802_zps52e928ff

Fabbing up front hood lower ledge both sides

Restoration Project IMG_6807_zpsfdbc81fb

Restoration Project IMG_6820_zps2a43063e

Restoration Project IMG_6815_zps14b7ac9f

Rear arch panel prep

Restoration Project IMG_6849_zps55b36eec

Restoration Project IMG_6851_zps129727b7

The other side only needed patching

Restoration Project IMG_6852_zps75e5d0a8

Restoration Project IMG_6854_zps4f646845

Restoration Project IMG_6855_zps3a41a81d

Paint on to protect underneath

Restoration Project IMG_6859_zps6fa0322e

Welded on, not bothering blending until next year when I tackle the panels ready for paint

Restoration Project IMG_6895_zps9cd52087

Restoration Project IMG_6897_zps002e98c2

Restoration Project IMG_6899_zps684ea051

16Restoration Project Empty Re: Restoration Project 19th January 2015, 9:57 pm

burrows1980

burrows1980

Starting prep for epoxy paint

Restoration Project IMG_6938_zps4a19d806

Restoration Project IMG_6947_zps0bd71a36

Bare steel

Restoration Project IMG_6948_zps1005240f

Restoration Project IMG_6950_zpsa5eff66c

Restoration Project IMG_6958_zpsa3f6d7bb

Lets get spraying, err think the mask is upside down?

Restoration Project IMG_6961_zps22d85aa2

Thats better!

Restoration Project IMG_6962_zpsd2fcd10c

Right so for the epoxy im using a product by Jotun called Jotamasic 87, its a 2k system and comes with a std hardner for above 10c and winter grade for below 10c, the company informed me most professionals use WG all year round, just means the pot life is 1hr once mixed, I was going through 600ml in about 15 to 20 minutes depending what panel I was on. Its been used on ship hulls for years, stands up to salt water very very well!!!! also used on oil rig legs and various other industrial applications.. Practical Classic mag are raving about epoxy products over conventional underseal, I was goig to use Rustbusters Epoxy Mastic 121, actually bought 1ltr tin of it but realised id need more, Jotun is cheaper and exactly the same product on paper so went with that.

Restoration Project IMG_6969_zps38e5354a

Next day after 24hr curing, will take 7 days to be fully hardened!

Restoration Project IMG_6995_zps24a3fd57

Restoration Project IMG_6997_zpse9832d1c

Restoration Project IMG_6998_zps45d8f974

Restoration Project IMG_7001_zpsa17ccbf0

Restoration Project IMG_7005_zps942b905f

Restoration Project IMG_7007_zps20776543

Restoration Project IMG_7008_zps6750300d

Restoration Project IMG_7009_zpsa0692a11

Restoration Project IMG_7015_zps999e0675

Restoration Project IMG_7016_zpseb9c5a1e

Restoration Project IMG_7017_zps5d5dd096

Restoration Project IMG_7018_zps3dc80ace

Restoration Project IMG_7019_zpsdd993c93

Restoration Project IMG_7020_zpse1263b14

Restoration Project IMG_7021_zpsf89297f0

Restoration Project IMG_7022_zps94112035

Restoration Project IMG_7023_zps60feec96

I used a LVLP gun, its a non iso product, so a decent charcoal filter mask only is needed. It can only be thinned to 10%, i found on the first coat it was very thick and hard to lay down out the gun, even though the tip was 1.8mm, left a orange peel effect due to the psi needed to shift the stuff, 2nd coat 16hrs later, thinned it to around 15%, much better to spray.. Possibly a 2.0mm tip would be better. It can be overcoated with most type of paints. The engine bay and underside im topcoating, just for the hell of it!

So thats it up to now, not doing much now till next year. Next job is to get shell sprayed, bits sand blasted and can start rebuilding finally!!

Gaz

17Restoration Project Empty Re: Restoration Project 19th January 2015, 10:15 pm

PartyPete

PartyPete
the one star club
the one star club

Wow this is amazing to see, another one saved! You're obviously handy with a welder! How many hours have you put into this so far? Very interesting to see/read! Great work

18Restoration Project Empty Re: Restoration Project 19th January 2015, 10:28 pm

burrows1980

burrows1980

Spent a lot of hours of trial and error alone on fabrication Laughing In all honesty once I got going with the fabrication it flowed quite quick, I was building an extension on the garage and landscaping the back garden as well so probably a couple of months of evenings and weekends (when i was aloud!) but spread over the year, hit it big time leading up to november so I could spray the epoxy beofre winter set in. If that makes any sense Rolling Eyes

Once ive sprayed it, Will start the rebuild, going to make a new engine wiring loom and custom ignition loom to incorporate alarm, new earthing points and rear mount battery etc, might as well with it being stripped, probably learn to regret doing this but test it properly before installing it shouldnt cause any problems Shocked

Going to be a few challenges putting her back together but im sure the GTi-R community will save me Very Happy And I expect a few trips to Bobs for bits n pieces!

Gaz

19Restoration Project Empty Re: Restoration Project 19th January 2015, 10:46 pm

nomad

nomad
Admin
Admin

Excellent work .... thumbsup you sir have earned a rep point ...

20Restoration Project Empty Re: Restoration Project 19th January 2015, 10:56 pm

gtir_woody

gtir_woody
moderator
moderator

Loving the updates. It's really interesting to see the amount of work and detail that's going into this restoration. It would obviously be a lot of time and effort. The fabrication work is also top notch thumbsup

21Restoration Project Empty Re: Restoration Project 19th January 2015, 11:01 pm

burrows1980

burrows1980

Cheers guys, i'll get a lot more updates posted this year!!

22Restoration Project Empty Re: Restoration Project 19th January 2015, 11:21 pm

GTI-R US

GTI-R US
Management
Management

What can I say british
You sir are one very patient very clever guy

I and many others would have given up on that long long ago but fair play to you for top notch fabrication skills

http://www.gti-r-us.co.uk www.force500.com

23Restoration Project Empty Re: Restoration Project 19th January 2015, 11:49 pm

Ajay.


Blimey that's some serious effort you've put into the r,well done and keep us posted for further updates.

24Restoration Project Empty Re: Restoration Project 20th January 2015, 12:00 am

mikewazowski

mikewazowski

that painted underside is explicit material +18

really loving the work you've put in to this, looking forward to the rest of the build !

25Restoration Project Empty Re: Restoration Project 20th January 2015, 9:24 am

Andy Sunny Gti

Andy Sunny Gti

Well done so far.. Great work

Sponsored content


Back to top  Message [Page 1 of 6]

Go to page : 1, 2, 3, 4, 5, 6  Next

Permissions in this forum:
You cannot reply to topics in this forum