Gtir Motorsport club
Would you like to react to this message? Create an account in a few clicks or log in to continue.
Gtir Motorsport club

Welcome to the largest Nissan Pulsar & Sunny GTI-R Forum. Masses of info, friendly members, cars for sale, lots of spares. Best forum on the net by far. Everything your gtir needs is here.


You are not connected. Please login or register

Restoration Project

+9
Cosmic73
DC313
steven_c
mike74
hagger
Ryaneg6freak
typeritr
nomad
johnny gtir
13 posters

Go to page : Previous  1, 2, 3, 4, 5, 6  Next

Go down  Message [Page 5 of 6]

101Restoration Project - Page 5 Empty Re: Restoration Project 3rd December 2018, 7:56 am

Ryaneg6freak

Ryaneg6freak

gtir_woody wrote:Pretty sure those proportioning valves come in ABS and non-abs ones. When I removed ABS from one of my old pulsars, I swapped to over to a non-abs one.

Doesn't really matter if you keep the ABS version really the only difference between the 2 is looks, both ABS and non-abs prop valves have exactly the same brake bias. I'm still running the OEM valve even though Ive removed the ABS entirely.

102Restoration Project - Page 5 Empty Re: Restoration Project 4th December 2018, 8:57 pm

nomad

nomad
Admin
Admin

Did you just loop it ryan ?


_________________
"Official post whore" and all round superhero....

103Restoration Project - Page 5 Empty Re: Restoration Project 3rd April 2019, 9:21 pm

Pulsartim

Pulsartim

I've been progressing slowly with the rebuild making sure everything goes back together correctly, I
got a bit of time tonight to upload some pictures of the progress.

Sound Proofing installed


Restoration Project - Page 5 Img_3212

Restoration Project - Page 5 Img_3210

Restoration Project - Page 5 Img_3211

Interior reinstallation


The wiring went back ok as everything was still labeled the only challenge I had was sorting out the spiders web of wires from the after market alarm and immobliser I had installed when the car was freshly imported, after re-soldering most of the connections and replacing all the cheap electrical tape with heat shrink it looks a lot more organised.

Restoration Project - Page 5 Img_3215

Restoration Project - Page 5 Img_3214

Restoration Project - Page 5 Img_3213

I when I went to install the steering wheel I realised I couldn't connect it to the steering rack with the rack installed correctly, I'm so glad I hadn't decided to install the engine a quick half an hours work and the steering rack was dropped out of the way and the connected to the steering column and reinstalled.

Restoration Project - Page 5 Img_3216


Exterior Progress

Restoration Project - Page 5 Img_3217


Can anyone help in telling where this goes, I've trawled all the pictures of the disassembly and can't identify where it's from.

Restoration Project - Page 5 23d31810

104Restoration Project - Page 5 Empty Re: Restoration Project 14th August 2019, 12:44 am

Pulsartim

Pulsartim

So i've been making slow progress over the last few months as it been a never ending task of cleaning and restoring small parts to go back on the car.   This week after coming back from my summer holidays I've planned to get in the garage an have a big push to move things forward starting with making the 3 main fuel pipes with the OEM spec pipe i ordered in from the States a couple of months ago.

I soon had these made up and installed.
Restoration Project - Page 5 Img_3311

Restoration Project - Page 5 Img_3310


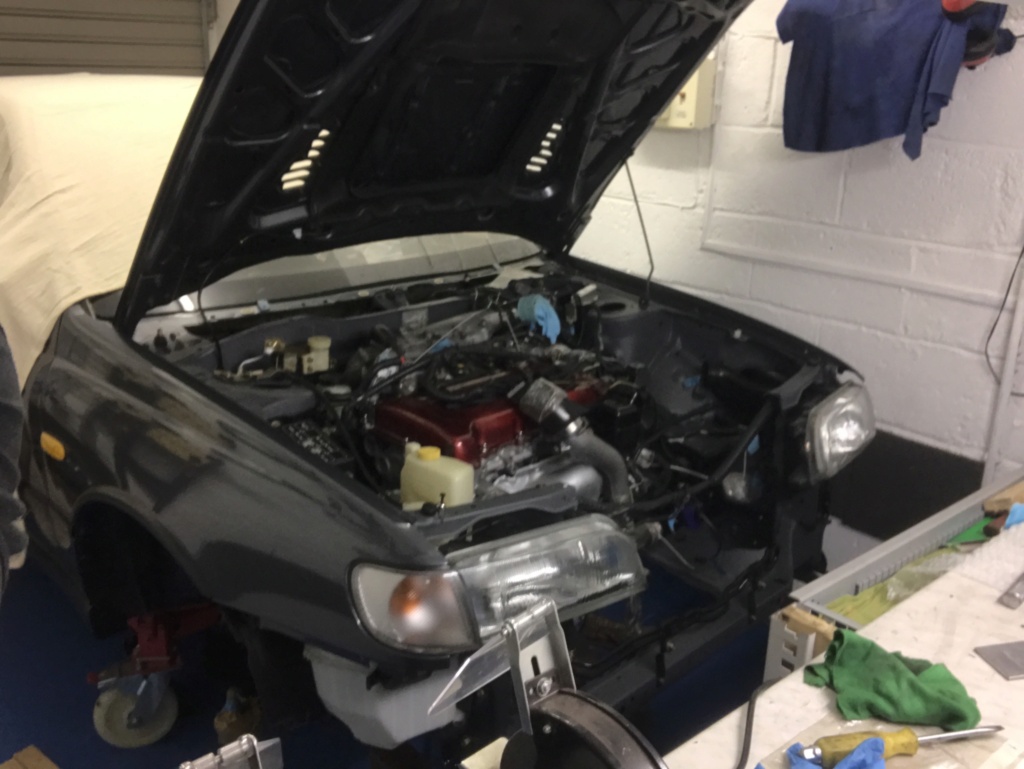
Once the fuel pipes were in my task for today was get the engine back in, it took a lot longer than the removal as I was desperate not to chip any paint in the engine bay.

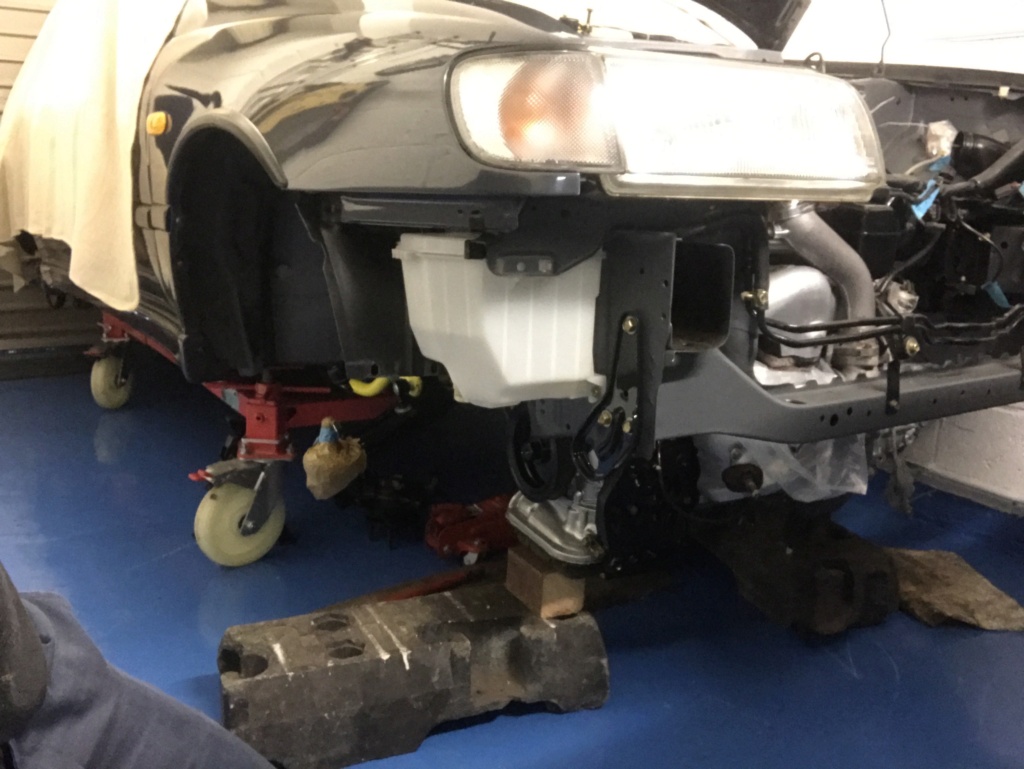
Engine mounts all ready for the engine install.
Restoration Project - Page 5 Img_3412

With the aid of the trusty fence post i lifted the shell up enough to slide the engine in and with few blocks of wood and a couple of trolley jacks and the engine was back in position.
Restoration Project - Page 5 Img_3411

Restoration Project - Page 5 Img_3426

The plan is now the engines installed I can drain the oil and refurbish the oil pan, which looks a rusting mess.
Restoration Project - Page 5 Img_3415

Restoration Project - Page 5 Img_3425

Engine finally in after 20 months tucked under my bench.
Restoration Project - Page 5 Img_3424


Last edited by Pulsartim on 22nd February 2021, 3:19 pm; edited 1 time in total (Reason for editing : Photo's inverted)

105Restoration Project - Page 5 Empty Re: Restoration Project 14th August 2019, 7:30 am

gtir_woody

gtir_woody
moderator
moderator

nice update mate, hopefully seeing the engine finally in will give you some extra motivation now Smile

106Restoration Project - Page 5 Empty Re: Restoration Project 14th August 2019, 10:34 am

johnny gtir

johnny gtir
moderator
moderator

Loving the pictures well done

107Restoration Project - Page 5 Empty Re: Restoration Project 14th August 2019, 11:00 am

DC313

DC313

Looks really good! Keep it up.

108Restoration Project - Page 5 Empty Re: Restoration Project 14th August 2019, 8:32 pm

Pulsartim

Pulsartim

Thanks guys, I think getting the engine fitted was the motivation I needed as today I was in the garage first thing this morning an installed both front suspension assemblies and brakes with new discs an pads.  Everything went together easily I just need to bleed the brakes as a priority to allow testing of all the flairs on the replacement pipes i've installed.

Restoration Project - Page 5 Img_3418

Restoration Project - Page 5 Img_3421

Restoration Project - Page 5 Img_3423

Restoration Project - Page 5 Img_3422


Last edited by Pulsartim on 22nd February 2021, 3:12 pm; edited 1 time in total (Reason for editing : Photo's inverted)

109Restoration Project - Page 5 Empty Re: Restoration Project 12th August 2020, 1:25 pm

Pulsartim

Pulsartim

Hi all, so through the lockdown I’ve been busy an not got a lot done on the car so I’ve decided to get my arse in gear an get some more done.
I’ve sourced a OEM fog light switch to replace the kettle one installed when the car was imported, the loom was easily adapted an she worked first time.

The rear box heatshield an fuel tank one were a challenge to restore an after lots of thought I purchase two sheets of Nimbus G11 heat shield An set to work fabricating them. I’m impressed how good they’ve come out an the overall strength of the finished product.

Restoration Project - Page 5 B34e4810

Restoration Project - Page 5 01c31710

Restoration Project - Page 5 7cff4110

Restoration Project - Page 5 8890ec10

Restoration Project - Page 5 08c4a910

Restoration Project - Page 5 5e101310

Restoration Project - Page 5 4e67ef10

Restoration Project - Page 5 Dcde1c10

Restoration Project - Page 5 26b7fe10

110Restoration Project - Page 5 Empty Re: Restoration Project 12th August 2020, 1:40 pm

gtir_woody

gtir_woody
moderator
moderator

They turned out looking great, well done, I’ve never thought about doing that.

111Restoration Project - Page 5 Empty Re: Restoration Project 12th August 2020, 6:34 pm

Mr B

Mr B
gtir technician
gtir technician

I've used similar material before and was quite nice to work with but spendy .
Car looks like it getting good careful work .
What sort of lift/cradle you using ? look bit unusual !

112Restoration Project - Page 5 Empty Re: Restoration Project 12th August 2020, 7:39 pm

Pulsartim

Pulsartim

Yeah sheet material was quite pricey but far cheaper that trying to get the heat shields bespoke made by a sheet metal shop.

It’s from a company called C J Autos https://cjautosheywood.co.uk/product/2ton-mobile-car-cradle-cm07/
It’s proved ever so handy an once the cars on it it’s lots safer that using axle stands.

Restoration Project - Page 5 13bd6210

113Restoration Project - Page 5 Empty Re: Restoration Project 12th August 2020, 10:51 pm

Mr B

Mr B
gtir technician
gtir technician

gives me some ideas for a custom cradle lower onto from the lift .

keep at it ... thumbsup

114Restoration Project - Page 5 Empty Re: Restoration Project 17th August 2020, 10:09 am

gtir_woody

gtir_woody
moderator
moderator

Looks like a very easy and adaptable design to suit alot of cars, I quite like it.

115Restoration Project - Page 5 Empty Re: Restoration Project 22nd February 2021, 3:07 pm

Pulsartim

Pulsartim

Quick update on the restoration.  So after a bit of a stall due to getting made redundant I managed to secure alternative employment in the hangar next door on a shift that gives me lots of off time this has allowed me to get further on with the jobs needed to finish the rebuild.  

Items ticked off the to do list, exhaust polished and installed, clutch bled, cooling system completed and coolant filled, power steering complete and filled, aircondtioning system seals replaced, battery trickle charger installed and battery fully charged.   I even had time to get some Shell Vpower and cranked her over............ a few turns of the key and she fired up for the first time in about 3 years.

I dropped the car of the body stand and went for a second start to turn her round on the drive to find a fuel leak near the tank.   i've been under today and found the pump line rubber hose has failed, it must of been the only rubber hose I've not replaced. so another item on the to do list but its getting shorter.

Fit front seats
Fit door cards
Fit glove box
Fit front bumper
Fit front wiper arms
Fit boot badges
Get four wheel alignment

Then MOT  Very Happy

Restoration Project - Page 5 Img_4412

Restoration Project - Page 5 Img_4411

Restoration Project - Page 5 Img_4414

Restoration Project - Page 5 Img_4413

Restoration Project - Page 5 Img_4415

116Restoration Project - Page 5 Empty Re: Restoration Project 24th February 2021, 10:15 am

gtir_woody

gtir_woody
moderator
moderator

nice progress mate, well done thumbsup

117Restoration Project - Page 5 Empty Re: Restoration Project 2nd March 2021, 5:12 pm

Pulsartim

Pulsartim

Last week after trying to polish the OEM intercooler shroud I decided that the level of rust on it needed addressing as it was beyond polishing, after a chat with my local chrome plating company i dropped it of for them to re-plate to OEM finish.

Before Plating
Restoration Project - Page 5 Img_4417

Restoration Project - Page 5 Img_4416

I had a text this afternoon saying it was plated.......speedy turnaround!! After collecting it I couldn't wait to get it installed, they've done a good job at getting the brushed stainless finish I was after considering the depth of the rust on the forward edge.

Restoration Project - Page 5 Img_4511

118Restoration Project - Page 5 Empty Re: Restoration Project 3rd March 2021, 8:10 am

gtir_woody

gtir_woody
moderator
moderator

How good did that come up looking thumbsup

119Restoration Project - Page 5 Empty Re: Restoration Project 3rd March 2021, 11:48 am

Pulsartim

Pulsartim

Hi Woody thanks for the thumbs up........I'm getting there slowly. I can't wait for the good weather an hope we can all get out an then I'll get the old girl out an about.

I had a Ebay delivery today, after a good clean and polish i now have the OEM tool kit (Or what I believe to be) which tops of the hard work.

Restoration Project - Page 5 Img_4512

I've been looking for all the OEM under bonnet decal's either original, pictures or drawing's so its even more genuine, if anyone has any information I'd appreciate any help.

120Restoration Project - Page 5 Empty Re: Restoration Project 6th March 2021, 7:56 am

gtir_woody

gtir_woody
moderator
moderator

nice mate, i cant say i even know what the OEM tool kit looks like, if so nice find Smile

Hopefully the weather turns good soon and get her out!

121Restoration Project - Page 5 Empty Re: Restoration Project 23rd March 2021, 6:25 am

Pulsartim

Pulsartim

I've had a bit of a start problem the last week! after being able to start every time on first turn of the key I now couldn't get the old girl started.  :chop

The starter was cranking, tried more fuel in the tank, pulled the intercooler off and had the plugs out to find a good spark, checked fuel pressure to the fuel rail, pulled the injectors and re-cleaned them and flow checked them for a second time.  Rebuilt everything and still she wouldn't fire, so I pulled all the alarm and immobiliser wiring out to find this was all working correctly...........so lots of head scratching and hair pulling I shut the garage door on her for a few days.

Hey presto this morning she started first time and she's moved under her own steam for the first time in over 4 years.  While she was out of the garage I bled the power steering up and the coolant system, and knocked back the idle once she'd warmed up


With my to do list getting shorter just the front seats, door cards and front bumper left to fit.

122Restoration Project - Page 5 Empty Re: Restoration Project 24th March 2021, 1:48 am

gtir_woody

gtir_woody
moderator
moderator

Thats awesome news! bet that must be a good feeling after those years! So what ended up being the problem do you know?

123Restoration Project - Page 5 Empty Re: Restoration Project 24th March 2021, 10:07 am

Pulsartim

Pulsartim

Yeah it feels good to be nearly on the road again. I’ve no idea what the problem was I just have my fingers crossed it doesn’t reappear.

124Restoration Project - Page 5 Empty Re: Restoration Project 30th March 2021, 11:43 am

Mr B

Mr B
gtir technician
gtir technician

Pulsartim wrote:Last week after trying to polish the OEM intercooler shroud I decided that the level of rust on it needed addressing as it was beyond polishing, after a chat with my local chrome plating company i dropped it of for them to re-plate to OEM finish.

That was a good solution.
Seen a few half painted or powder coated and never looks right .
This does indeed look brand new and factory .

125Restoration Project - Page 5 Empty Re: Restoration Project 30th March 2021, 11:46 am

Mr B

Mr B
gtir technician
gtir technician

Pulsartim wrote:Yeah it feels good to be nearly on the road again.   I’ve no idea what the problem was I just have my fingers crossed it doesn’t reappear.  

Doubt you be that lucky but expect be easy enough trace down if becomes more permanent .
Will make a few peoples day seeing this driving around,
Seeing any of the jdm rally inspired heritage on the road today is bit of rarity .

Sponsored content


Back to top  Message [Page 5 of 6]

Go to page : Previous  1, 2, 3, 4, 5, 6  Next

Permissions in this forum:
You cannot reply to topics in this forum