Gtir Motorsport club
Would you like to react to this message? Create an account in a few clicks or log in to continue.
Gtir Motorsport club

Welcome to the largest Nissan Pulsar & Sunny GTI-R Forum. Masses of info, friendly members, cars for sale, lots of spares. Best forum on the net by far. Everything your gtir needs is here.


You are not connected. Please login or register

My VET Build

+17
Jdmsentra
Animaldaz
Gostek
johnny gtir
Stu
Garnaby
Mr B
toaster55
Welling_AL
badgtir
MartyMG
GTI-R US
nomad
pulsarmoley
Bones
gtir_woody
ducie54
21 posters

Go to page : Previous  1, 2, 3, 4, 5, 6  Next

Go down  Message [Page 3 of 6]

51My VET Build - Page 3 Empty Re: My VET Build 12th July 2015, 11:42 pm

gtir_woody

gtir_woody
moderator
moderator


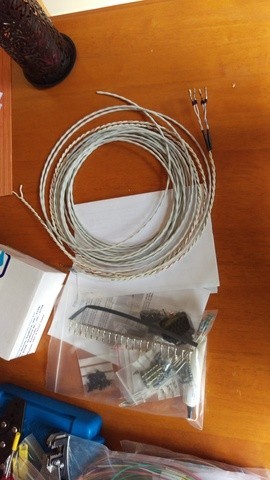
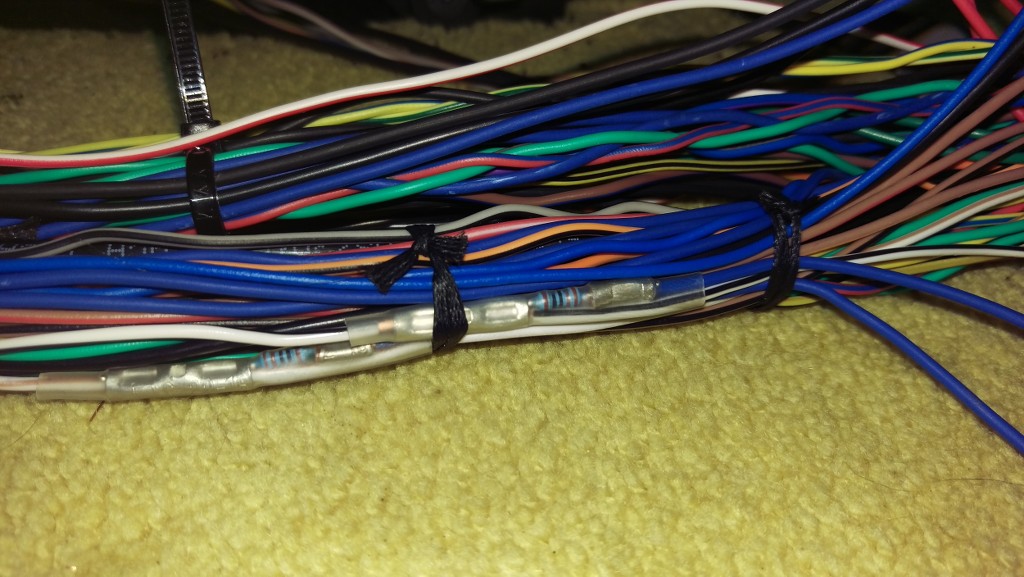
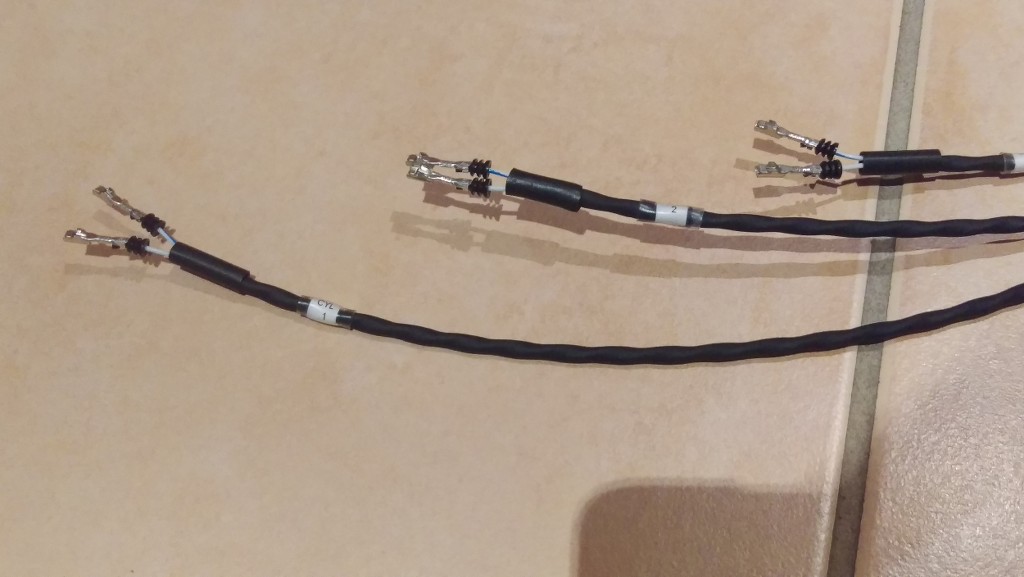
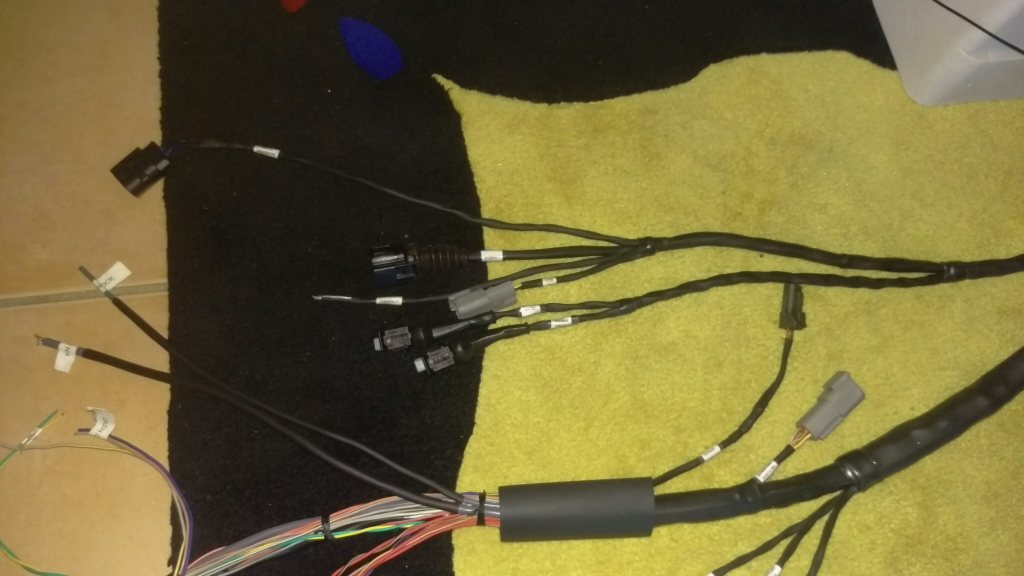
Bit of info on tefzel wiring

52My VET Build - Page 3 Empty Re: My VET Build 15th July 2015, 9:42 am

ducie54

ducie54

Thanks for the video Chris, there's several types of tefzel wire but I plan to use M22759/32 in several different gauges. I'll redo the whole car one day so if I buy all the bits now they wont go to waste.

53My VET Build - Page 3 Empty Re: My VET Build 18th July 2015, 7:57 pm

Animaldaz


Very impressive build. Looks as if nothing is untouched on this R, the only oe part in the engine bay is the wiper motor!

54My VET Build - Page 3 Empty Re: My VET Build 7th August 2015, 4:35 am

ducie54

ducie54

Still doing wiring but since there's been talk on brakes i thought id share brake info. When choosing master cylinder size pedal foot pressure and brake line pressure is important.

A larger master cylinder is not a upgrade, It is used to shorten the pedal travel BUT it means you have to press the pedal harder for the same brake line pressure as before. Here's a quick video from summit that may answer some questions https://www.youtube.com/watch?v=H3TU-GRoO2k  

I ended up building my own pressure tester as good aftermarket ones are not cheap. I bought 2 stainless steel bleed nipples, the stock hole I Tig welded closed then drilled out the other end to allow fluid to flow through it once it was screwed in. M10x1mm thread size. A dash 4 JIC male fitting was then welded to the nipple. I have a 'T' piece at the pressure gauge for a bleed nipple to removed air in the line. Wilwood make 1/8NPT bleed nipples which I used.

Since im using twin master cylinders and a balance bar my front master is a .63" and a .75" on the rear. With my balance bar in the middle my brake split is 55% front 45% rear which means I've got plenty of adjustment either way. The stock setup is 60% front 40% rear, but with the r32 calipers there was too much nose dive under brakes so what I have now is a good starting point. With a normal foot pressure 1000psi was easy to achieve and 1400psi max using two feet.


My VET Build - Page 3 BlvuU4
My VET Build - Page 3 RFJ2VX
My VET Build - Page 3 NCS66D

55My VET Build - Page 3 Empty Re: My VET Build 7th August 2015, 5:18 am

gtir_woody

gtir_woody
moderator
moderator

That's awesome mate, it's good you are now able to dial your brakes in like that and get them setup exactly how you want. Your brakes make me jealous Laughing

56My VET Build - Page 3 Empty Re: My VET Build 18th November 2015, 8:56 am

ducie54

ducie54

Been awhile since I've done an update. Still not going yet, everything seems to take longer than expected.

Went to send my ID2000cc injectors back to get cleaned and found that they were copies, so I ended up getting a set of 1300cc injectors from ASNU here in Australia. They were sent to Motec for full data, only place I know of that can accurately measure injectors. These are slightly different from ID injectors as they have a spray plate on the end.

My VET Build - Page 3 TqUR4J
My VET Build - Page 3 56fkYT

Panel under the dash had to be changed again as I need more relays, Now I have 15 normal relays and 5 solid state relays to use. EGT probes now go back into a CAN based amplifier to free up 4 Voltage inputs to the ECU. Motec make a Dual Magnetic Converters so I can use the 4 abs wheel sensors as inputs into the LINK ecu for individual wheel speed. This will come in use with full traction control.

My VET Build - Page 3 S5GZUr
My VET Build - Page 3 Qifhog

Now have all my sensors fitted,

Surge tank pressure, Fuel pressure, oil pressure, Coolant water pressure, Exhaust manifold pressure,

My VET Build - Page 3 3LVETZ
My VET Build - Page 3 55Gfw0
My VET Build - Page 3 HoIIeG

4 Exhaust gas temp sensors, 3x Water to Air intercooler water temps, Fuel temp, Oil temp, Gearbox temp,

Plus the basics Bosch 4.9 wideband sensor, TPS, IAT, Water temp and knock sensor.


Decided to redo my CDI ignition harness again this time using shielded cable. All new plugs and cable as last time I soldered the terminals, A big no-no I've now learnt..

My VET Build - Page 3 KxcdjO

Wanted to use Tefzel wire for all my harnesses but couldn't justify the extra cost were it could be spent else where. So the ignition harness is Tefzel while the engine and body wiring is TXL wire which is rated to 125c. I've currently taken over the kitchen table with wire, terminals, plugs and tools. Wife's not happy about it but meh.

My VET Build - Page 3 VsqCim

57My VET Build - Page 3 Empty Re: My VET Build 18th November 2015, 9:00 am

ducie54

ducie54

Since im not running a top mount intercooler I can run the strut brace across the engine without the bend. Modified a set of Nismo strut braces to the angle I want. Just need a length of alloy tube and another thing ticked off.

My VET Build - Page 3 VUQgOa
My VET Build - Page 3 EXs8Hg

Cold air intake pipe is now run to the front bumper 4" pipe used. Bunnings sells the ducting as its used for stove top extraction. I have also fitted a air temp sensor between the air filter and turbo intake so I can test the difference this ducting makes plus latter on the plan is to box in the front bonnet scoop and direct the air into the air box.

My VET Build - Page 3 UFsfCp
My VET Build - Page 3 MaT96G

Last oil air separator made and fitted. It had to be a odd shape as I didn't have much room left.

My VET Build - Page 3 FxxJq4
My VET Build - Page 3 0EZ55u
My VET Build - Page 3 CDmUqL
My VET Build - Page 3 IWeymS
My VET Build - Page 3 SDotxX

58My VET Build - Page 3 Empty Re: My VET Build 18th November 2015, 9:18 am

gtir_woody

gtir_woody
moderator
moderator

Said it already, but always love your updates, keep them coming Smile everything always takes longer than expected mate Laughing regardless you are still ticking boxes off the list Smile

59My VET Build - Page 3 Empty Re: My VET Build 18th November 2015, 6:28 pm

pulsarmoley

pulsarmoley
moderator
moderator

Nice update and the extra time it takes will be worth it in the long run thumbsup

60My VET Build - Page 3 Empty Re: My VET Build 20th November 2015, 7:46 am

gtir_woody

gtir_woody
moderator
moderator

The ducting for the air intake looks pretty neat Nigel, did you also make up the airbox? Does it seal on the bonnet or have its own lid?

61My VET Build - Page 3 Empty Re: My VET Build 20th November 2015, 10:47 am

ducie54

ducie54

Yeah I built the air box. Lid sits on top with Dzus clips and the charcoal canister bolts to the side. These are the only pics I have.

Still not sure if I want to duct the air from the bonnet vent to the air box or over the intake and down the firewall. Either way it will be a pain to do  Sad

My VET Build - Page 3 YHIZBK
My VET Build - Page 3 UaSffh

62My VET Build - Page 3 Empty Re: My VET Build 20th November 2015, 12:04 pm

gtir_woody

gtir_woody
moderator
moderator

Looks good mate, very well made. Wish I could fab this kind of stuff on my car.

63My VET Build - Page 3 Empty Re: My VET Build 20th November 2015, 10:51 pm

nomad

nomad
Admin
Admin

I always get excited when i see new posts on this thread .... its an awesome thread qaulity workmanship no half measure build ....

64My VET Build - Page 3 Empty Re: My VET Build 21st November 2015, 12:32 am

ducie54

ducie54

Thanks guys. Slowly getting there. They just released the ECU I've been waiting for, will order one Monday and hopefully it's running before the end of the year.

http://www.linkecu.com/G4PlusThunder

Chris I didn't have much welding experience before starting this build. I hate to see how much it would of cost me to pay someone to do all the fab work.

65My VET Build - Page 3 Empty Re: My VET Build 21st November 2015, 2:54 am

Mr B

Mr B
gtir technician
gtir technician

Link do some nice stuff. amazing ecu & amazing looking build.

66My VET Build - Page 3 Empty Re: My VET Build 15th January 2016, 11:09 am

ducie54

ducie54

Been awhile since a update. Nothing to exciting done, just wiring. Also had to redesign the ECU holder as the size of this ECU is huge.

Mounted a GPS tracker inside the aircon evaporator box. Jaycar here in Australia sell them. They have there a cool little phone app and have a feature where you can SMS it to turn the car off.

My VET Build - Page 3 20Lqjm
My VET Build - Page 3 9qUg5U
My VET Build - Page 3 XIOU3i
My VET Build - Page 3 ULIvcr
My VET Build - Page 3 X2UAj8
My VET Build - Page 3 GL7HmT

Mounted the 3 Solid state relays in the boot for the fuel pumps and water 2 air pump. Redid the battery terminals and circuit breaker.

My VET Build - Page 3 Fg31wV
My VET Build - Page 3 CqbuGN

Made 14 and 12 gauge harness for all the fans, and pumps. Didn't like the stock plugs so used Delphi GT plugs.

My VET Build - Page 3 AoD04L
My VET Build - Page 3 L7z6wf

With a BIG ecu comes a lot of wiring. The ECU has 120 pins but then you still have to add all the 12v ignition switched wires, sensor grounds and 5v wires. Lost count on how many hours I've spent on it but its slowly getting there. Having a label maker makes it a lot easier and neater cool thing is it prints on heat shrink too.

My VET Build - Page 3 KWdScA
My VET Build - Page 3 UHHSVp
My VET Build - Page 3 816jGo

Still have to make the harness from the relay box to the engine, add the factory Gti-r dash sensor wires then join all the wires into the rear relay box. So much more time needed. All up Ive had to trim up over 600 meters of wires. Ive got all new plugs and pins just need to work out the heat shrink sizes and lengths then I can start terminating the pins.

Below are the extra sensors im running.

Pressure sensors      
Surge tank fuel pressure
Fuel pressure
Oil pressure
Water pressure
Turbine manifold back pressure
Front brake pressure
Rear brake pressure

Temp sensors
Water 2 air tank temp
Fuel temp
Oil temp
Inlet of water 2 air radiator
Outlet of water 2 air radiator.
Air intake before the throttle body
Air intake before the turbo
Gearbox temp
4 EGT sensors using a Ray hall Amplifier

Hopefully next update is a video of it running in the garage cant fix it

67My VET Build - Page 3 Empty Re: My VET Build 15th January 2016, 1:52 pm

Stu

Stu
Admin
Admin

A lot of head scratching work done then lol

The tracker sounds good. Would like to see about getting one myself. Any links or info so I can read up on it please?

http://www.j10-meets.co.uk

68My VET Build - Page 3 Empty Re: My VET Build 15th January 2016, 6:18 pm

ducie54

ducie54

http://www.jaycar.com.au/p/LA9011

69My VET Build - Page 3 Empty Re: My VET Build 15th January 2016, 9:32 pm

gtir_woody

gtir_woody
moderator
moderator

Alot of wiring nightmares coming your way mate lol.

70My VET Build - Page 3 Empty Re: My VET Build 12th April 2016, 1:47 am

ducie54

ducie54

Just waiting on more heat shrink as my measurements were a little out and a few more plugs as i wasn't keen on using 20 year old plugs on a new harness.

CDI ignition harness complete. EGT harness complete.

Had the ECU all powered up on the kitchen table while i setup the CAN Exhaust Gas Temp module and the display dash. Played around with 3D tables for fuel, water pumps and fans. Once its up running i can dial in the final numbers. Also worked out how to keep the ECU alive once the ignition is turned off so i can keep the engine water pumps running.

Also added pressure sensors in the front and rear brake line to make it easier to work out ABS setup after the master cylinder swap.

Here's some progress pics.

My VET Build - Page 3 Ti2TBY
My VET Build - Page 3 POWCC4
My VET Build - Page 3 KfLLSc
My VET Build - Page 3 J96cRY
My VET Build - Page 3 GdZSMP
My VET Build - Page 3 Gh6BFB
My VET Build - Page 3 P4q7at
My VET Build - Page 3 XkYjIK
My VET Build - Page 3 AvCuqI
My VET Build - Page 3 XQPgIU
My VET Build - Page 3 BWGm52
My VET Build - Page 3 7D2wFN
My VET Build - Page 3 6ZzZtF
My VET Build - Page 3 EuxZ7C
My VET Build - Page 3 P5VAu8
My VET Build - Page 3 WOyp7J
My VET Build - Page 3 9poTZS
My VET Build - Page 3 QOSBF7
My VET Build - Page 3 GSGO7G

71My VET Build - Page 3 Empty Re: My VET Build 11th June 2016, 11:56 am

ducie54

ducie54

Slowly getting there. Engine Harness now complete after a lot of hours and frustration. There's about 46 plugs under the engine bay. Just need to supply power and ground to the main switch relay then i can power it all up and check functions.

E85 has finally been released locally which is a bonus, plan to run only E85. After putting the first lot of fuel in the tank would not hold air pressure. FFS tank out again to get the holes welded up for a 3rd time. Now its all back together, holds pressure and fuel system bled.

Relay/fuse panel now all wired in and glove box still closes Smile

Still need to gap the plugs down to 24 thou, Blow the oil out of the bores and pressurize the oil system before starting. Almost there  Very Happy

Some pics

My VET Build - Page 3 MgpnMN
My VET Build - Page 3 EFBsh9
My VET Build - Page 3 MilYnN
My VET Build - Page 3 QA80Uf
My VET Build - Page 3 6Q0bDx
My VET Build - Page 3 0PcCuq
My VET Build - Page 3 Q78A2n
My VET Build - Page 3 ETOisk
My VET Build - Page 3 DwgxD2

72My VET Build - Page 3 Empty Re: My VET Build 27th June 2016, 12:14 pm

ducie54

ducie54

5 years and now its alive, im still working on the tune.

73My VET Build - Page 3 Empty Re: My VET Build 27th June 2016, 7:06 pm

johnny gtir

johnny gtir
moderator
moderator

Get in well done keep us posted

74My VET Build - Page 3 Empty Re: My VET Build 27th June 2016, 8:46 pm

Mr B

Mr B
gtir technician
gtir technician

Looks to good to want put a bonnet over it :-)

75My VET Build - Page 3 Empty Re: My VET Build 27th June 2016, 9:04 pm

gtir_woody

gtir_woody
moderator
moderator

Great news mate, bet you are excited Smile

Sponsored content


Back to top  Message [Page 3 of 6]

Go to page : Previous  1, 2, 3, 4, 5, 6  Next

Permissions in this forum:
You cannot reply to topics in this forum